

Overview
The Assets module in HR360 Hub provides a centralized system for managing the organization's IT and physical assets, from initial inventory setup through to employee requests, approvals, and assignment tracking. It gives administrators a single place to monitor total assets, review incoming requests, and track which employee currently holds each item.
The Assets module contains the following areas:
- Dashboard — Provides an at-a-glance summary of total, assigned, and available assets, along with category and brand breakdowns, request activity, and recently added assets.
- Assets — Used to view, add, and manage the full inventory of assets, including specifications and assignment history for each item.
- Assets Request — Used to review, approve, or reject asset requests submitted by employees.
- Assets Assignment — Used to assign assets to employees and view each employee's current assigned assets.
- Returned Assets — Used to review, approve, or reject assets that employees have submitted for return.
- My Assets — Used by an employee to view the assets currently assigned to them.
- My Requests — Used by an employee to submit new asset requests and track their status.
- Categories and Brands — Used to maintain the lists of asset categories and brands available throughout the module.
This guide covers:
- How to access the Assets module from the left sidebar.
- Understanding the Assets Dashboard and its key metrics.
- How to view the Assets listing page and add a new asset.
- How to view and edit an asset's details, including its specifications and activity timeline.
- How to review, approve, and reject asset requests submitted by employees.
- How to assign assets to employees and view an employee's assigned assets.
- How to review, approve, and reject asset return submissions.
- How to view assets assigned to you and submit new asset requests.
- How to maintain asset categories and brands.
📜 Note: Access to the Assets module and its actions is controlled by role permissions. Users must have Assets module access to add assets, approve or reject requests, or assign assets to employees.
Prerequisites
Before working with the Assets module, ensure the following are in place:
- The user must be logged in with a role that has access to the Assets module.
- Asset categories and brands must be configured in the system before an asset can be added.
- Employees must be added as system users before assets can be requested or assigned to them.
Section 1: Accessing the Assets Module
After logging in to HR360 Hub, follow the steps below to access the Assets module.
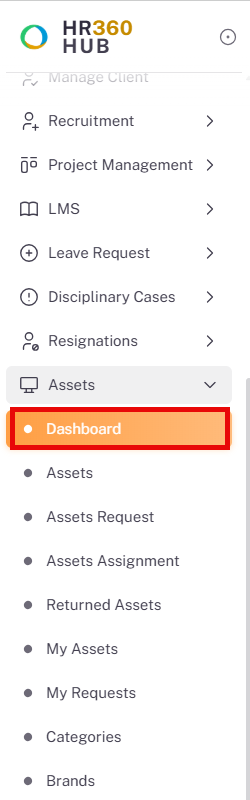
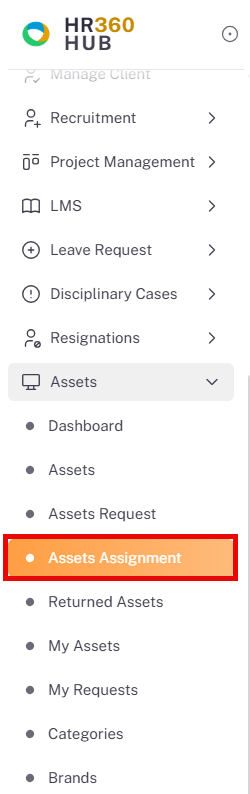
- From the left sidebar, click on Assets to expand the sub-menu.
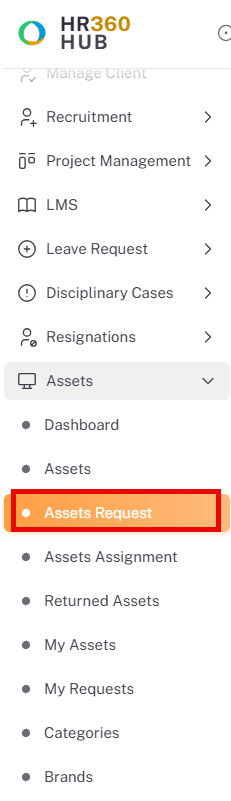
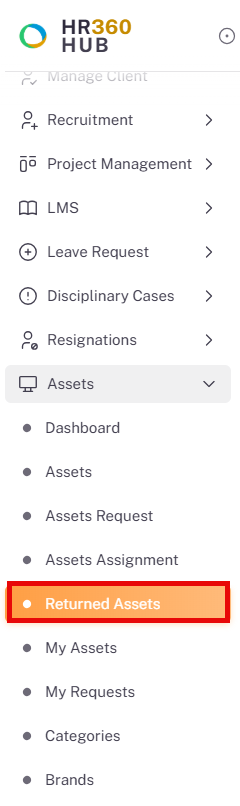
- The sub-menu displays Dashboard, Assets, Assets Request, Assets Assignment, Returned Assets, My Assets, My Requests, Categories, and Brands.
- Click on Dashboard (highlighted in orange when active) to open the Assets Dashboard.
Section 2: Assets Dashboard
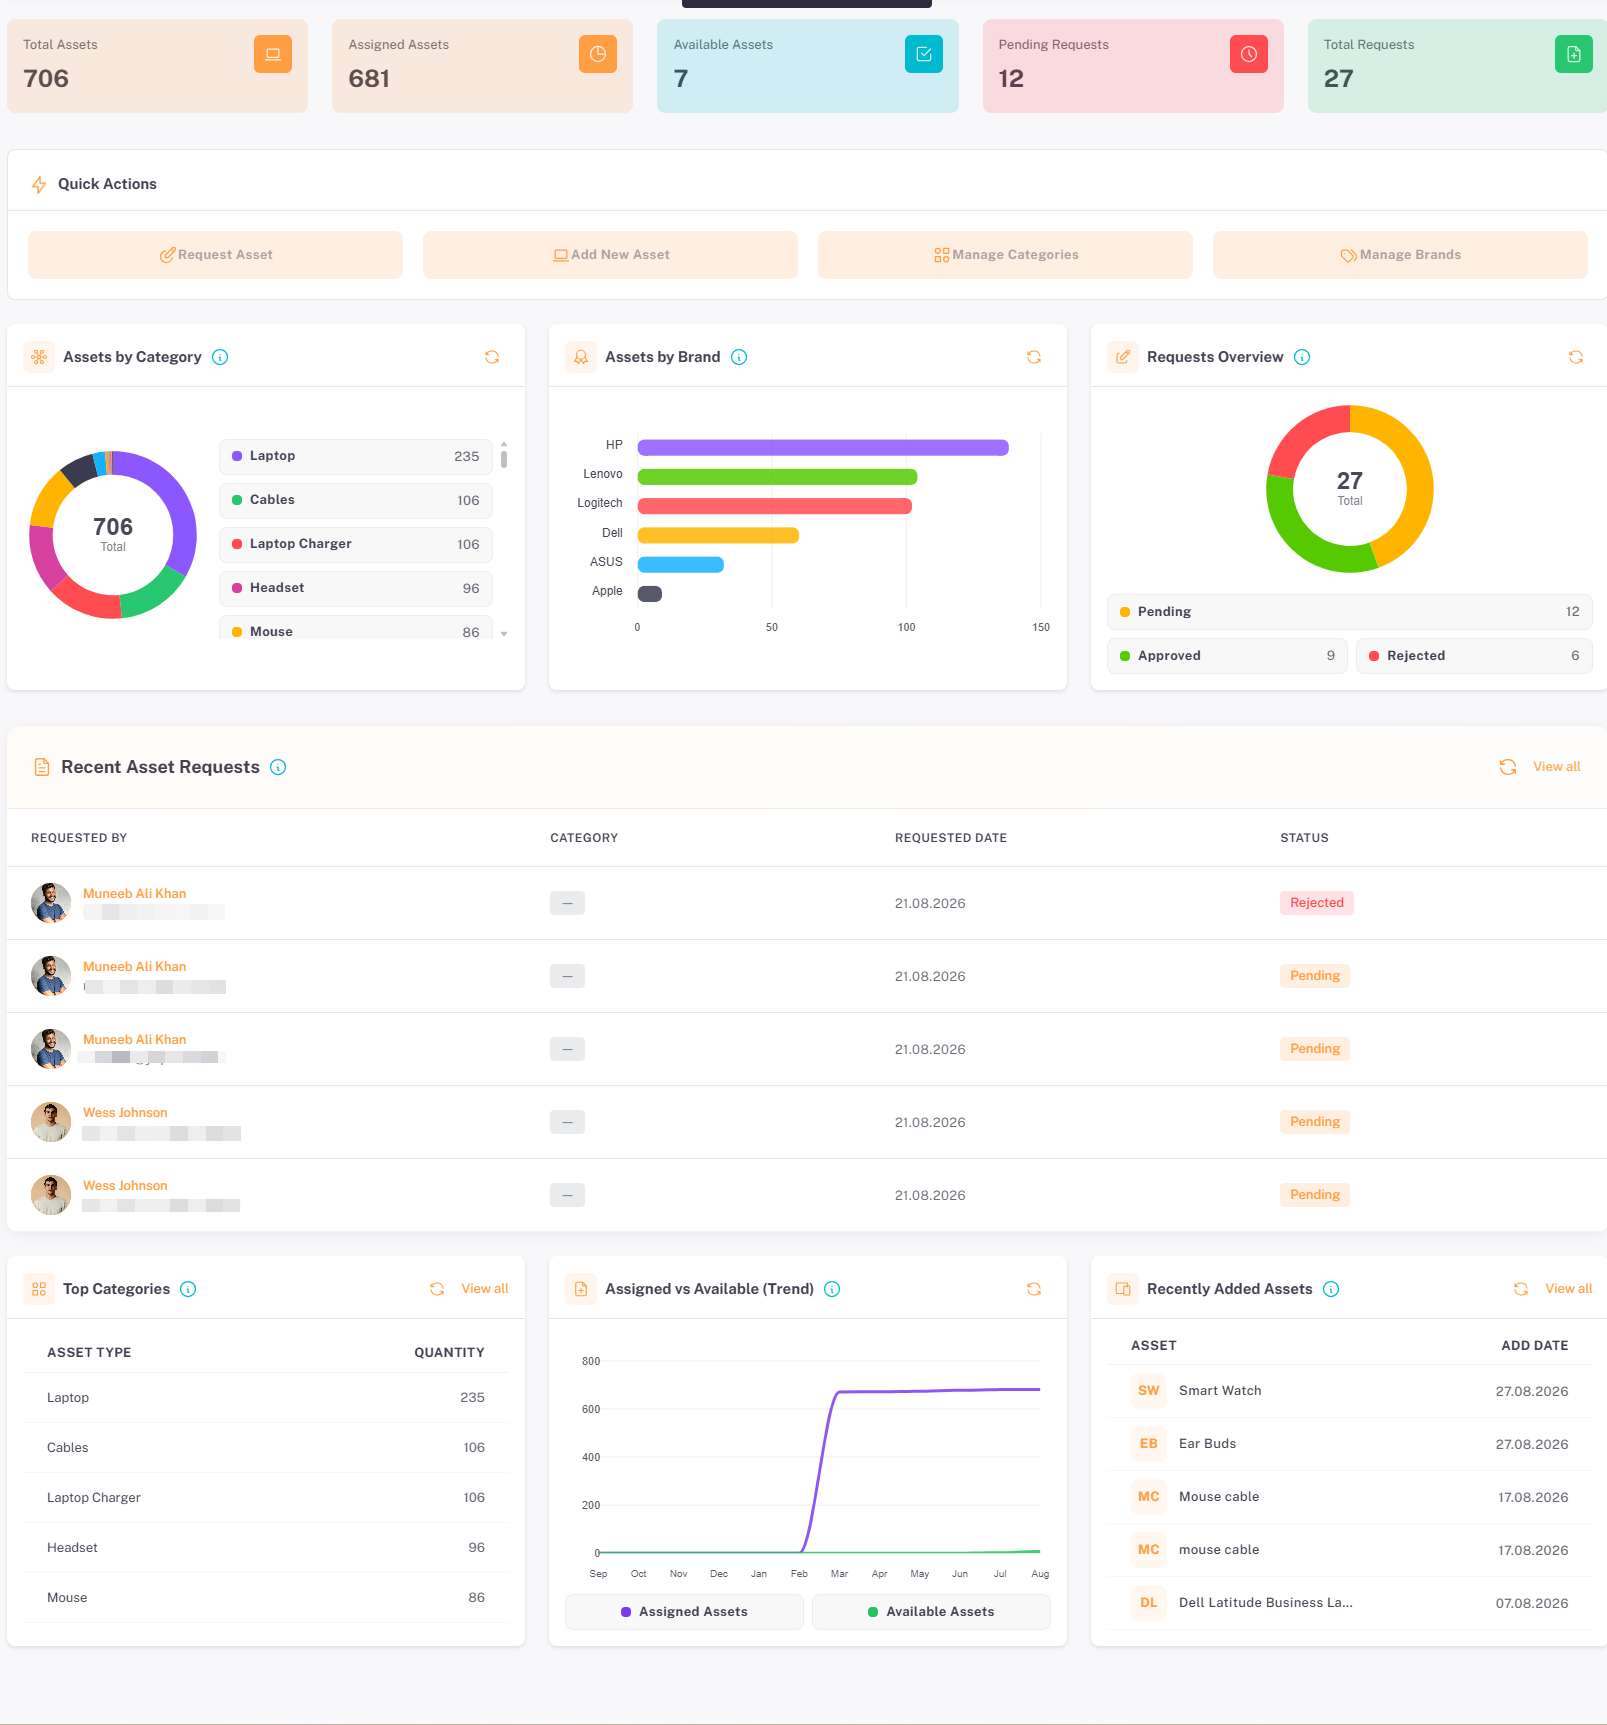
The Assets Dashboard is the default landing page for the module. It provides a summary view of the asset inventory, including key metrics, category and brand breakdowns, request activity, and recently added assets.
2.1. Key Metrics
The top of the Dashboard displays five summary cards:
Metric | Description |
Total Assets | The total number of assets recorded in the system across all categories. |
Assigned Assets | The number of assets currently assigned to an employee. |
Available Assets | The number of assets in inventory that are not currently assigned. |
Pending Requests | The number of asset requests awaiting approval or rejection. |
Total Requests | The total number of asset requests submitted, across all statuses. |
2.2. Quick Actions
The Quick Actions panel provides shortcuts to the most common tasks in the module:
Action | Description |
Request Asset | Opens the form to submit a new asset request. |
Add New Asset | Opens the Add New Asset form to register a new asset in the inventory. |
Manage Categories | Opens the Categories page to view or maintain asset categories. |
Manage Brands | Opens the Brands page to view or maintain asset brands. |
2.3. Charts and Overview Panels
Below the Quick Actions panel, the Dashboard displays three overview widgets:
Panel | Description |
Assets by Category | A donut chart with a running total in the centre, showing the number of assets in each category, e.g. Laptop, Cables, Laptop Charger, Headset, Mouse. |
Assets by Brand | A horizontal bar chart showing the number of assets recorded for each brand, e.g. HP, Lenovo, Logitech, Dell, ASUS, Apple. |
Requests Overview | A donut chart with the total request count in the centre, broken down by Pending, Approved, and Rejected status. |
2.4. Recent Asset Requests Table
The Recent Asset Requests table lists the most recently submitted requests, showing who requested the asset, the category, the requested date, and the current status.
💡 Tip: Use the Recent Asset Requests table on the Dashboard to quickly spot new requests that need review, without navigating into the Assets Request page.
2.5. Top Categories, Trend, and Recently Added Assets
The bottom row of the Dashboard displays three further widgets:
Panel | Description |
Top Categories | A table listing each asset type and the current quantity in inventory, e.g. Laptop, Cables, Laptop Charger, Headset, Mouse. |
Assigned vs Available (Trend) | A line chart tracking the number of Assigned Assets and Available Assets over time, from September through August. |
Recently Added Assets | A list of the most recently added assets, showing the asset name and the date it was added. |
Section 3: Assets Listing Page
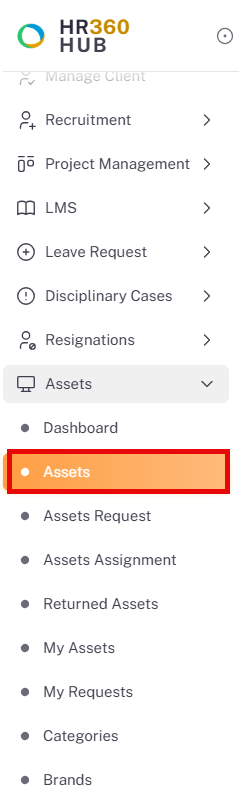
The Assets page lists every asset recorded in the system. To access it, click on Assets in the left sidebar to expand the sub-menu, then click on Assets.
3.1. Summary Cards
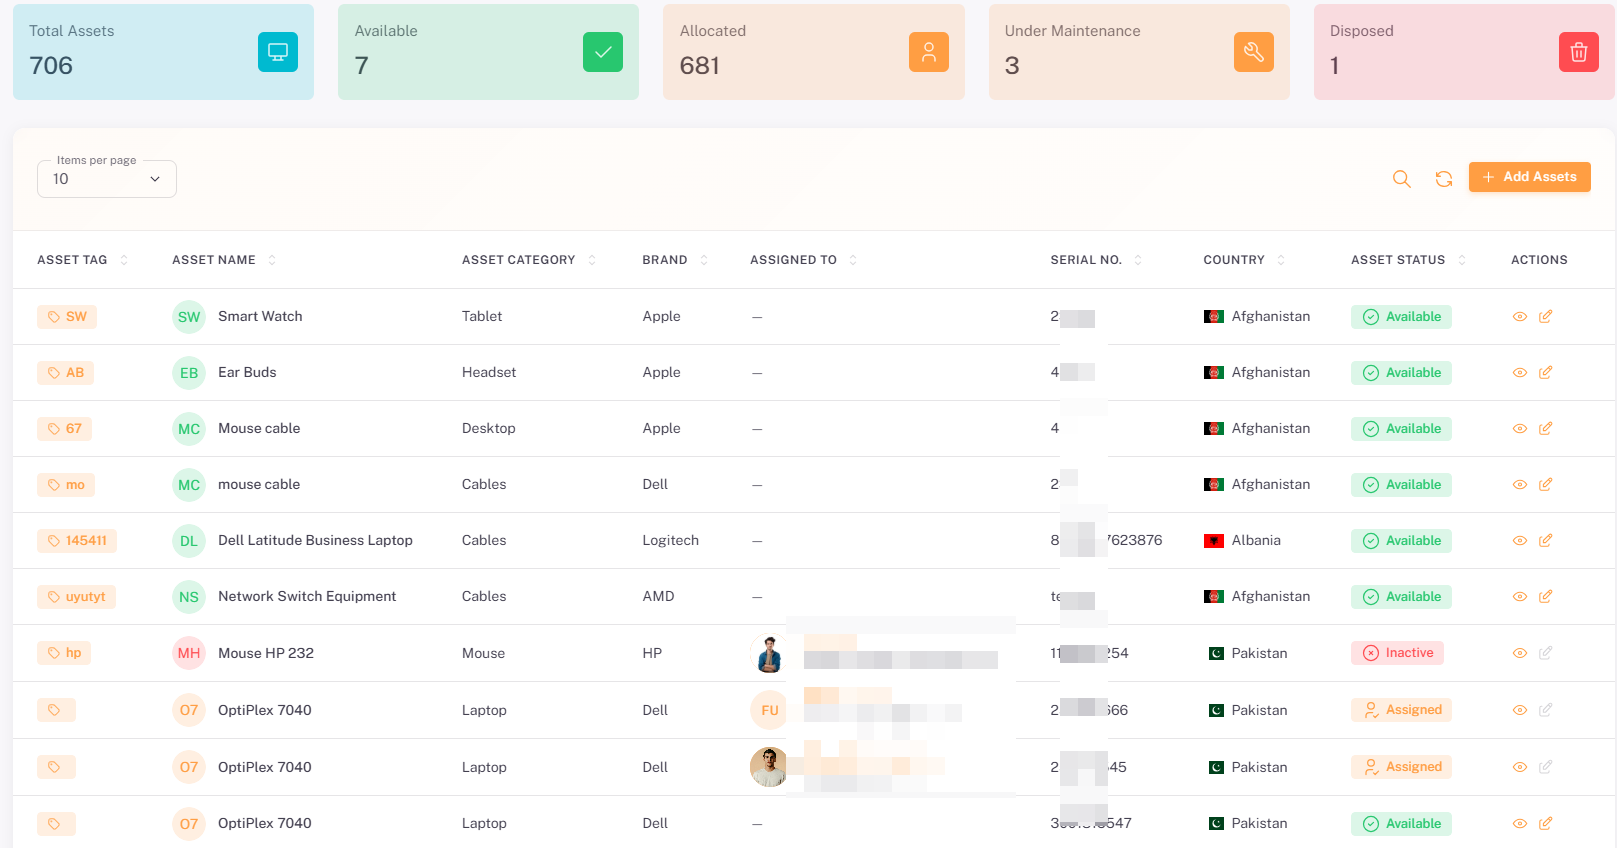
The top of the Assets page displays five summary cards reflecting the current inventory:
Card | Description |
Total Assets | The total number of assets recorded in the system. |
Available | The number of assets not currently assigned to an employee. |
Allocated | The number of assets currently assigned to an employee. |
Under Maintenance | The number of assets currently marked as under maintenance. |
Disposed | The number of assets that have been disposed and removed from active inventory. |
3.2. Listing Table Columns
Column | Description | Sortable |
Asset Tag | The unique tag assigned to identify the asset. | Yes |
Asset Name | The name of the asset, with an icon showing its initials. | Yes |
Asset Category | The category the asset belongs to, e.g. Laptop, Tablet, Headset. | Yes |
Brand | The manufacturer or brand of the asset. | Yes |
Assigned To | The employee currently holding the asset, or a dash if unassigned. | No |
Serial No. | The manufacturer serial number of the asset. | Yes |
Country | The country the asset is located in, shown with a flag icon. | Yes |
Asset Status | The current status of the asset: Available, Assigned, or Inactive. | Yes |
Actions | Eye icon — opens the asset's details view. Pencil icon — opens the Edit Asset form. | No |
3.3. Page Controls
- Items per page selector — Controls the number of records displayed per page (default: 10).
- Search icon — Filter assets by name, tag, or other fields.
- Refresh icon — Reload the listing to reflect the latest changes.
- Add Assets button — Opens the Add New Asset form to register a new asset.
Section 4: Adding a New Asset
To register a new asset, click the + Add Assets button on the Assets listing page. The Add New Asset form opens.
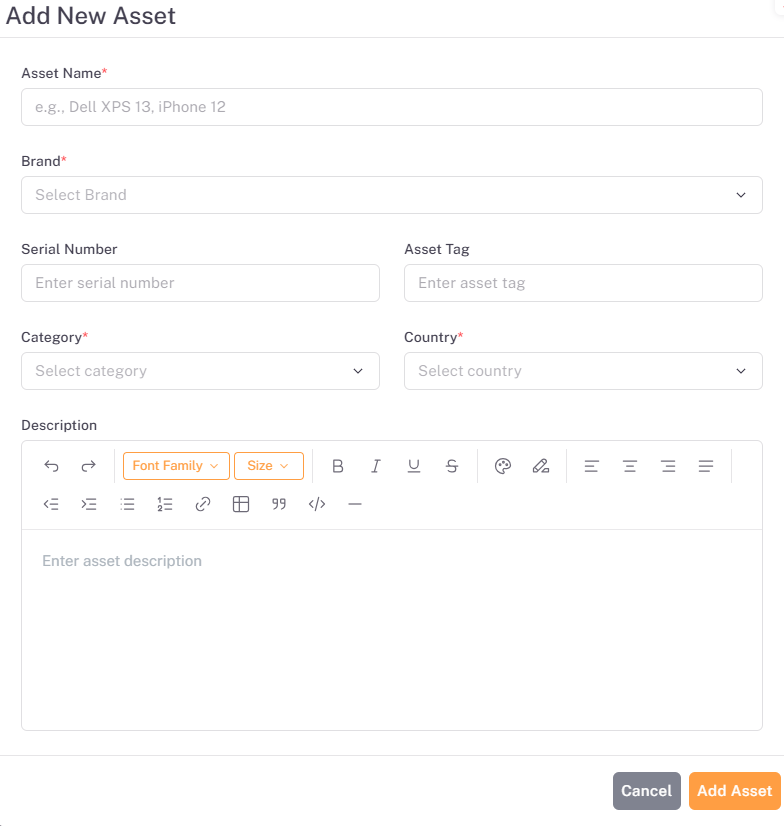
Field | Required | Description |
Asset Name | Yes | Enter the name of the asset, e.g. Dell XPS 13, iPhone 12. |
Brand | Yes | Select the brand or manufacturer of the asset. |
Serial Number | No | Enter the manufacturer serial number for the asset. |
Asset Tag | No | Enter a unique tag to identify the asset. |
Category | Yes | Select the category the asset belongs to. |
Country | Yes | Select the country the asset is located in. |
Description | No | Enter additional details about the asset using the rich-text editor. Formatting options include Bold, Italic, Underline, Strikethrough, lists, links, tables, and quotes. |
Click Add Asset to save the new asset and add it to the listing, or click Cancel to discard the entry.
Section 5: Asset Details and Editing
5.1. Editing an Asset
Clicking the Pencil icon for any asset on the Assets listing page opens the Edit Asset form, pre-filled with the asset's current details.
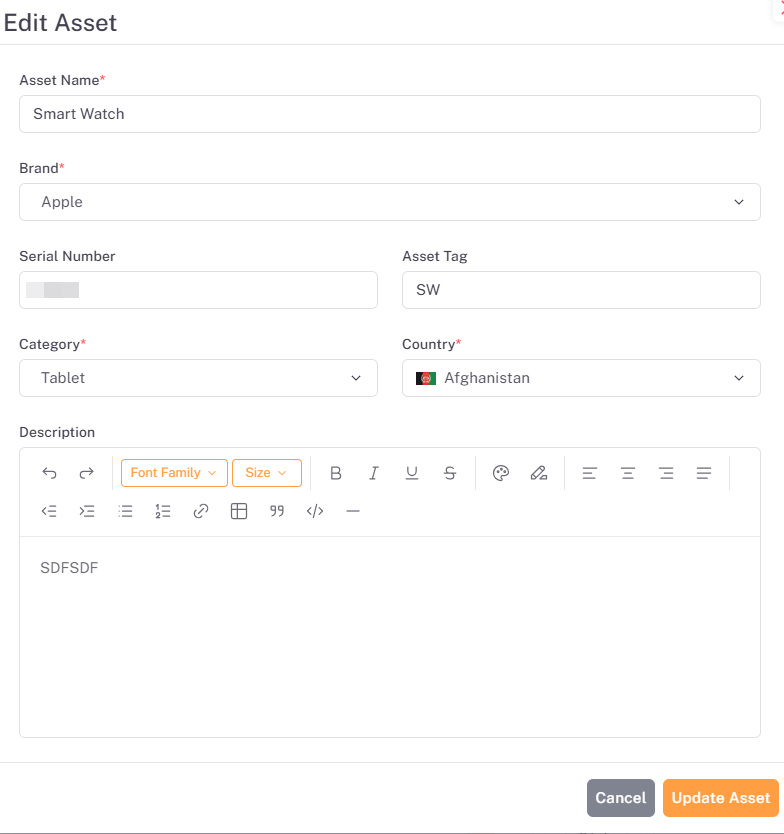
📜 Note: The Serial Number field is read-only once an asset has been created and cannot be edited from this form.
Update the required fields as needed, then click Update Asset to save the changes, or click Cancel to discard them.
5.2. Asset Details Page
Clicking the Eye icon for any asset on the Assets listing page opens the Asset Details page, showing the asset's specifications, assignment overview, and activity timeline.
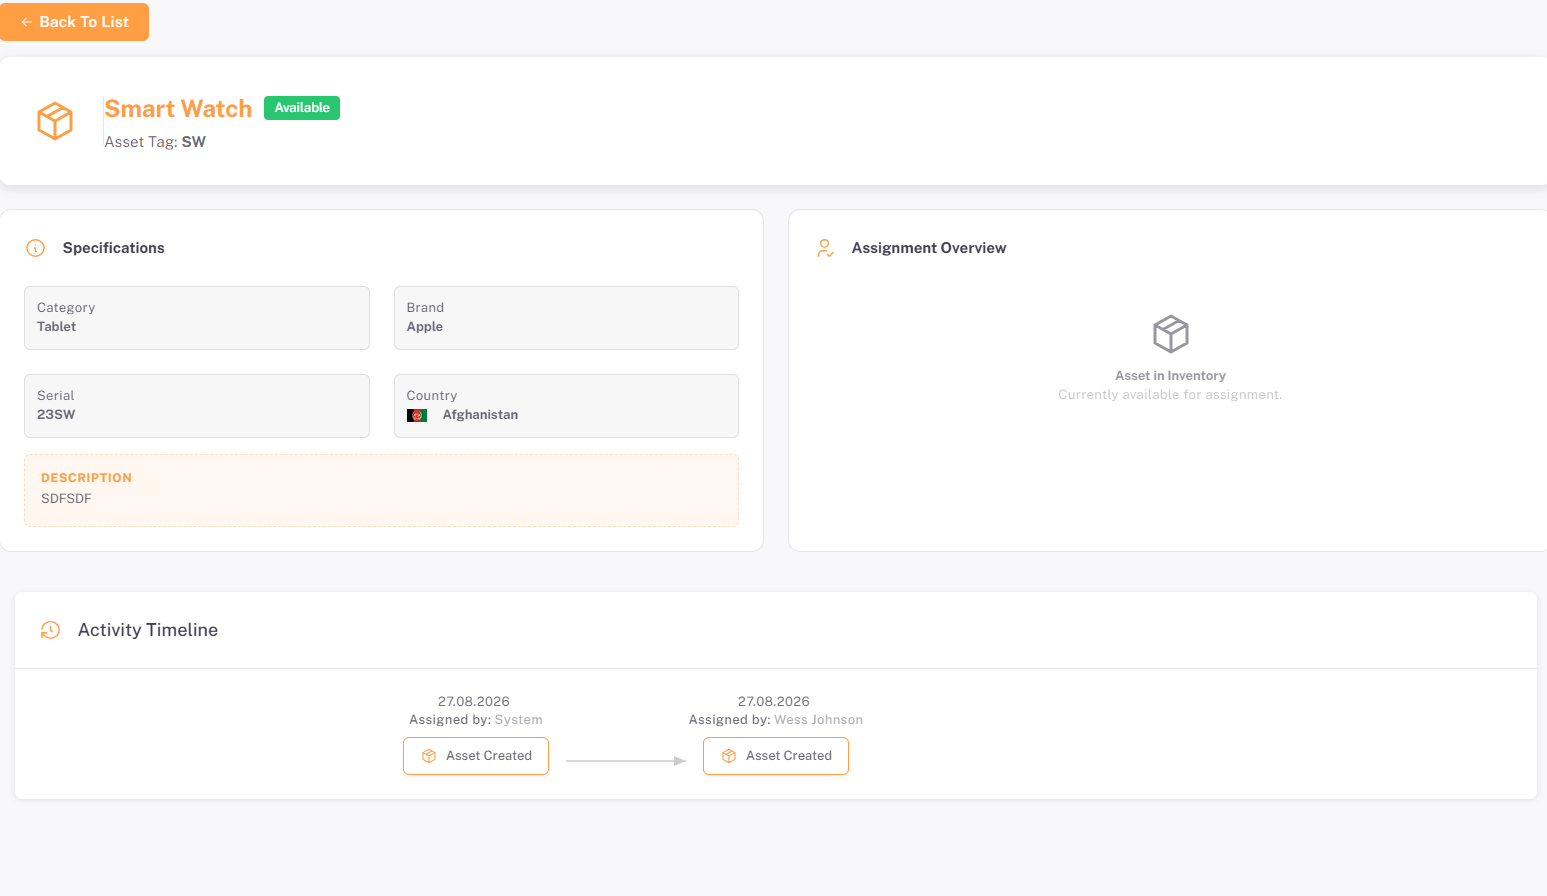
Section | Description |
Header | Displays the asset name, current status badge (e.g. Available), and asset tag. Includes a Back To List button to return to the Assets listing page. |
Specifications | Displays the asset's Category, Brand, Serial number, Country, and Description. |
Assignment Overview | Displays the employee the asset is currently assigned to, or "Asset in Inventory — Currently available for assignment" if the asset is unassigned. |
Activity Timeline | A chronological record of key events for the asset, such as when it was created and by whom, shown as a connected sequence of activity cards. |
Section 6: Assets Request Page
The Assets Request page lists every asset request submitted by employees. To access it, click on Assets in the left sidebar to expand the sub-menu, then click on Assets Request.
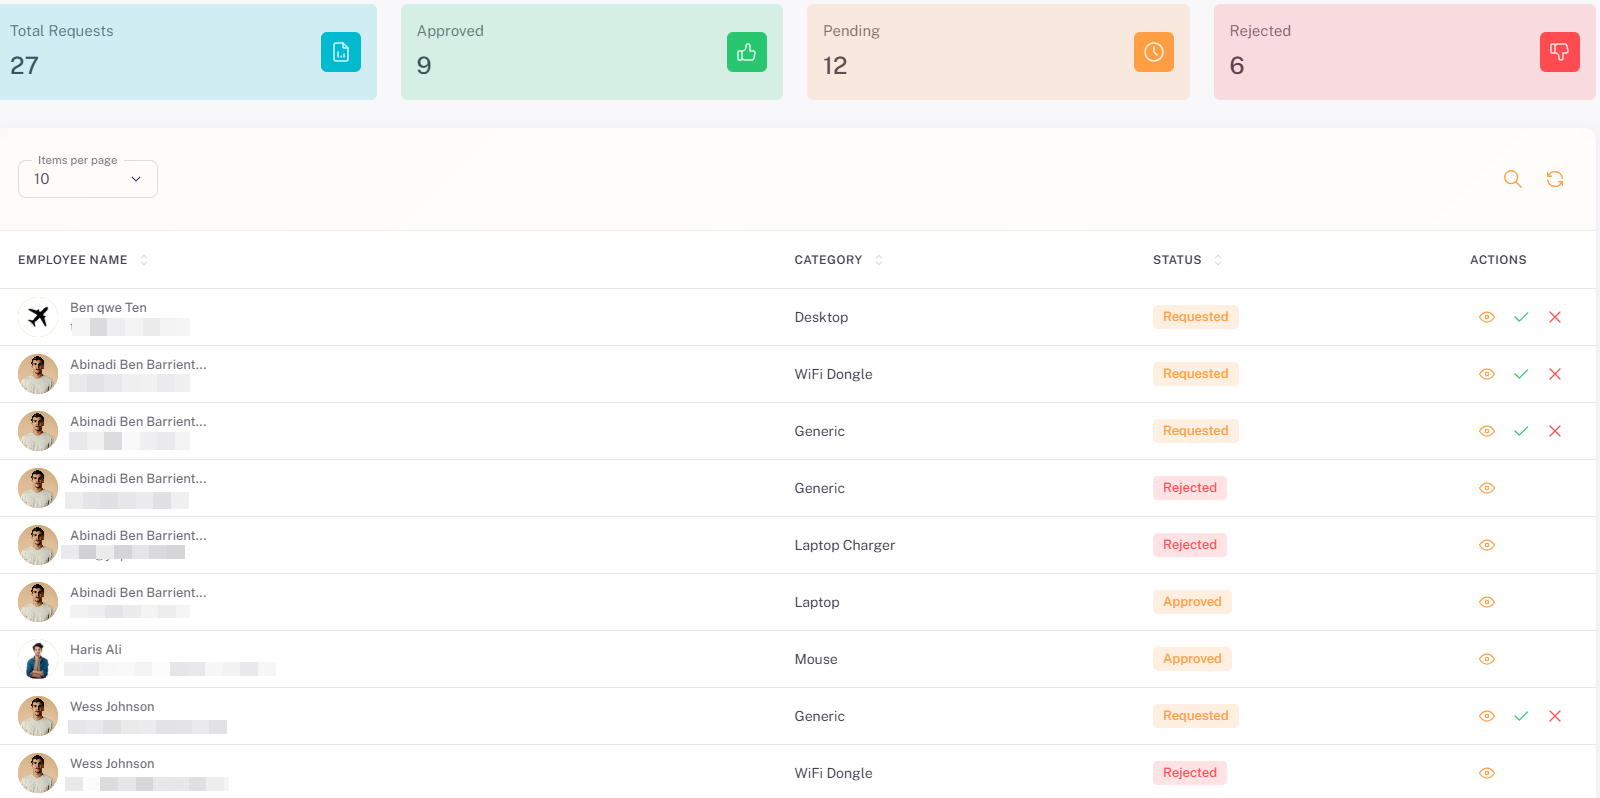
6.1. Summary Cards
Card | Description |
Total Requests | The total number of asset requests submitted, across all statuses. |
Approved | The number of requests that have been approved. |
Pending | The number of requests awaiting review. |
Rejected | The number of requests that have been rejected. |
6.2. Listing Table Columns
Column | Description | Sortable |
Employee Name | The name of the employee who submitted the request, with an avatar or profile icon. | Yes |
Category | The asset category requested, e.g. Desktop, WiFi Dongle, Laptop, Mouse. | Yes |
Status | The current status of the request: Requested, Approved, or Rejected. | Yes |
Actions | Eye icon — view request details. Check icon — approve the request. Cross icon — reject the request. | No |
📜 Note: The Approve and Reject icons are only available for requests with a Requested status. Requests that have already been Approved or Rejected show only the Eye icon.
6.3. Viewing Request Details
Clicking the Eye icon for any request opens the Asset Request Details dialog, showing the employee, requested category, current status, and the reason entered by the employee.
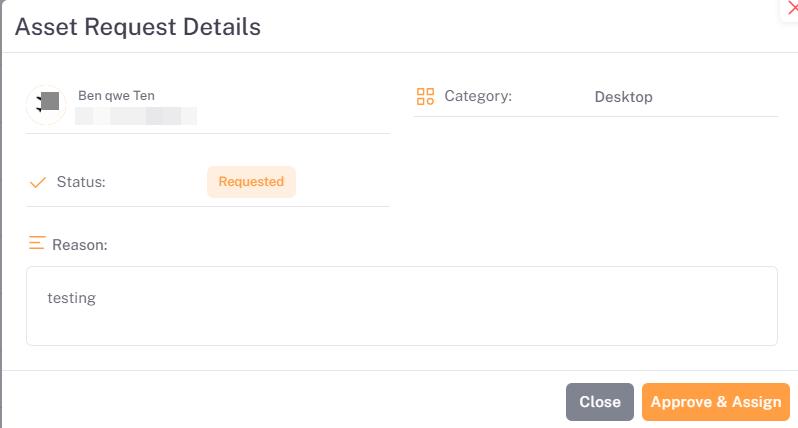
Click Approve & Assign to approve the request directly from this dialog, or click Close to dismiss it without making changes.
6.4. Approving a Request
Clicking the Check icon for a request, or clicking Approve & Assign from the Asset Request Details dialog, opens the Approve Asset Request dialog.
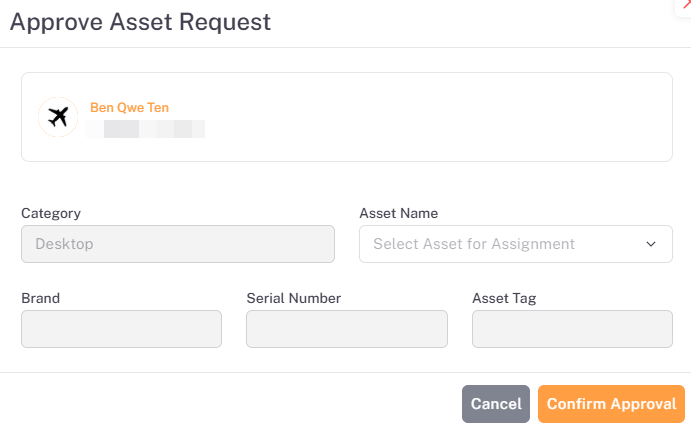
Field | Description |
Category | Displays the category requested by the employee (read-only). |
Asset Name | Select the specific available asset to assign for this request. |
Brand | Displays the brand of the selected asset. |
Serial Number | Displays the serial number of the selected asset. |
Asset Tag | Displays the asset tag of the selected asset. |
Click Confirm Approval to approve the request and assign the selected asset to the employee, or click Cancel to close the dialog without approving.
6.5. Rejecting a Request
Clicking the Cross icon for a request opens the Reject Asset Request confirmation dialog.
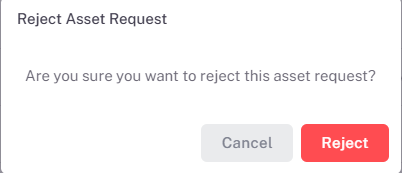
Click Reject to confirm and reject the request, or click Cancel to close the dialog without rejecting it.
⚠️ Important: Rejecting a request cannot be undone from this dialog. Confirm the correct request is selected before clicking Reject.
Section 7: Assets Assignment Page
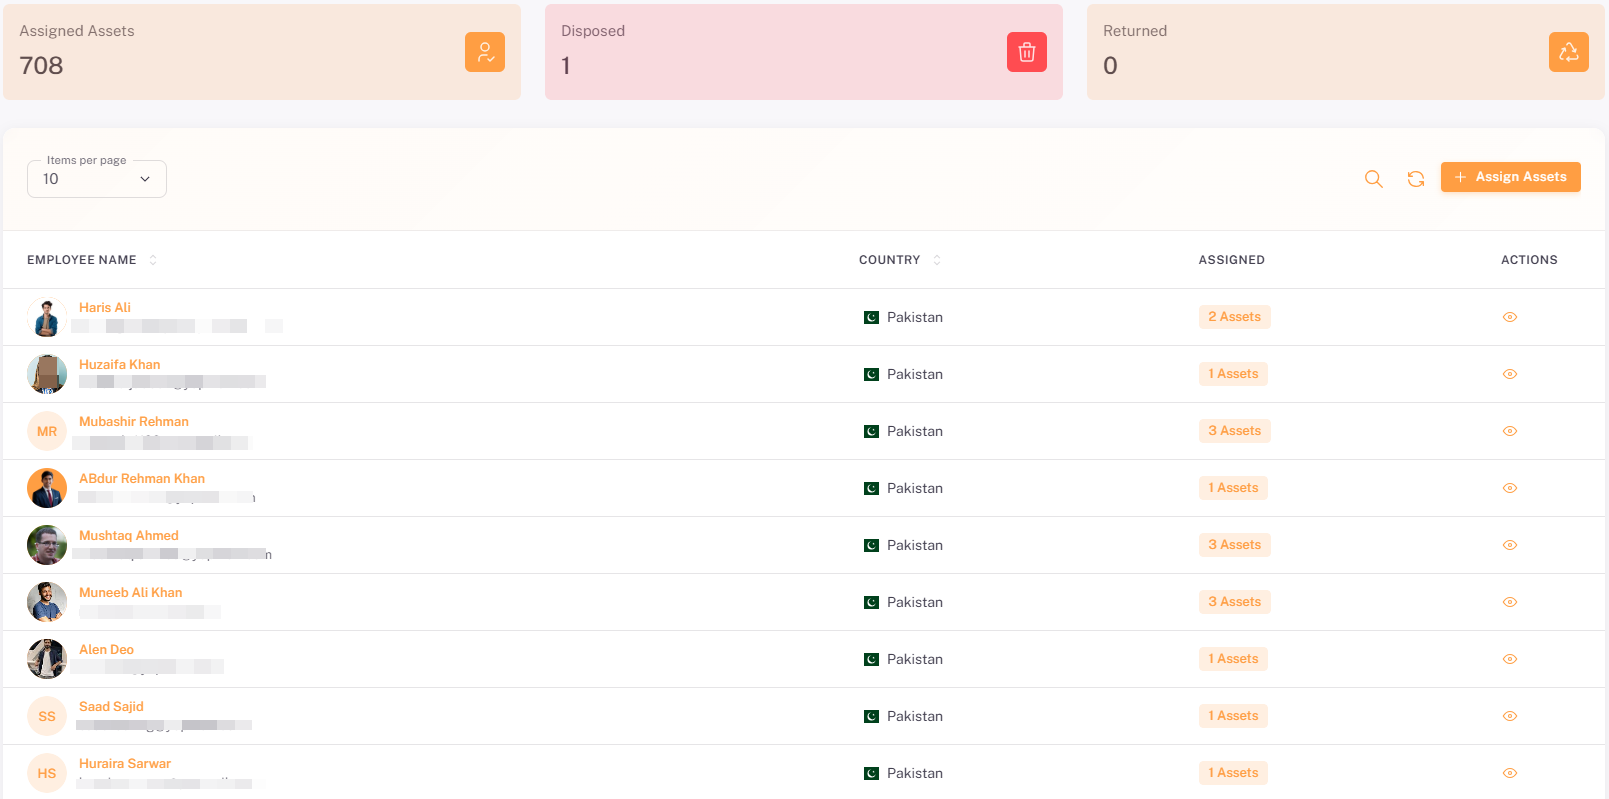
The Assets Assignment page lists every employee who currently holds one or more assigned assets, and provides the entry point for assigning new assets to employees. To access it, click on Assets in the left sidebar to expand the sub-menu, then click on Assets Assignment.
7.1. Summary Cards
Card | Description |
Assigned Assets | The total number of assets currently assigned across all employees. |
Disposed | The number of assets that have been disposed and removed from active inventory. |
Returned | The number of assets that have been returned by employees. |
7.2. Listing Table Columns
Column | Description | Sortable |
Employee Name | The name of the employee, with an avatar or initials icon. | Yes |
Country | The country the employee is based in, shown with a flag icon. | Yes |
Assigned | The total number of assets currently assigned to the employee. | No |
Actions | Eye icon — opens the Employee Assets view for that employee. | No |
7.3. Page Controls
- Items per page selector — Controls the number of records displayed per page (default: 10).
- Search icon — Filter employees by name or other fields.
- Refresh icon — Reload the listing to reflect the latest changes.
- Assign Assets button — Opens the Assign Assets form to assign one or more assets to an employee.
7.4. Assigning Assets to an Employee
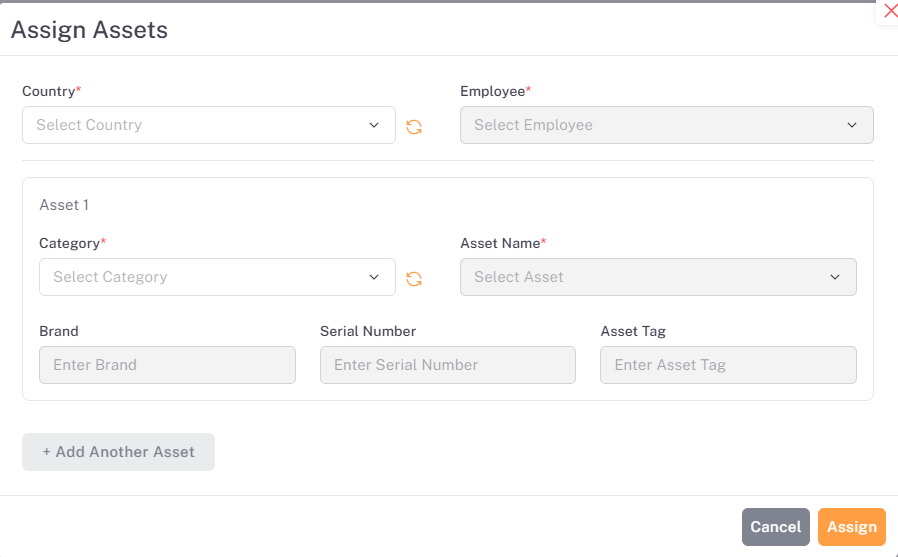
Click the + Assign Assets button on the Assets Assignment listing page to open the Assign Assets form.
Field | Required | Description |
Country | Yes | Select the country to filter available employees and assets. |
Employee | Yes | Select the employee the asset will be assigned to. |
Category | Yes | Select the asset category for this assignment. |
Asset Name | Yes | Select the specific available asset to assign. |
Brand | No | Displays or enter the brand of the selected asset. |
Serial Number | No | Displays or enter the serial number of the selected asset. |
Asset Tag | No | Displays or enter the asset tag of the selected asset. |
💡 Tip: Click + Add Another Asset to assign more than one asset to the same employee in a single submission.
Click Assign to complete the assignment, or click Cancel to close the form without assigning any assets.
7.5. Viewing an Employee's Assigned Assets
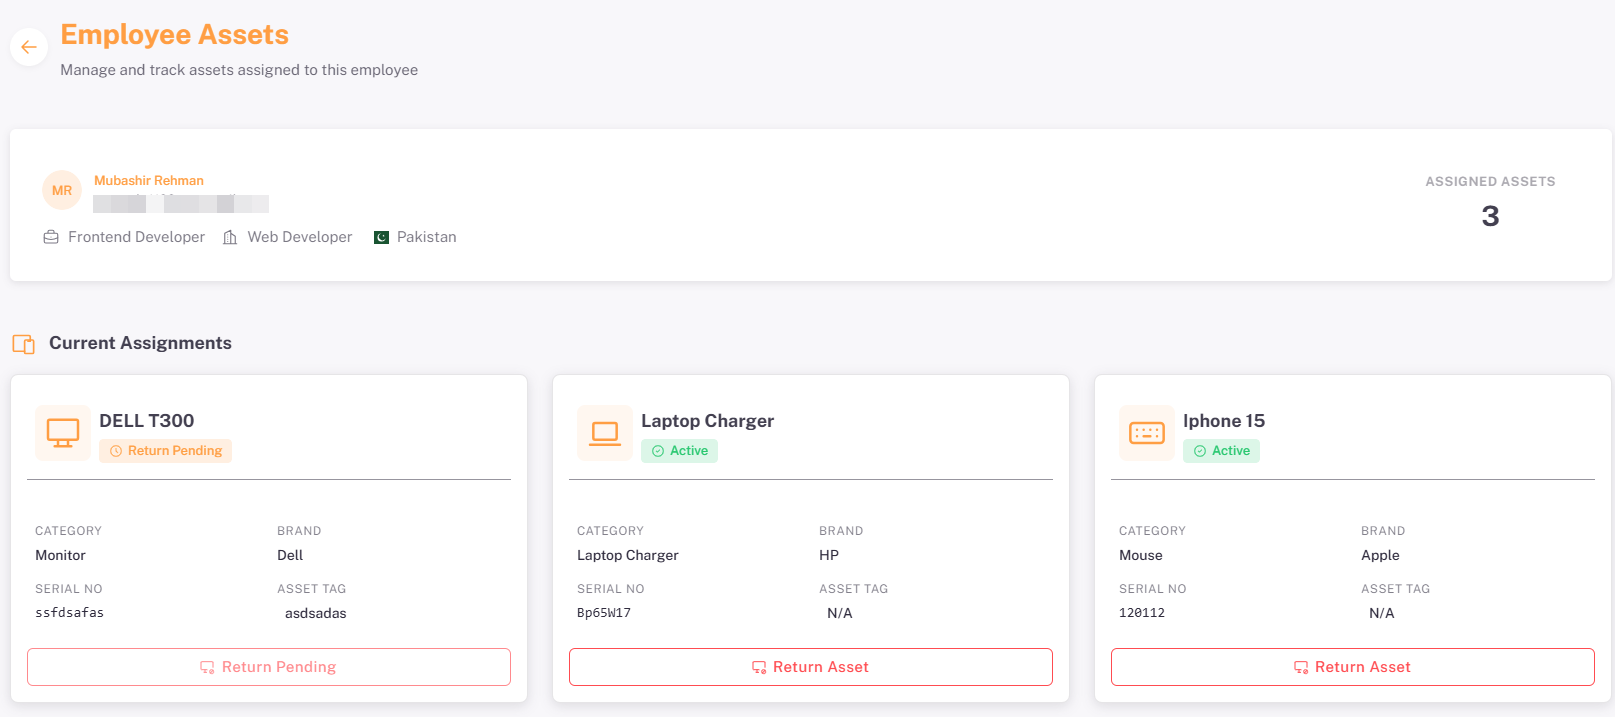
Clicking the Eye icon for any employee on the Assets Assignment listing page opens the Employee Assets page, showing every asset currently or previously assigned to that employee.
Section | Description |
Header | Displays the employee's name, job title, department, and country, along with the total count of Assigned Assets. Includes a Back button to return to the Assets Assignment listing. |
Current Assignments | A set of cards, one per assigned asset, each showing the asset name, status (e.g. Active, Return Pending), category, brand, serial number, and asset tag. |
Return Asset | A button on each asset card used to initiate the return of that asset. Displays as Return Pending when a return has already been requested for that asset. |
Section 8: Returned Assets Page
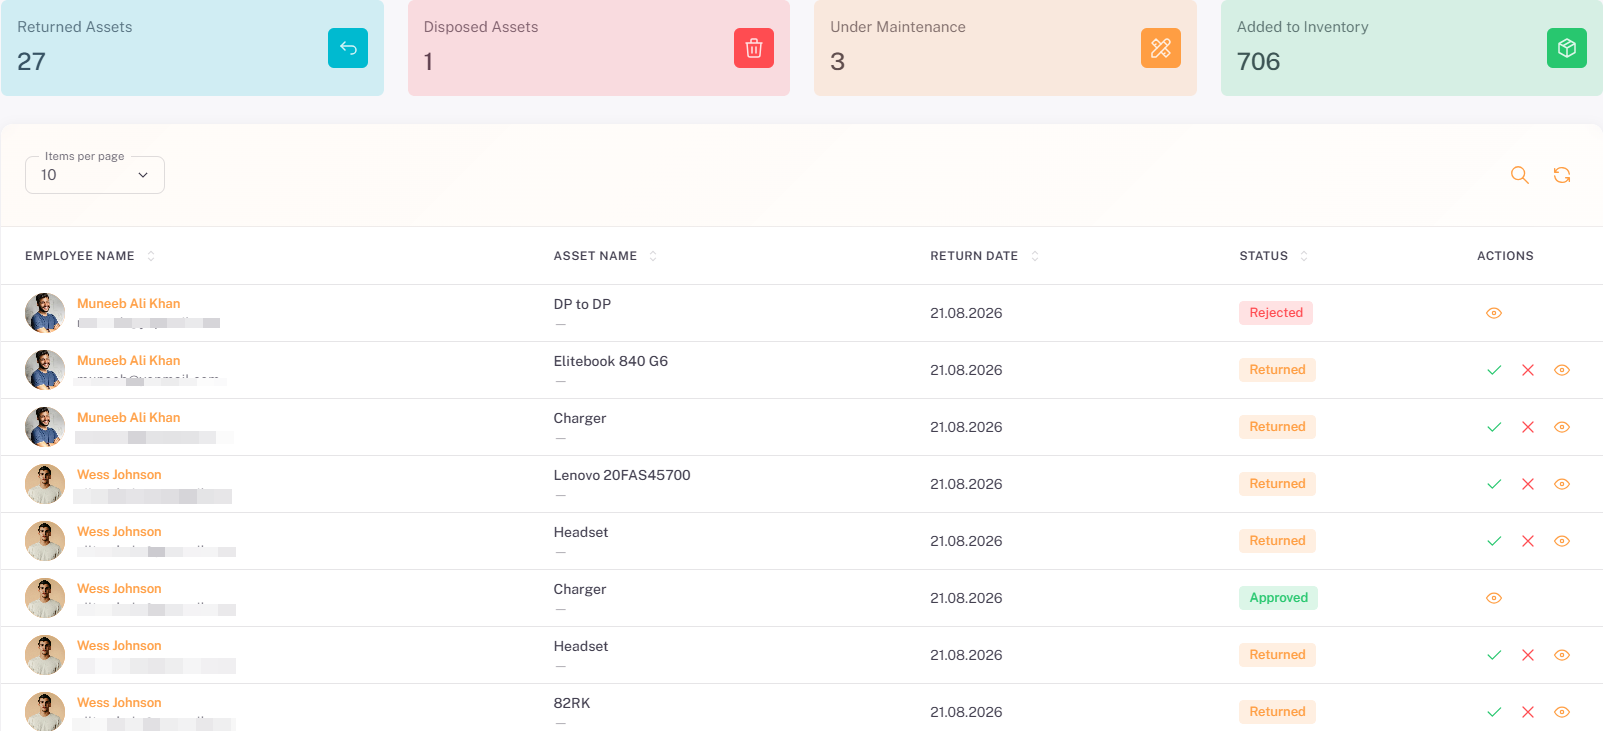
The Returned Assets page lists every asset return submitted by employees, and is used to review, approve, or reject those returns. To access it, click on Assets in the left sidebar to expand the sub-menu, then click on Returned Assets.
8.1. Summary Cards
Card | Description |
Returned Assets | The total number of assets that have been submitted for return, across all statuses. |
Disposed Assets | The number of returned assets that have been disposed and removed from active inventory. |
Under Maintenance | The number of returned assets currently marked as under maintenance. |
Added to Inventory | The total number of assets currently held in the inventory. |
8.2. Listing Table Columns
Column | Description | Sortable |
Employee Name | The name of the employee returning the asset, with an avatar or profile icon. | Yes |
Asset Name | The name of the asset being returned. | Yes |
Return Date | The date the return was submitted. | Yes |
Status | The current status of the return: Returned, Approved, or Rejected. | Yes |
Actions | Check icon — approve the return. Cross icon — reject the return. Eye icon — view the return details. | No |
📜 Note: The Approve and Reject icons are only available for returns with a Returned status. Returns that have already been Approved or Rejected show only the Eye icon.
8.3. Viewing Return Details
Clicking the Eye icon for any return opens the Asset Return Details dialog, showing the employee, asset, category, brand, asset tag, condition, priority, return date, and the reason entered by the employee.
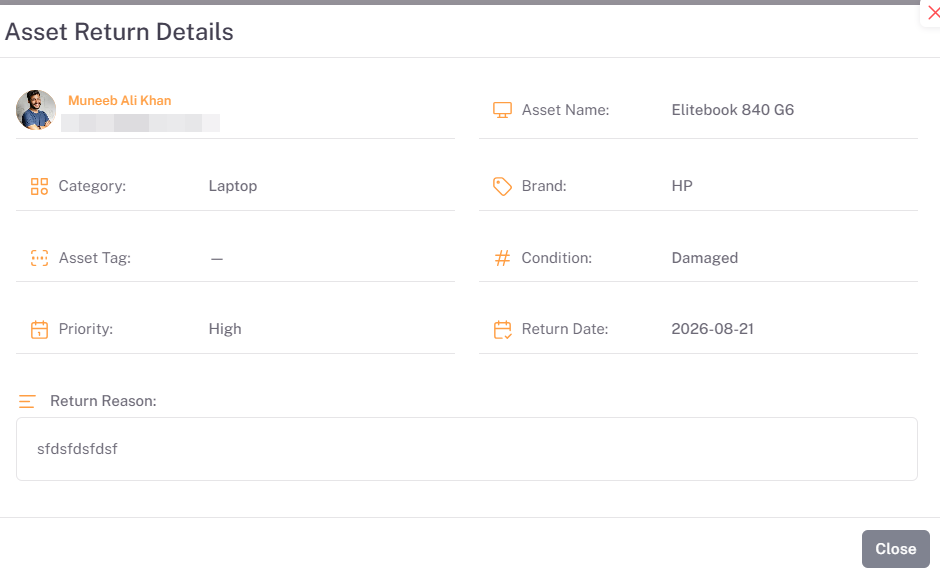
Click Close to dismiss the dialog.
8.4. Approving a Return
Clicking the Check icon for a return opens the Approve Asset Return dialog, showing the employee, asset, category, and return date, along with the return reason entered by the employee.
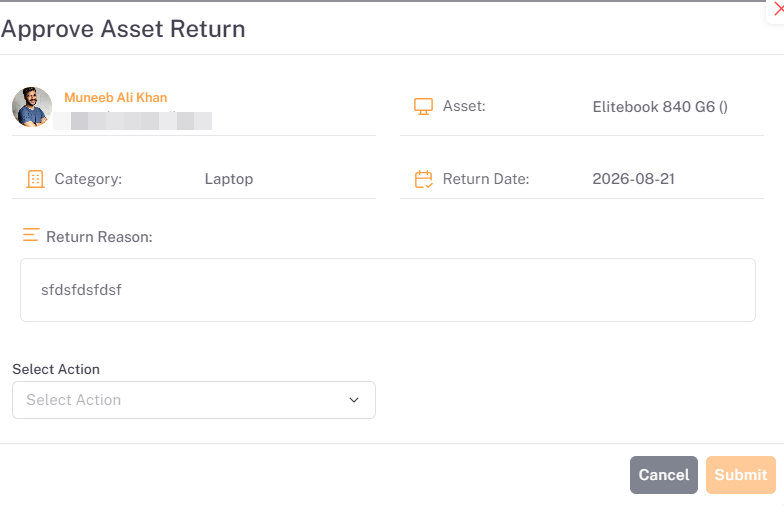
Field | Required | Description |
Select Action | Yes | Select what should happen to the returned asset, e.g. return it to available inventory, send it for maintenance, or dispose of it. |
Click Submit to approve the return and apply the selected action, or click Cancel to close the dialog without approving.
8.5. Rejecting a Return
Clicking the Cross icon for a return opens the Reject Asset Return dialog, showing the same employee, asset, category, and return reason details.
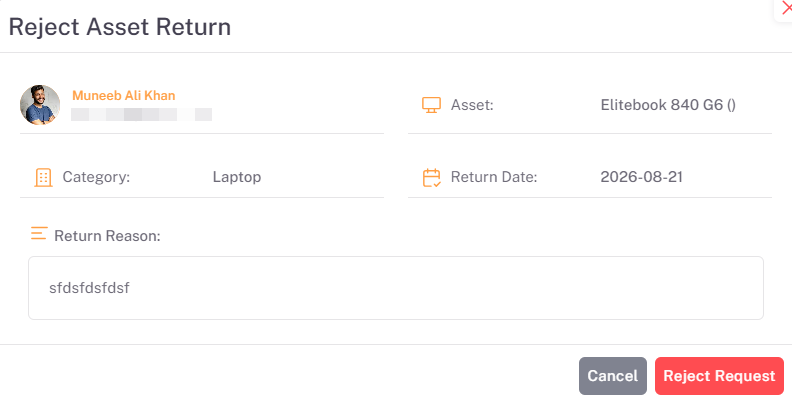
Click Reject Request to confirm and reject the return, or click Cancel to close the dialog without rejecting it.
Section 9: My Assets Page
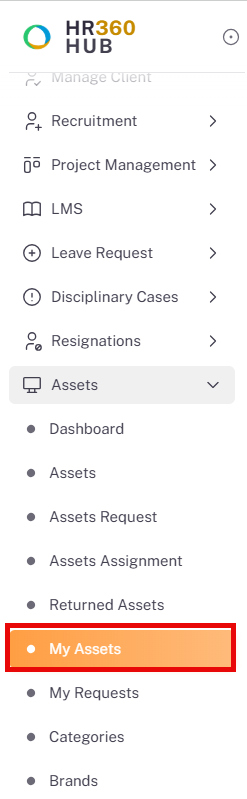
The My Assets page allows an employee to view the assets currently assigned to them. To access it, click on Assets in the left sidebar to expand the sub-menu, then click on My Assets.
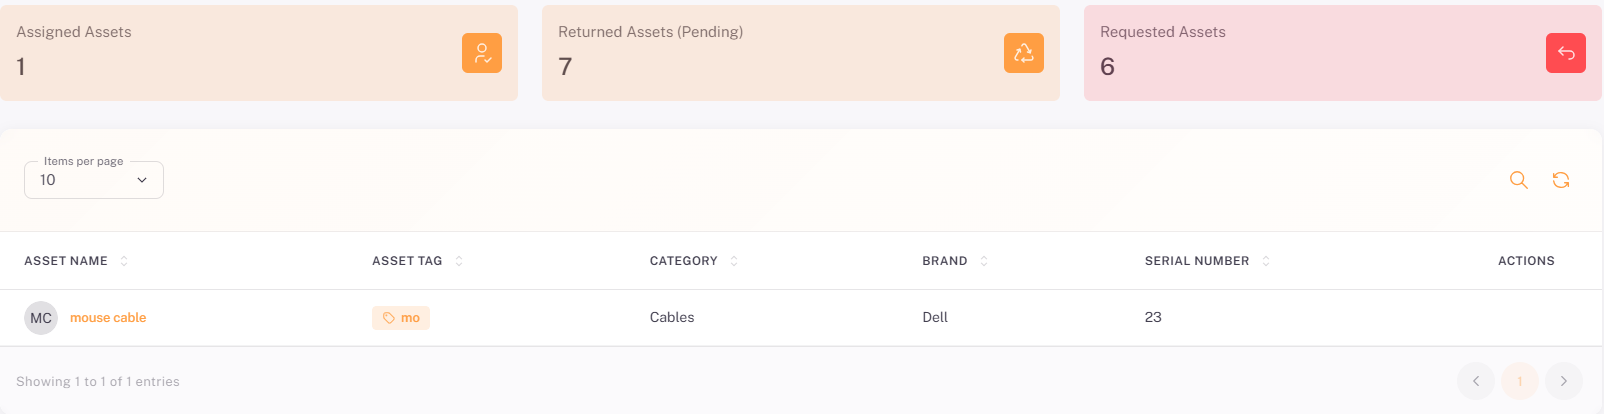
9.1. Summary Cards
Card | Description |
Assigned Assets | The number of assets currently assigned to the logged-in employee. |
Returned Assets (Pending) | The number of assets the employee has submitted for return that are awaiting approval. |
Requested Assets | The number of asset requests the employee has submitted. |
9.2. Listing Table Columns
Column | Description | Sortable |
Asset Name | The name of the assigned asset, with an icon showing its initials. | Yes |
Asset Tag | The unique tag assigned to identify the asset. | Yes |
Category | The category the asset belongs to, e.g. Cables. | Yes |
Brand | The manufacturer or brand of the asset. | Yes |
Serial Number | The manufacturer serial number of the asset. | Yes |
Actions | Used to initiate a return request for the asset. | No |
Section 10: My Requests Page
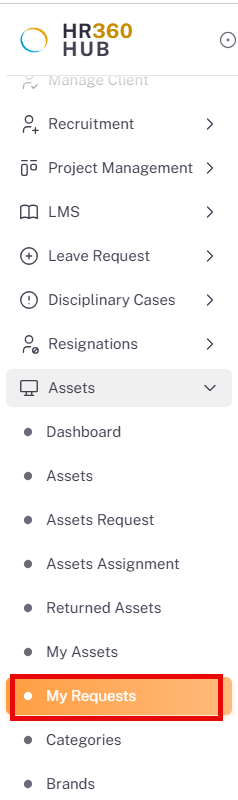
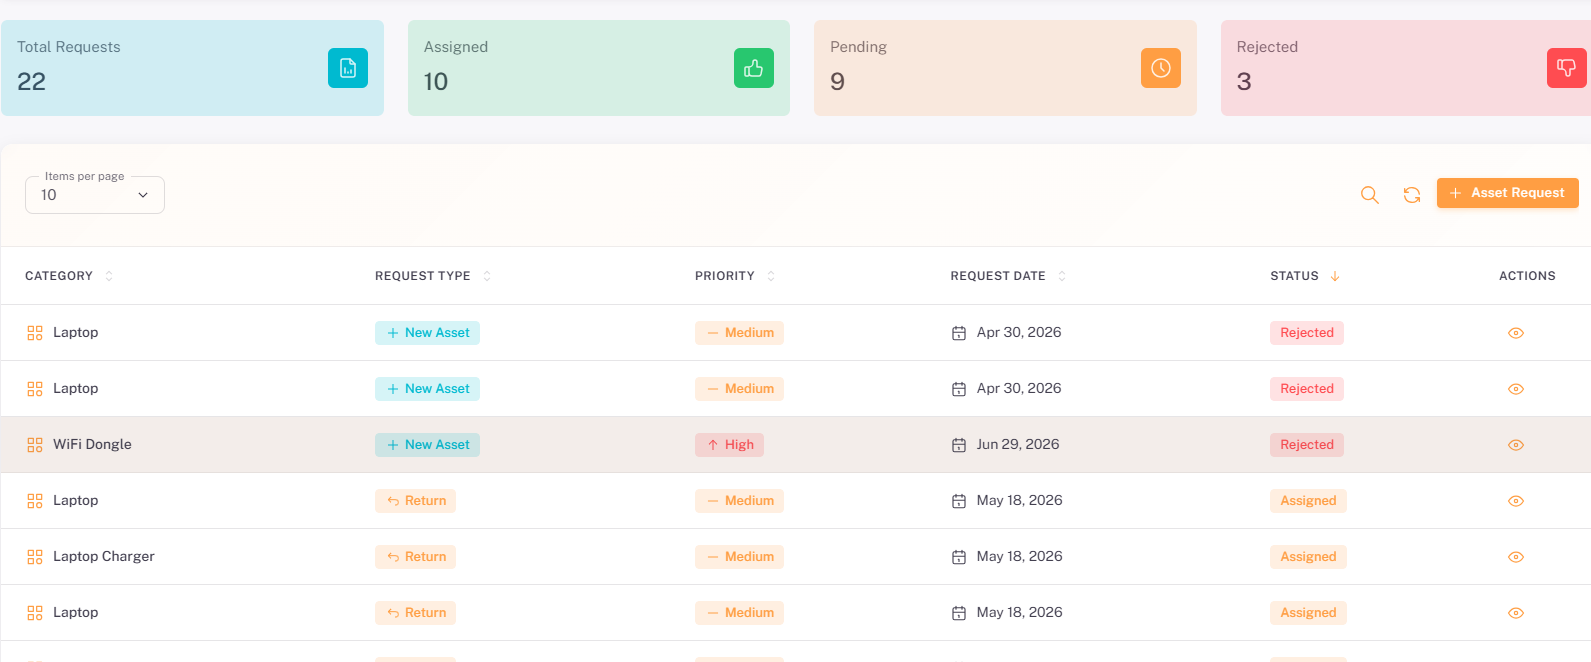
The My Requests page allows an employee to submit new asset requests and track the status of requests they have previously submitted. To access it, click on Assets in the left sidebar to expand the sub-menu, then click on My Requests.
10.1. Summary Cards
Card | Description |
Total Requests | The total number of requests submitted by the employee, across all statuses. |
Assigned | The number of requests that have resulted in an asset being assigned to the employee. |
Pending | The number of requests awaiting review. |
Rejected | The number of requests that have been rejected. |
10.2. Listing Table Columns
Column | Description | Sortable |
Category | The asset category associated with the request, e.g. Laptop, WiFi Dongle, Laptop Charger. | Yes |
Request Type | The type of request submitted: New Asset or Return. | Yes |
Priority | The priority level of the request: Medium or High. | Yes |
Request Date | The date the request was submitted. | Yes |
Status | The current status of the request: Assigned, Rejected, or Pending. | Yes |
Action | Eye icon — opens the full request details. | No |
10.3. Page Controls
- Items per page selector — Controls the number of records displayed per page (default: 10).
- Search icon — Filter requests by category or other fields.
- Refresh icon — Reload the listing to reflect the latest changes.
- Asset Request button — Opens the Request New Asset form to submit a new request.
10.4. Submitting a New Asset Request
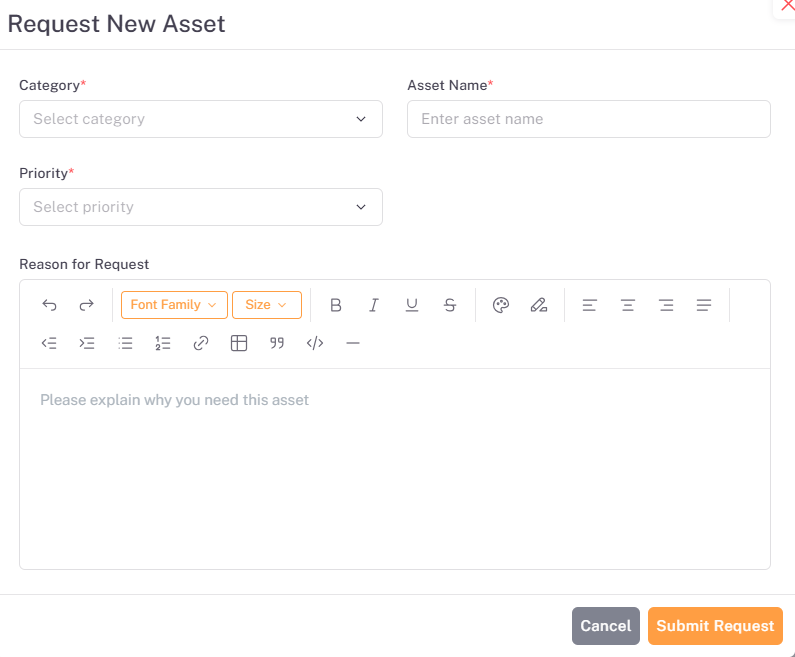
Click the + Asset Request button on the My Requests listing page to open the Request New Asset form.
Field | Required | Description |
Category | Yes | Select the category of the asset being requested. |
Asset Name | Yes | Enter the name of the specific asset being requested. |
Priority | Yes | Select the priority level of the request. |
Reason for Request | No | Enter the reason for the request using the rich-text editor, e.g. "Please explain why you need this asset." |
Click Submit Request to send the request for review, or click Cancel to discard it.
10.5. Viewing Request Details
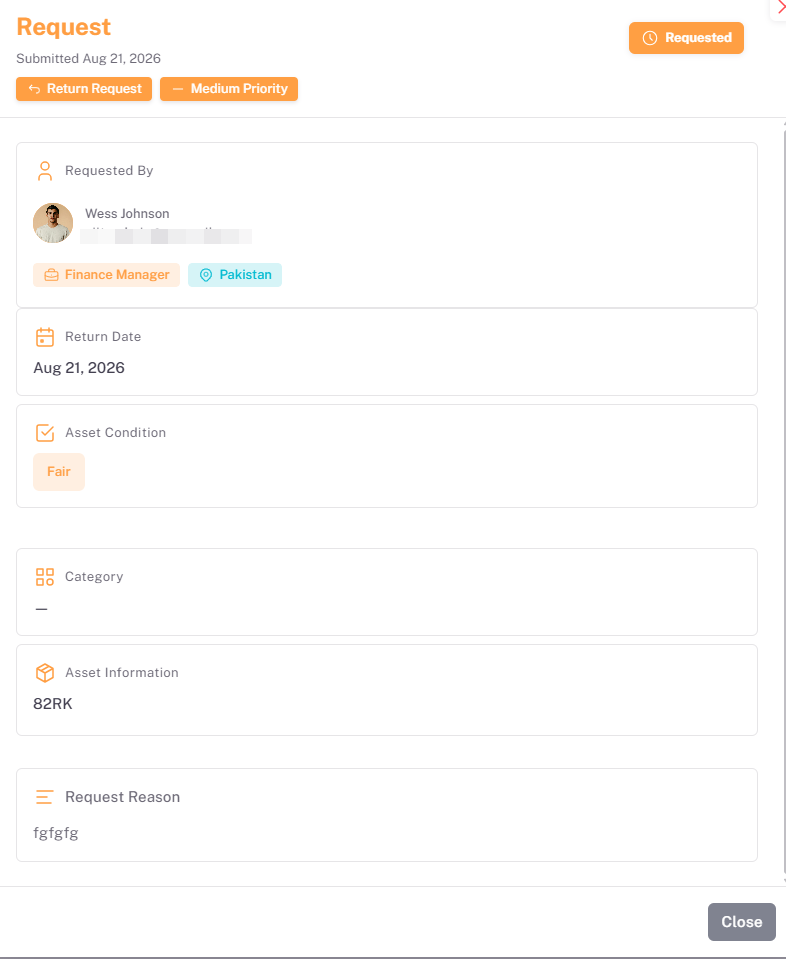
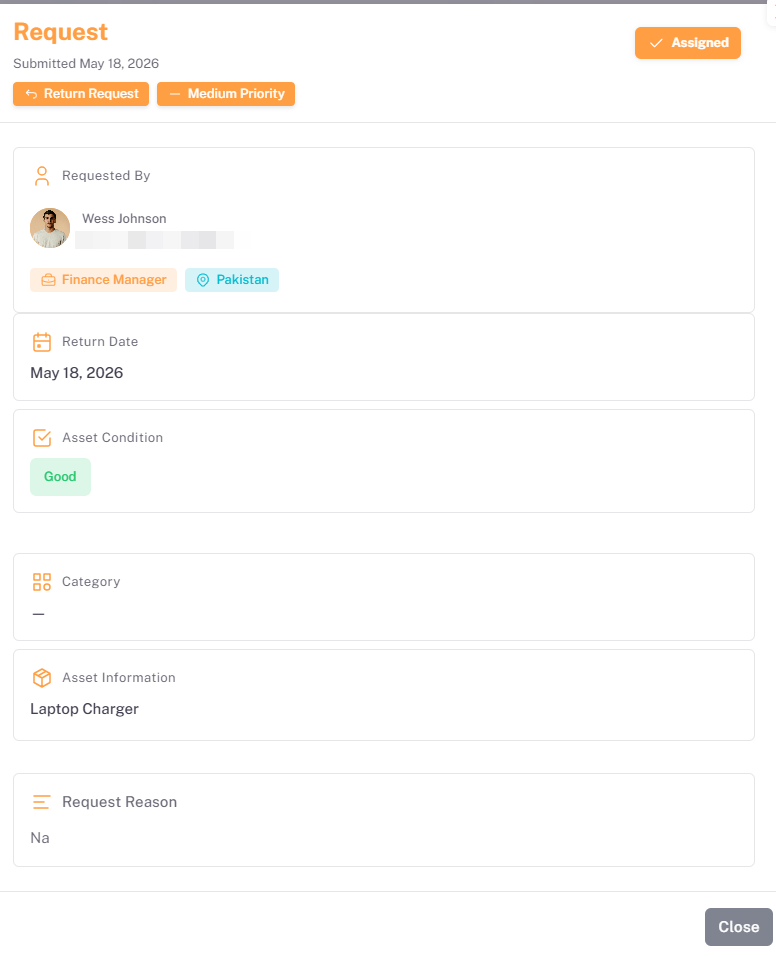
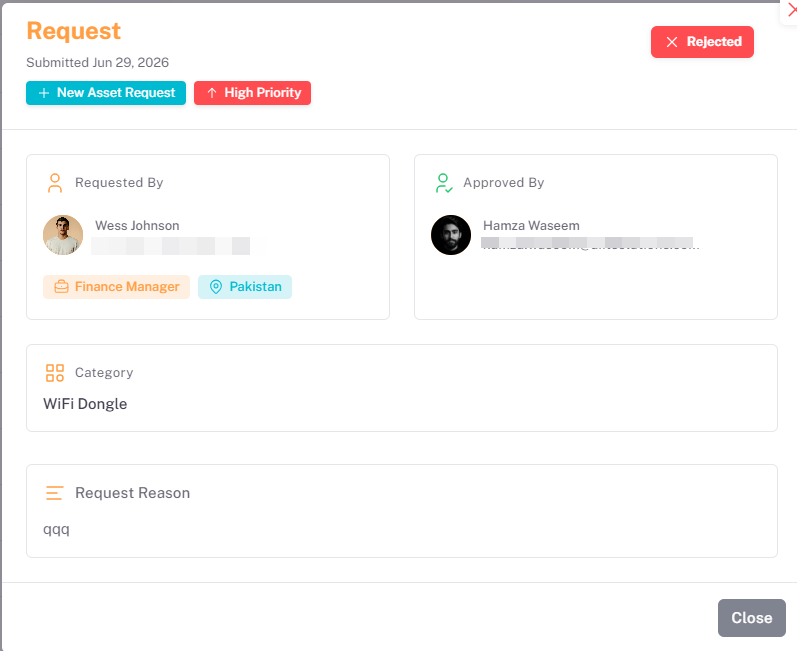
Clicking the Eye icon for any request opens the full Request details view, showing who requested it, the return date (for return-type requests), asset condition, category, asset information, and the reason for the request. The status badge and available actions in the header vary according to the request's current status.
Status | Description |
Requested | The request has been submitted and is awaiting review. The Return Request and priority actions are available in the header. |
Assigned | The request has been approved and an asset assigned. The Asset Condition and Asset Information fields reflect the assigned asset. |
Rejected | The request has been rejected. The header also displays who approved or rejected the request under Approved By. |
Click Close to dismiss the details view.
Section 11: Categories Page
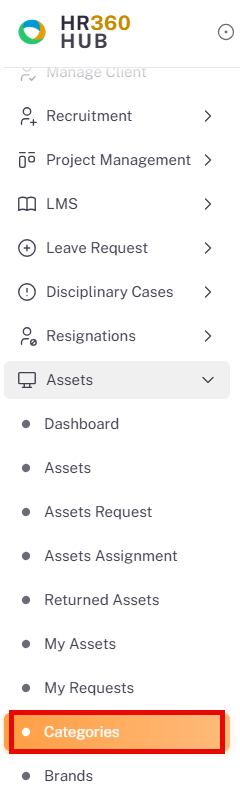
The Categories page is used to maintain the list of asset categories available throughout the Assets module. To access it, click on Assets in the left sidebar to expand the sub-menu, then click on Categories.
11.1. Listing Table Columns
Column | Description | Sortable |
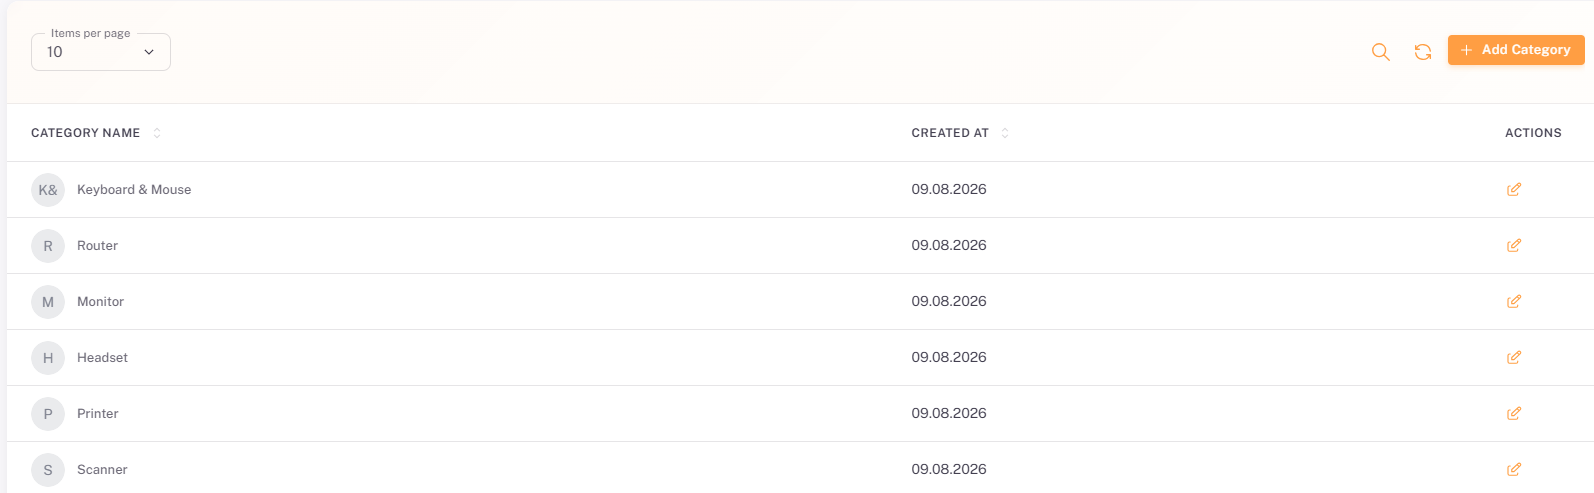
Category Name | The name of the asset category, with an icon showing its initials, e.g. Keyboard & Mouse, Router, Monitor, Headset, Printer, Scanner. | Yes |
Created At | The date the category was created. | Yes |
Actions | Pencil icon — opens the Edit Category form. | No |
11.2. Page Controls
- Items per page selector — Controls the number of records displayed per page (default: 10).
- Search icon — Filter categories by name.
- Refresh icon — Reload the listing to reflect the latest changes.
- Add Category button — Opens the Add Category form to create a new category.
11.3. Adding a Category
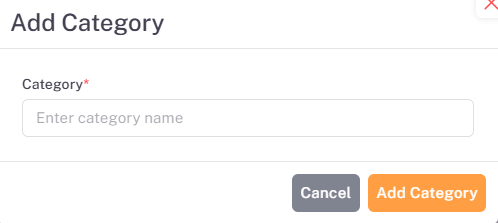
Click the + Add Category button on the Categories listing page to open the Add Category form.
Field | Required | Description |
Category | Yes | Enter the name of the new category. |
Click Add Category to save the new category, or click Cancel to discard it.
11.4. Editing a Category
Clicking the Pencil icon for any category on the Categories listing page opens the Edit Category form, pre-filled with the category's current name.
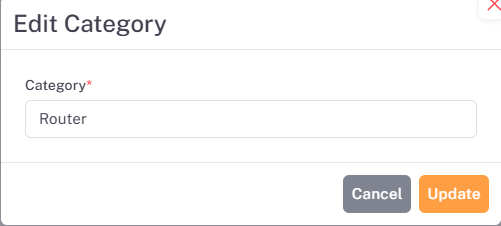
Update the Category field as needed, then click Update to save the changes, or click Cancel to discard them.
Section 12: Brands Page
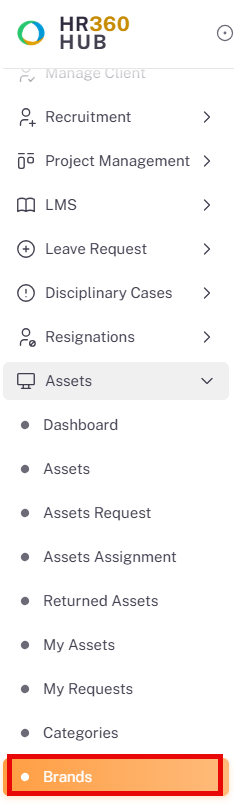
The Brands page is used to maintain the list of asset brands available throughout the Assets module. To access it, click on Assets in the left sidebar to expand the sub-menu, then click on Brands.
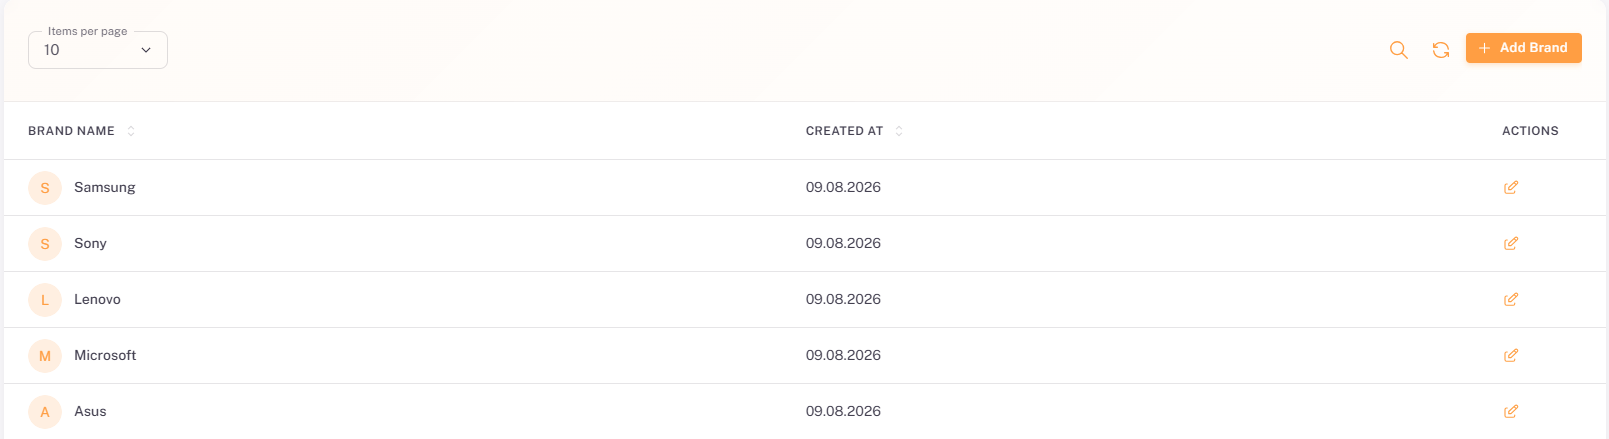
12.1. Listing Table Columns
Column | Description | Sortable |
Brand Name | The name of the asset brand, with an icon showing its initial, e.g. Samsung, Sony, Lenovo, Microsoft, Asus. | Yes |
Created At | The date the brand was created. | Yes |
Actions | Pencil icon — opens the Edit Brand form. | No |
12.2. Page Controls
- Items per page selector — Controls the number of records displayed per page (default: 10).
- Search icon — Filter brands by name.
- Refresh icon — Reload the listing to reflect the latest changes.
- Add Brand button — Opens the Add Brand form to create a new brand.
📜 Note: The Add Brand and Edit Brand forms follow the same single-field pattern as Add Category and Edit Category, described in Section 11.
12.3. Adding a Brand
Click the + Add Brand button on the Brands listing page to open the Add Brand form.
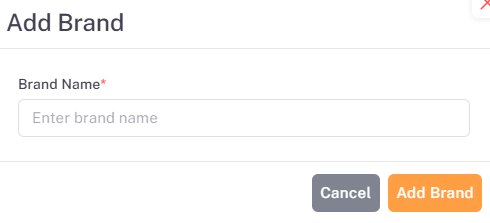
Field | Required | Description |
Brand | Yes | Enter the name of the new brand. |
Click Add Brand to save the new brand, or click Cancel to discard it.
11.4. Editing a Brand
Clicking the Pencil icon for any brand on the Brands listing page opens the Edit Brand form, pre-filled with the brand's current name.
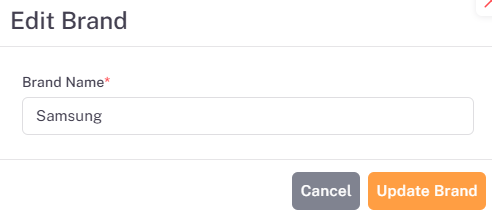
Update the Brand field as needed, then click Update to save the changes, or click Cancel to discard them.
Summary
The following table provides a complete step-by-step summary of all key workflows in the Assets module:
# | Action / Step | Result |
1 | Access Assets: Log in → Assets in left sidebar → Dashboard. | Assets Dashboard opens showing key metrics, category/brand breakdowns, requests overview, and recent activity. |
2 | Review Assets: Assets → Assets. | Listing of every asset with tag, name, category, brand, assignment, serial number, country, and status. |
3 | Add an Asset: Click + Add Assets → Complete Asset Name, Brand, Category, Country, and optional fields → Click Add Asset. | New asset created and added to the Assets listing. |
4 | Edit or View an Asset: Click the Pencil icon to edit, or the Eye icon to view specifications, assignment overview, and activity timeline. | Asset details updated, or the Asset Details page opens with full specifications and history. |
5 | Review Asset Requests: Assets → Assets Request → View, Approve, or Reject each request. | Requests are approved (with an asset assigned) or rejected, updating the request status immediately. |
6 | Assign Assets: Assets → Assets Assignment → Click + Assign Assets → Select Country, Employee, Category, and Asset → Click Assign. | Selected asset(s) assigned to the employee and reflected in the Assets Assignment listing. |
7 | View Employee Assets: On Assets Assignment, click the Eye icon for an employee. | Employee Assets page opens showing all current assignments, with the option to initiate a return. |
8 | Review Returned Assets: Assets → Returned Assets → View, Approve, or Reject each return. | Returns are approved (asset returned to inventory, sent for maintenance, or disposed) or rejected. |
9 | View My Assets: Assets → My Assets. | Listing of assets currently assigned to the logged-in employee. |
10 | Submit an Asset Request: Assets → My Requests → Click + Asset Request → Complete Category, Asset Name, Priority, and Reason → Click Submit Request. | New request created and tracked on the My Requests listing until it is assigned or rejected. |
11 | Maintain Categories: Assets → Categories → Click + Add Category or the Pencil icon to edit. | Category created or updated and available for selection throughout the module. |
12 | Maintain Brands: Assets → Brands → Click + Add Brand or the Pencil icon to edit. | Brand created or updated and available for selection throughout the module. |