

Overview
The Employees module in the HR360 Hub HRMS Portal is the central directory of every employee record in the organization. It brings together each employee's personal details, employment contract, leave balances, compensation, goals, emergency contacts, documents, licenses, AI usage, territory assignments, and login activity in a single Employee Profile page.
This guide covers the Employee Profile page and its tabs. The wider Employees section of the sidebar also includes Employee Exit and Exit Reason, which are covered in separate guides.
This guide covers:
- How to access the Employees List from the left sidebar.
- Understanding the Employees List page and its summary counts.
- How to open an individual Employee Profile and read the profile summary panel.
- Navigating between the profile tabs: Basic Information, Contract, Leave, Salary Info, Goals, Emergency Contact, Documents, License, Hub AI Usage, Territories, and Login History.
- How to review and update the information held in each tab.
📜 Note: Access to the Employees module and its actions is controlled by role permissions. Users must have Employees module access to view employee profiles, and the relevant tab-level permissions to edit contract, salary, or document information.
Prerequisites
Before working with the Employees module, ensure the following are in place:
- The user must be logged in with a role that has access to the Employees module.
- At least one department, designation, and reporting manager must be configured in the system before an employee's Contract details can be completed.
- Employee records must already exist in the system before a profile can be opened; new employees are added using the + Add Employee action on the Employees List page.
Section 1: Accessing the Employees List
After logging in to the HRMS Portal, follow the steps below to access the Employees List.
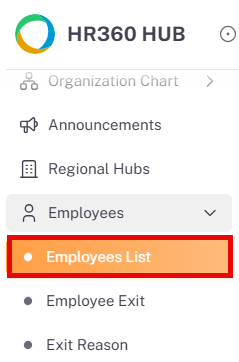
- From the left sidebar, click on Employees to expand the sub-menu.
- The sub-menu displays Employees List, Employee Exit, and Exit Reason.
- Click on Employees List to open the employee directory.
Section 2: Employees List Page
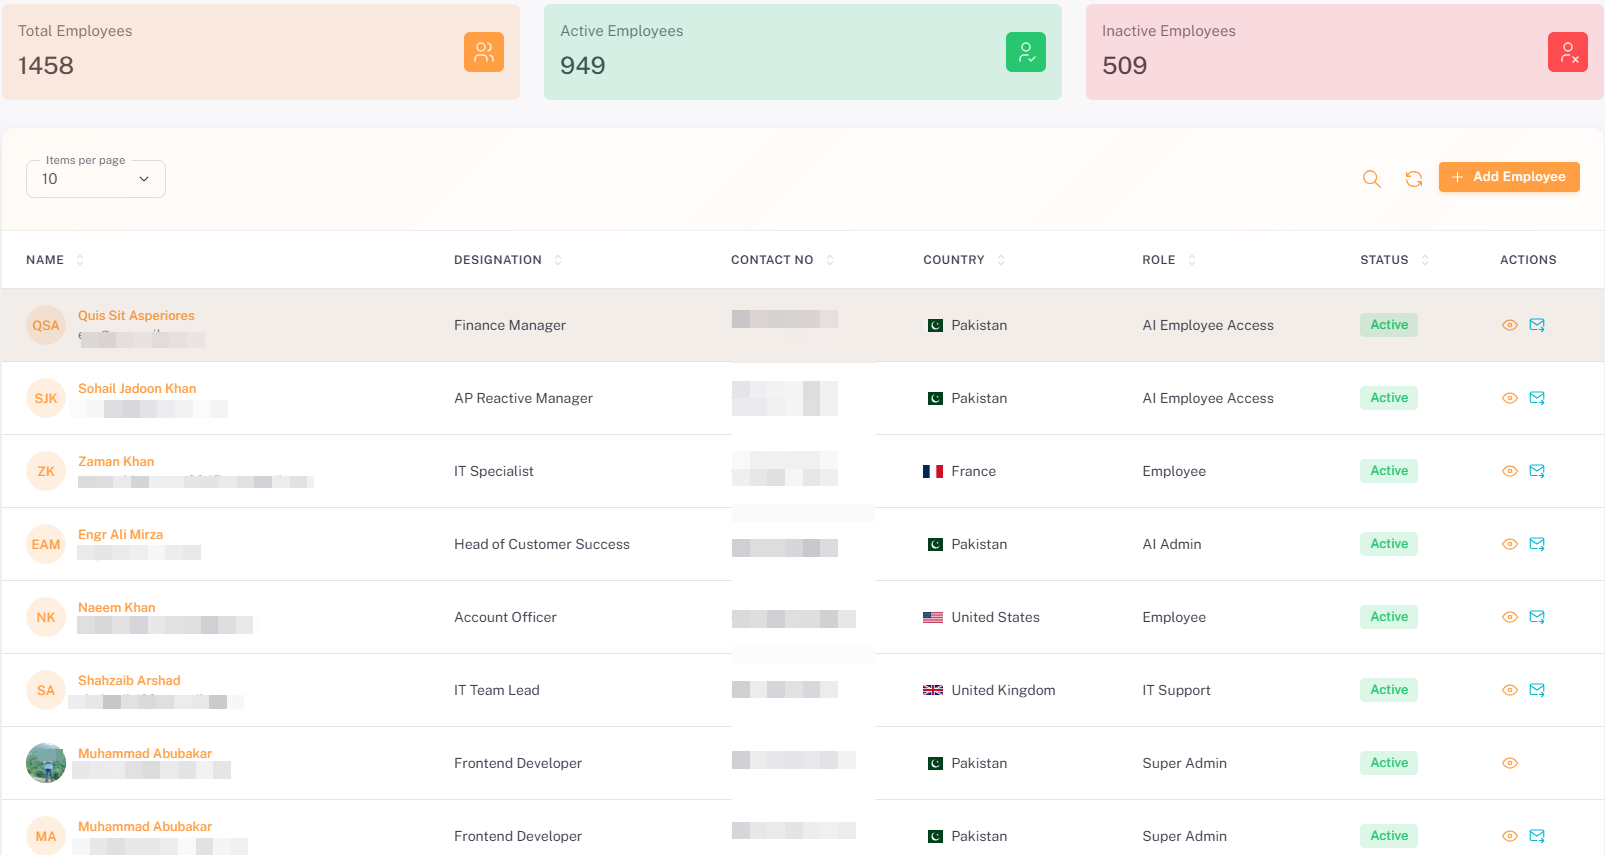
The Employees List page displays every employee record in the system, along with summary counts and a searchable, sortable table.
2.1. Summary Cards
The top of the page displays three summary cards:
Field | Description |
Total Employees | The total number of employee records in the system, regardless of status. |
Active Employees | The number of employees whose status is currently Active. |
Inactive Employees | The number of employees whose status is currently Inactive, e.g. deactivated. |
2.2. Listing Table Columns
Column | Description | Sortable |
Name | The employee's full name and avatar along with the email address of the employee | Yes |
Designation | The employee's current job title. | Yes |
Contact No | The employee's registered contact number. | No |
Country | The country associated with the employee, shown with a flag icon. | Yes |
Role | The system access role assigned to the employee, e.g. Employee, Manager, Admin, Super Admin etc. | Yes |
Status | The employee's current status: Active or Inactive. | Yes |
Actions | Eye icon — opens the employee's Employee Profile. Envelope icon — send an email to the employee for first time password setup. | No |
2.3. Page Controls
- Items per page selector — Controls the number of records displayed per page (default: 10).
- Search icon — Filter employees by name or other fields.
- Refresh icon — Reload the listing to reflect the latest changes.
- + Add Employee button — Opens the form to create a new employee record.
💡 Tip: Click the Eye icon next to any employee to open their Employee Profile and review or update their full record.
Section 3: Employee Profile Overview
Clicking the Eye icon for any employee on the Employees List opens the Employee Profile page. The page is split into two areas: a profile summary panel on the left, and a tabbed content area on the right.
3.1. Profile Summary Panel
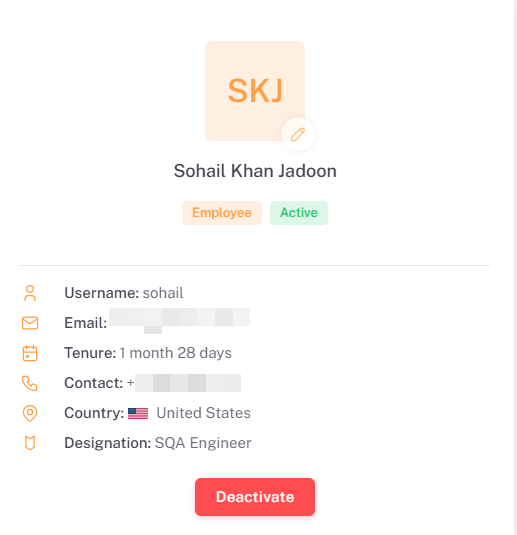
The profile summary panel stays visible on the left of the page regardless of which tab is open. It gives a quick-reference snapshot of the employee.
Element | Description |
Photo | The employee's profile photo or, if none is uploaded, their initials on a colored tile. A pencil icon lets the photo be updated. |
Name | The employee's full name. |
Role badge | Shows the employee's system role, e.g. Employee. |
Status badge | Shows the employee's current status, e.g. Active or Inactive. |
Username | The employee's system login username. |
The employee's registered email address. | |
Tenure | The length of time the employee has been with the organization, shown in years, months, and days. |
Contact | The employee's registered contact number. |
Country | The country associated with the employee, shown with a flag icon. |
Designation | The employee's current job title. |
Deactivate button | Deactivates the employee's account. The button label changes to Activate for an already-inactive employee. |
⚠️ Important: Deactivating an employee immediately revokes their access to the HRMS Portal. Confirm the employee's employment status before using this action.
3.2. Tab Navigation
The right side of the Employee Profile page is organized into tabs. Use the left and right arrows at either end of the tab bar to scroll to tabs that do not fit onscreen.

The available tabs are:
- Basic Information — the employee's personal, demographic, and location details.
- Contract — employment type, role, department, and reporting details.
- Leave — leave balances by leave type.
- Salary Info — payslip, income, deductions, and payment method details.
- Goals — goals assigned to the employee and their status.
- Emergency Contact — the employee's emergency contacts.
- Documents — documents uploaded for the employee, e.g. CV/Resume.
- License — licenses held by the employee, e.g. insurance or driving licenses.
- Hub AI Usage — the employee's HR360Hub AI credit consumption.
- Employee History — a consolidated, filterable log of changes and actions recorded against the employee's record.
- Territories — territories assigned to the employee.
- Login History — the employee's recent login devices and activity.
Section 4: Basic Information Tab
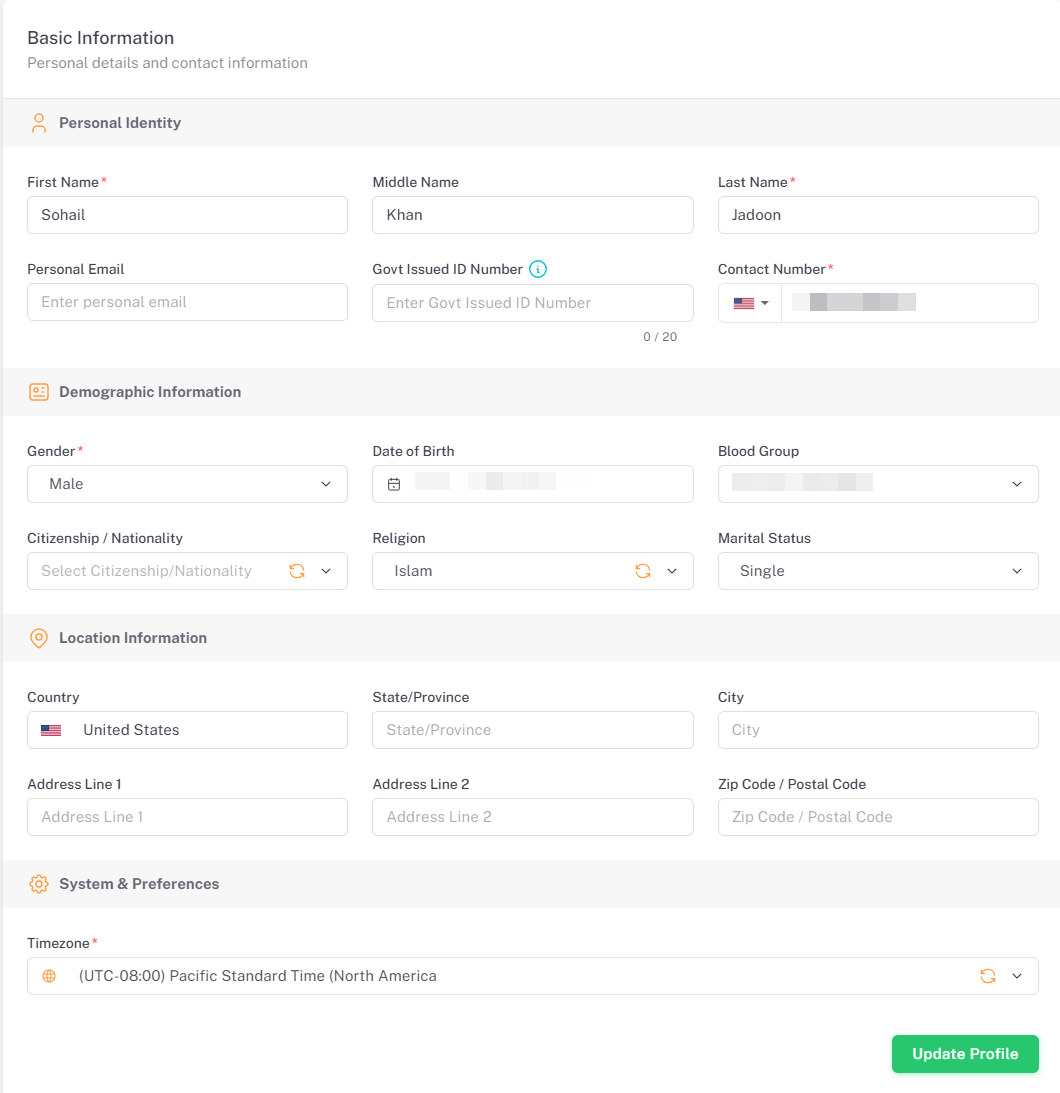
The Basic Information tab displays the employee's personal details and contact information, grouped into four sections: Personal Identity, Demographic Information, Location Information, and System & Preferences.
Personal Identity
Field | Required | Description |
First Name | Yes | The employee's first name. |
Middle Name | No | The employee's middle name, if applicable. |
Last Name | Yes | The employee's last name. |
Personal Email | No | A personal email address, separate from the employee's system login email. |
Govt Issued ID Number | No | The employee's government-issued identification number. |
Contact Number | Yes | The employee's contact number, with a country code selector. |
Demographic Information
Field | Required | Description |
Gender | Yes | The employee's gender. |
Date of Birth | No | The employee's date of birth. |
Blood Group | No | The employee's blood group. |
Citizenship / Nationality | No | The employee's citizenship or nationality. |
Religion | No | The employee's religion. |
Marital Status | No | The employee's marital status. |
Location Information
Field | Required | Description |
Country | No | The country the employee is based in. |
State/Province | No | The state or province the employee is based in. |
City | No | The city the employee is based in. |
Address Line 1 | No | The first line of the employee's residential address. |
Address Line 2 | No | The second line of the employee's residential address. |
Zip Code / Postal Code | No | The postal code for the employee's address. |
System &Preferences
Field | Required | Description |
Time zone | Yes | The employee's working time zone, used to display dates and times across the portal. |
Click Update Profile to save changes made on the Basic Information tab.
Section 5: Contract Tab
The Contract tab displays the employee's employment terms, reporting structure, and leave category assignments.
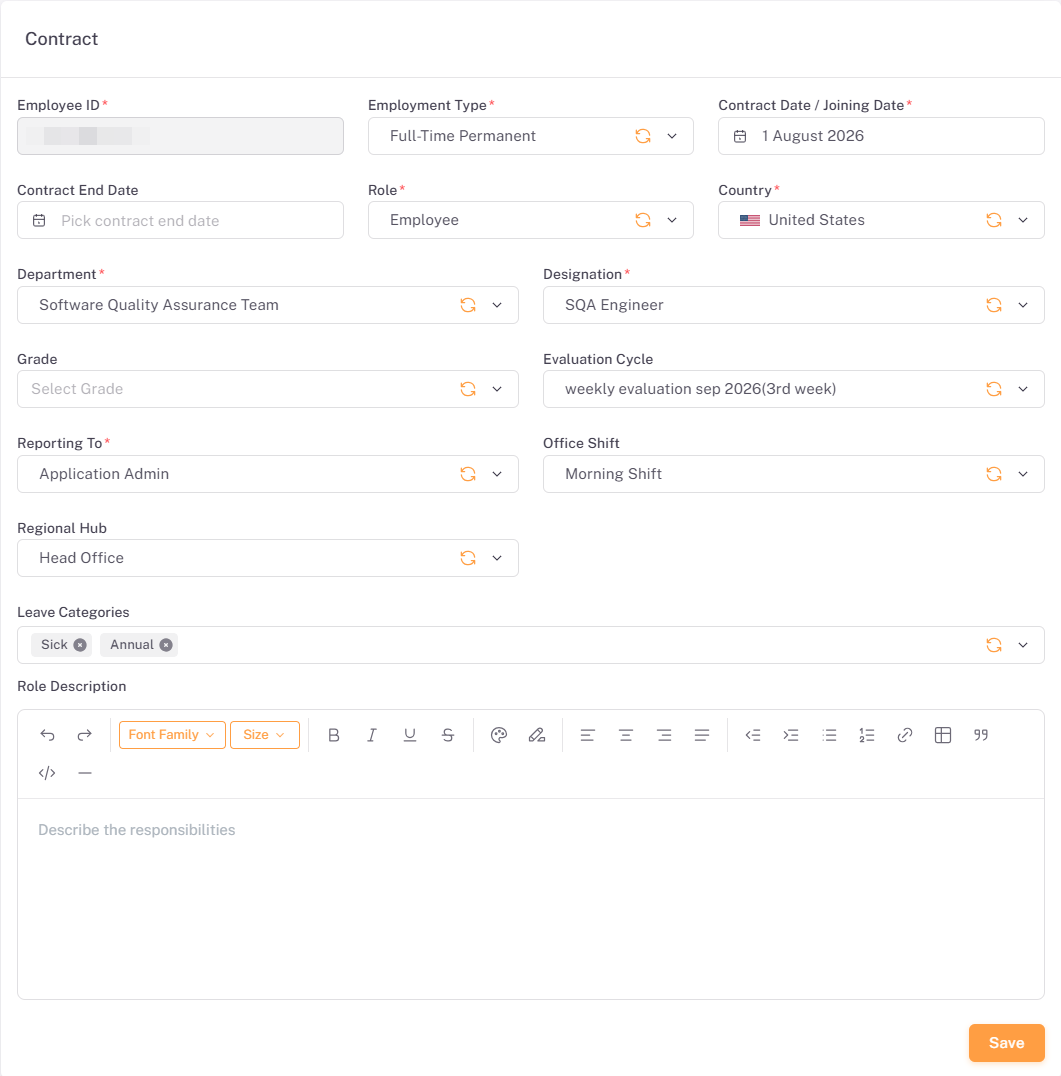
Field | Required | Description |
Employee ID | Yes | The employee's unique system-generated identifier. Read-only. |
Employment Type | Yes | The type of employment, e.g. Full-Time Permanent. |
Contract Date / Joining Date | Yes | The date the employee's contract began. |
Contract End Date | No | The date the employee's contract ends, if applicable. |
Role | Yes | The employee's system access role, e.g. Employee. |
Country | Yes | The country the employee's contract is based in. |
Department | Yes | The department the employee belongs to. |
Designation | Yes | The employee's job title. |
Grade | No | The employee's job grade. |
Evaluation Cycle | No | The performance evaluation cycle the employee is assigned to. |
Reporting To | Yes | The manager the employee reports to. |
Office Shift | No | The work shift assigned to the employee, e.g. Morning Shift. |
Regional Hub | No | The regional hub the employee is attached to, e.g. Head Office. |
Leave Categories | No | One or more leave types the employee is eligible for, e.g. Sick, Annual. |
Role Description | No | A description of the employee's responsibilities, entered using the rich-text editor. |
Click Save to apply changes made on the Contract tab.
Section 6: Leave Tab
The Leave tab shows the employee's leave balances, broken down by leave type.
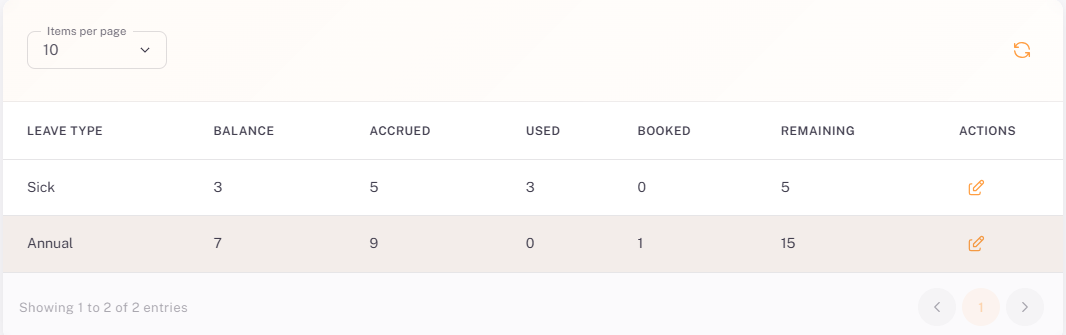
Column | Description |
Leave Type | The leave category, e.g. Sick, Annual. |
Balance | The number of days currently available to the employee. |
Accrued | The total number of days accrued for this leave type to date. |
Used | The number of days already taken. |
Booked | The number of days booked for future leave but not yet taken. |
Remaining | The number of days remaining after accounting for used and booked leave. |
Actions | Pencil icon — edit the leave allocation for this leave type. |
💡 Tip: Leave Categories assigned on the Contract tab determine which leave types appear here.
Section 7: Salary Info Tab
The Salary Info tab captures the employee's compensation details and payment method, organized into Salary Information, Income, Deductions, and Payment Method sections.
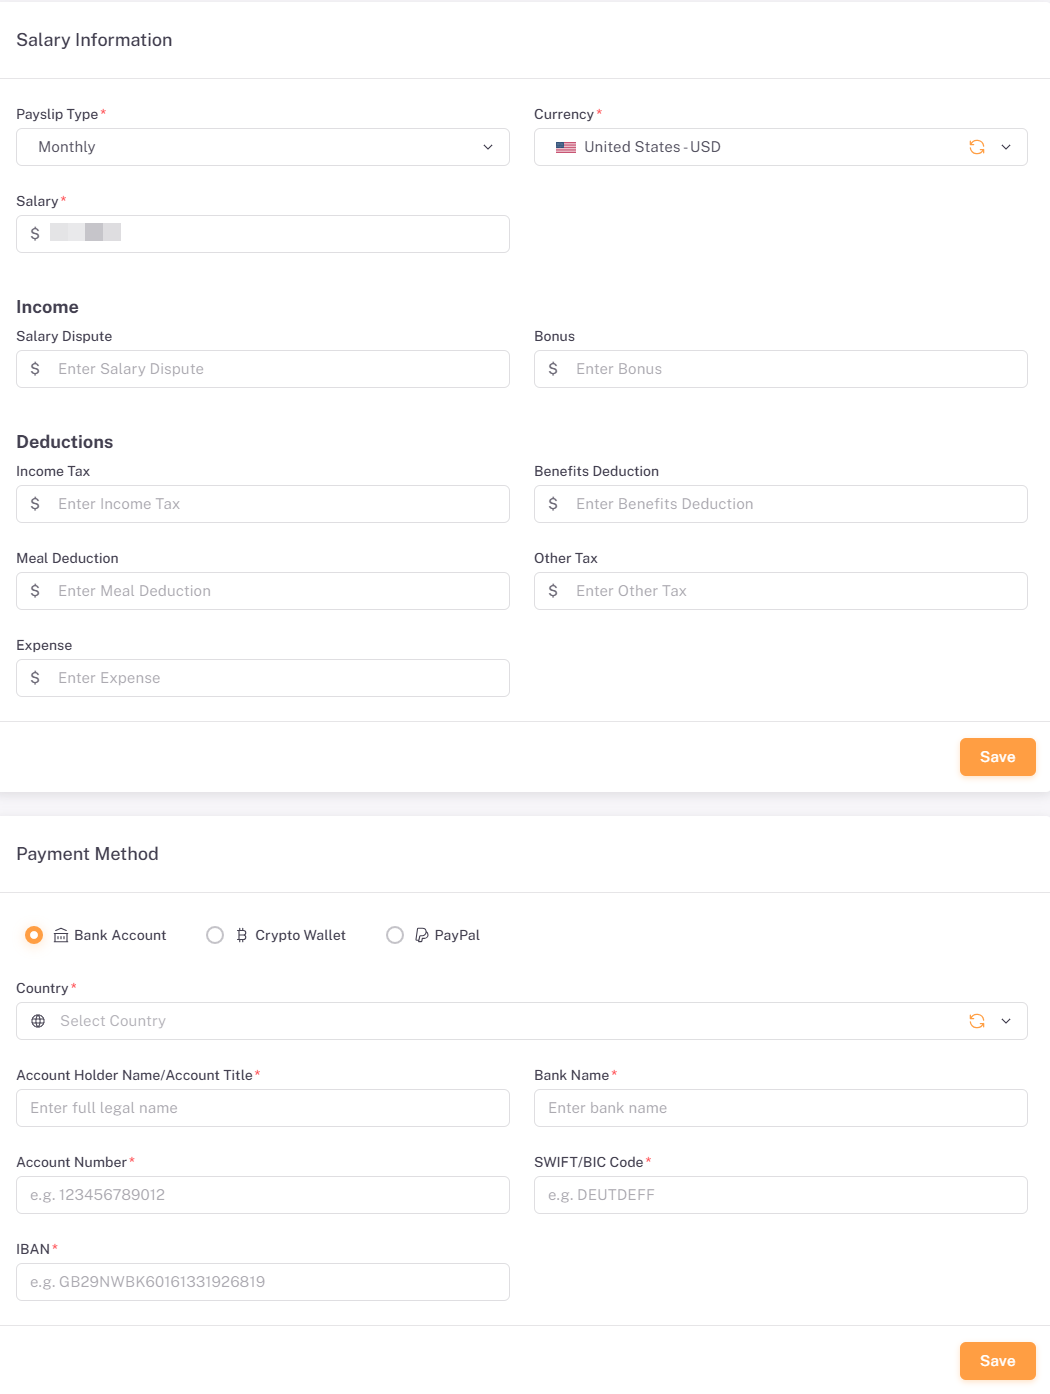
Salary Information
Field | Required | Description |
Payslip Type | Yes | The frequency at which the employee is paid, e.g. Monthly. |
Currency | Yes | The currency the salary is paid in. |
Salary | Yes | The employee's base salary amount. |
Income
Field | Required | Description |
Salary Dispute | No | Any disputed salary amount recorded against the employee. |
Bonus | No | A bonus amount added to the employee's pay. |
Deductions
Field | Required | Description |
Income Tax | No | The income tax amount deducted from the employee's pay. |
Benefits Deduction | No | The amount deducted for employee benefits. |
Meal Deduction | No | The amount deducted for meals. |
Other Tax | No | Any other applicable tax deduction. |
Expense | No | Any expense amount deducted from the employee's pay. |
Click Save at the bottom of the Salary Information section to apply changes to salary, income, and deduction amounts.
Payment Method
The Payment Method section captures how the employee is paid. Select one of Bank Account, Crypto Wallet, or PayPal; the fields displayed depend on the option selected. The fields for Bank Account are:
Field | Required | Description |
Country | Yes | The country of the bank account. |
Account Holder Name / Account Title | Yes | The full legal name on the bank account. |
Bank Name | Yes | The name of the bank. |
Account Number | Yes | The employee's bank account number. |
SWIFT/BIC Code | Yes | The bank's SWIFT or BIC code. |
IBAN | Yes | The employee's International Bank Account Number. |
Click Save at the bottom of the Payment Method section to apply changes.
📜 Note: Salary and payment method information is sensitive. Access to view or edit the Salary Info tab is restricted by role permissions.
Section 8: Goals Tab
The Goals tab lists every goal assigned to the employee, along with due dates, weightage, ratings, and status.
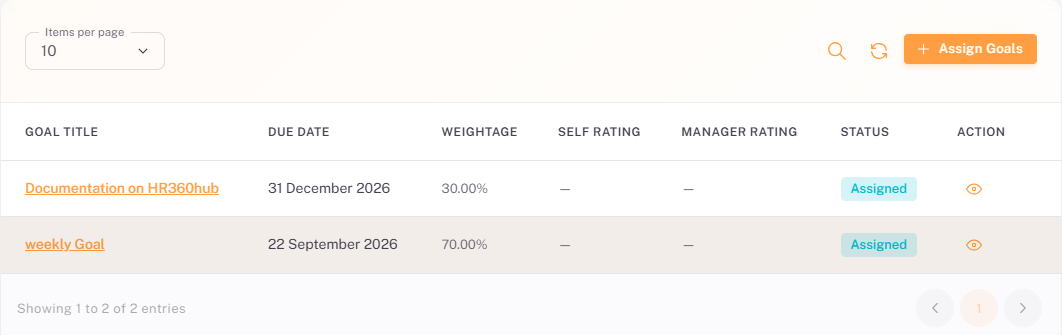
Column | Description |
Goal Title | The name of the goal, shown as a link that opens the goal's detail view. |
Due Date | The date by which the goal is due. |
Weightage | The percentage weight the goal carries toward the employee's overall performance evaluation. |
Self Rating | The employee's self-assessed rating for the goal, once submitted. |
Manager Rating | The manager's rating for the goal, once submitted. |
Status | The current status of the goal, e.g. Assigned. |
Action | Eye icon — view the goal in detail. |
- Items per page selector, Search, and Refresh controls behave as described earlier.
- + Assign Goals button — opens the form to assign a new goal to the employee.
Section 9: Emergency Contact Tab
The Emergency Contact tab lists the emergency contacts recorded for the employee.
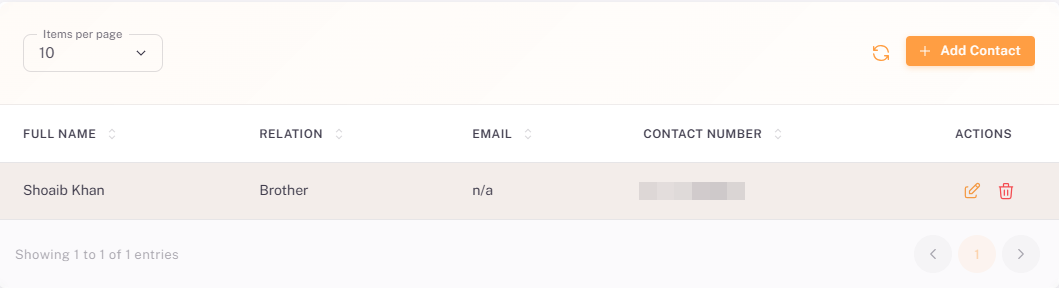
Column | Description |
Full Name | The emergency contact's full name. |
Relation | The contact's relationship to the employee, e.g. Brother. |
The contact's email address, or n/a if not provided. | |
Contact Number | The contact's phone number. |
Actions | Pencil icon — edit the contact. Trash icon — delete the contact. |
- + Add Contact button — opens the form to add anew emergency contact for the employee.
Section 10:Documents Tab
The Documents tab lists documents uploaded for the employee, such as their CV/Resume.
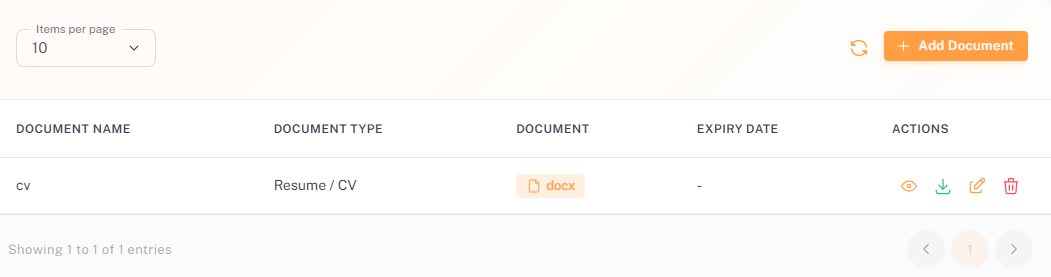
Column | Description |
Document Name | The name given to the uploaded document, e.g. CV. |
Document Type | The category of document, e.g. Resume / CV. |
Document | A badge showing the uploaded file and its format, e.g. docx. |
Expiry Date | The document's expiry date, or a dash if not applicable. |
Actions | Eye icon — preview the document. Download icon — download the file. Pencil icon — edit the document record. Trash icon — delete it. |
- + Add Document button — opens the form to upload a new document for the employee.
Section 11: License Tab
The License tab lists licenses held by the employee, such as insurance or driving licenses.
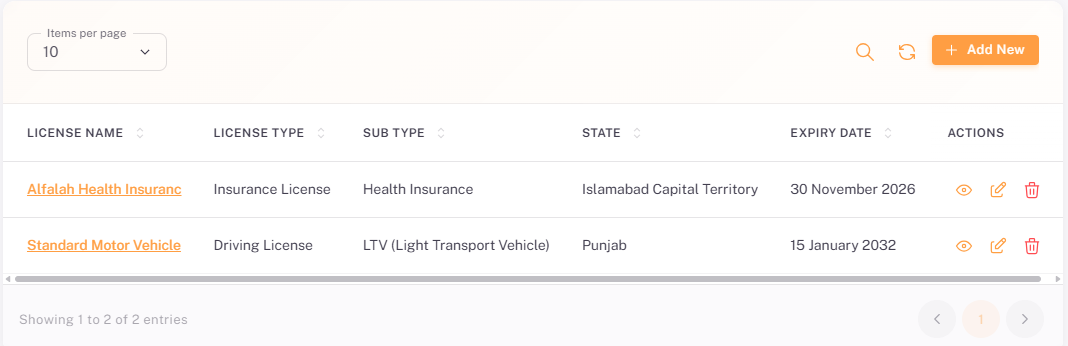
Column | Description |
License Name | The name of the license, shown as a link that opens the license's detail view. |
License Type | The category of license, e.g. Insurance License, Driving License. |
Sub Type | The specific sub-type of the license, e.g. Health Insurance, LTV (Light Transport Vehicle). |
State | The state or province the license is registered in. |
Expiry Date | The date the license expires. |
Actions | Eye icon — view the license. Pencil icon — edit it. Trash icon — delete it. |
- + Add New button — opens the form to add a new license record for the employee.
Section 12: Hub AI Usage Tab
The Hub AI Usage tab shows the employee's individual consumption of HR360 Hub AI credits.
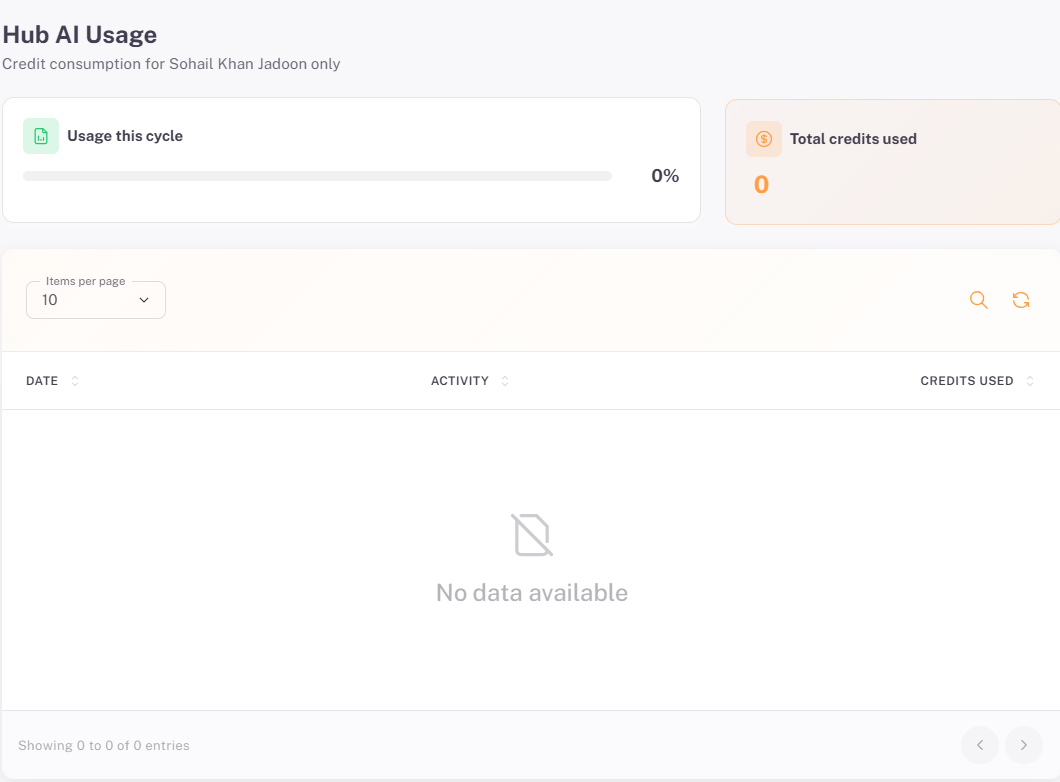
Field | Description |
Usage this cycle | A progress bar showing the percentage of the employee's AI credit allowance used in the current billing cycle. |
Total credits used | The total number of AI credits consumed by the employee to date. |
Below the summary cards, a table lists the employee's individual AI activity:
Column | Description |
Date | The date the AI activity occurred. |
Activity | The type of AI activity performed. |
Credits Used | The number of credits consumed by that activity. |
📜 Note: Hub AI Usage figures on this tab reflect credit consumption for this employee only, and do not include AI usage by other employees.
Section 13: Employee History Tab
The Employee History tab keeps a consolidated, chronological log of the changes and actions recorded against the employee's record — from profile edits to leave, goal, territory, appraisal, project, and disciplinary activity. Each entry shows what changed, who made the change, and when.
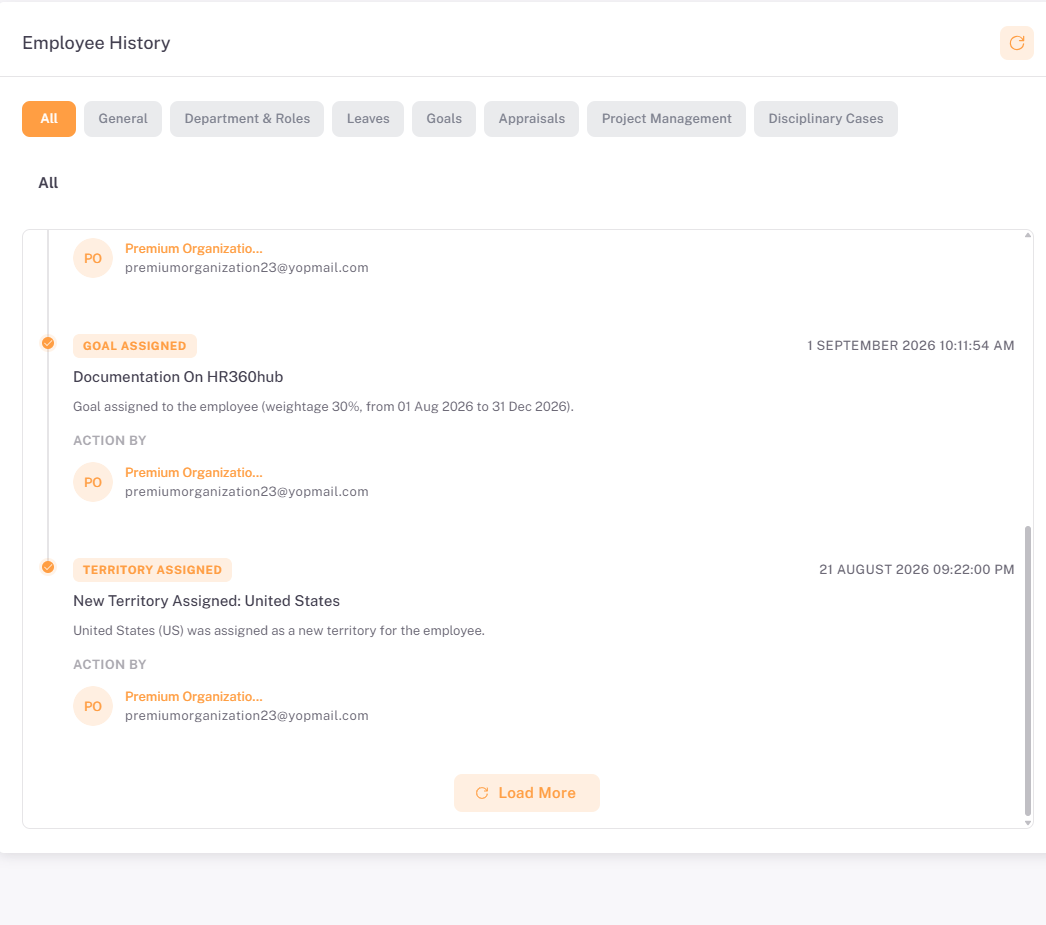
Filter Categories
A row of filter chips at the top of the tab narrows the timeline to a single category of activity:
Category | Description |
All | Shows every history entry across all categories in a single chronological timeline. |
General | Changes to core profile fields, e.g. nationality. |
Department & Roles | Changes to department, designation, role, reporting line, or territory assignment. |
Leaves | Leave balance updates and leave type assignments. |
Goals | Goals assigned to the employee and related goal changes. |
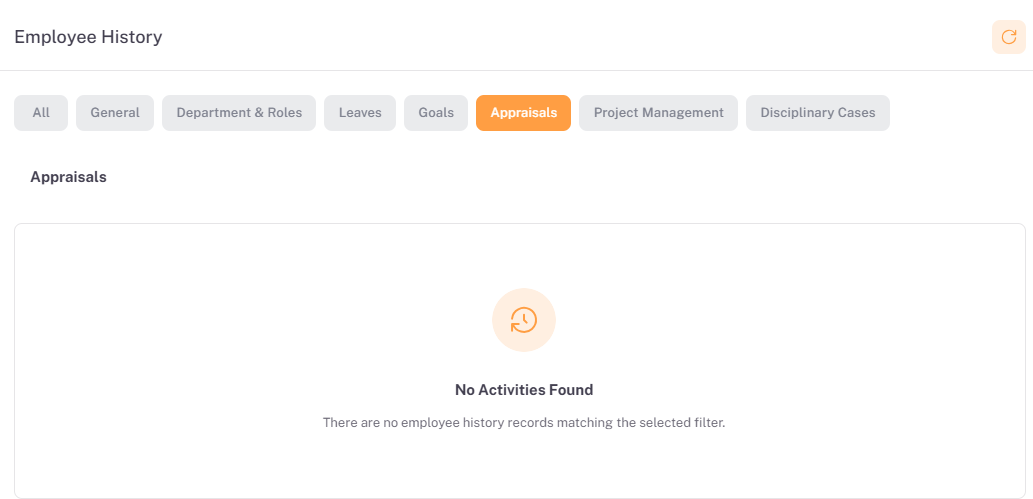
Appraisals | Performance appraisal and evaluation activity. |
Project Management | Activity related to projects the employee is added to or removed from. |
Disciplinary Cases | Disciplinary actions recorded against the employee. |
Activity Entries
Each entry in the timeline shows the following:
Element | Description |
Action badge | A colored label identifying the type of change, e.g. Goal Assigned, Nationality Updated, Territory Assigned, Leave Updated, Leave Assigned. |
Title | A short summary of the change, e.g. "New Territory Assigned: United States". |
Description | Additional detail about the change. |
Action By | The user, or system organization, who performed the change, shown with an avatar, name, and email address. |
Timestamp | The date and time the change was recorded, shown at the top right of the entry. |
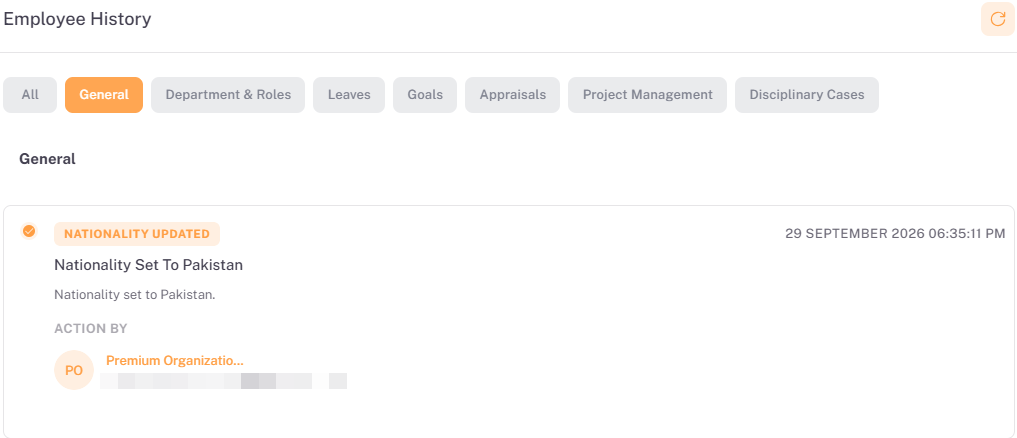
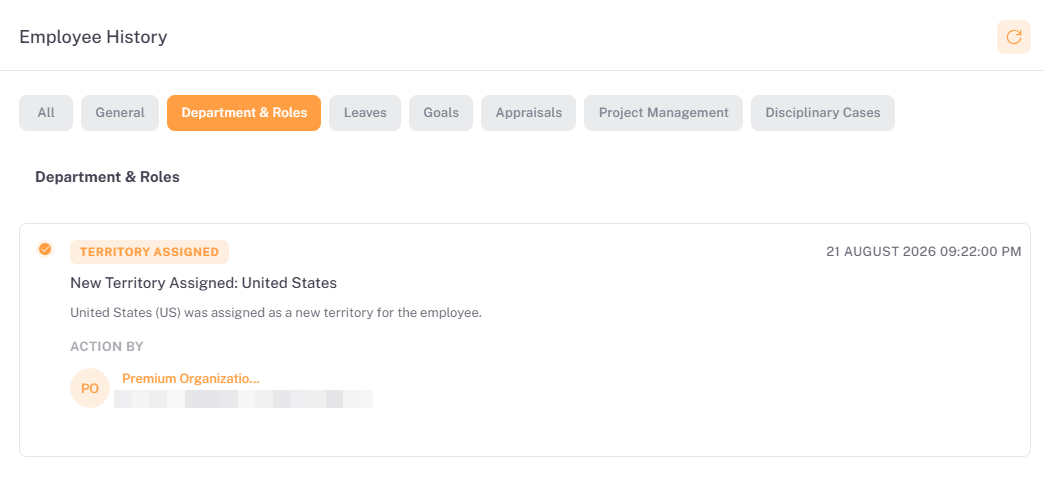
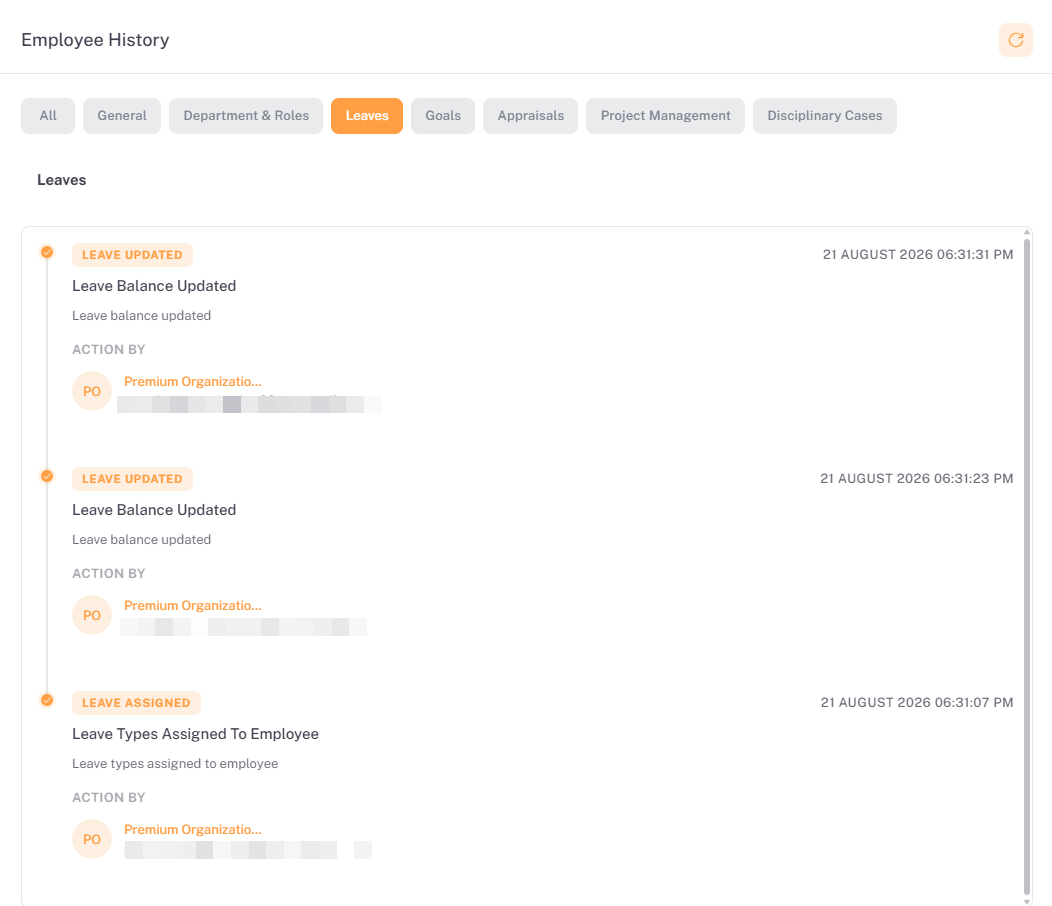
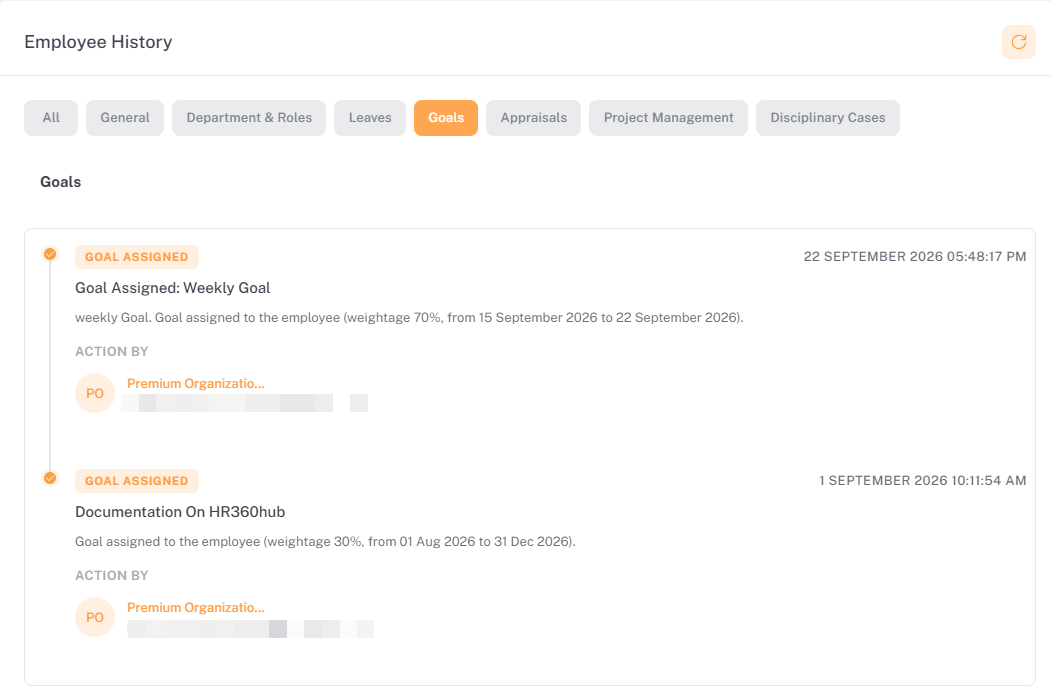
💡 Tip: Click Load More at the bottom of the All view to load older entries. Refresh reloads the timeline for the currently selected category.
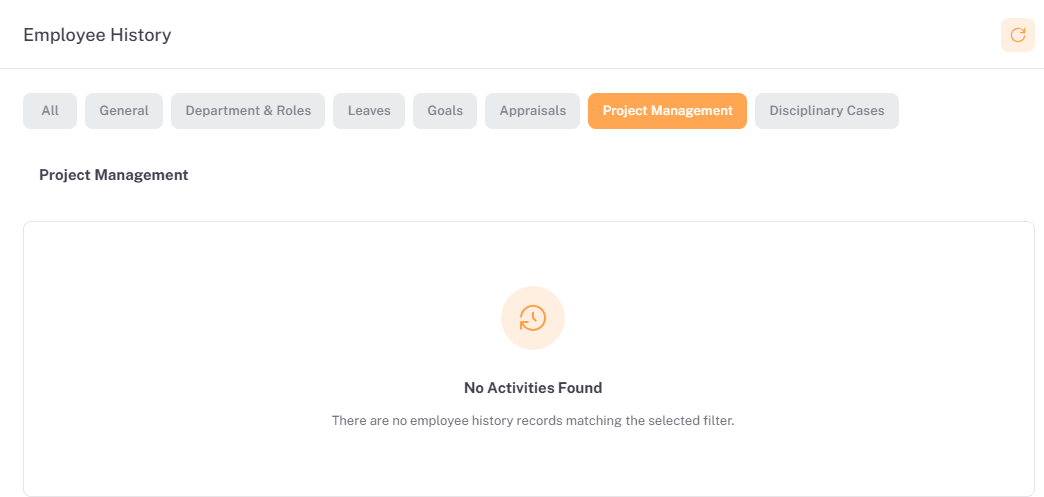
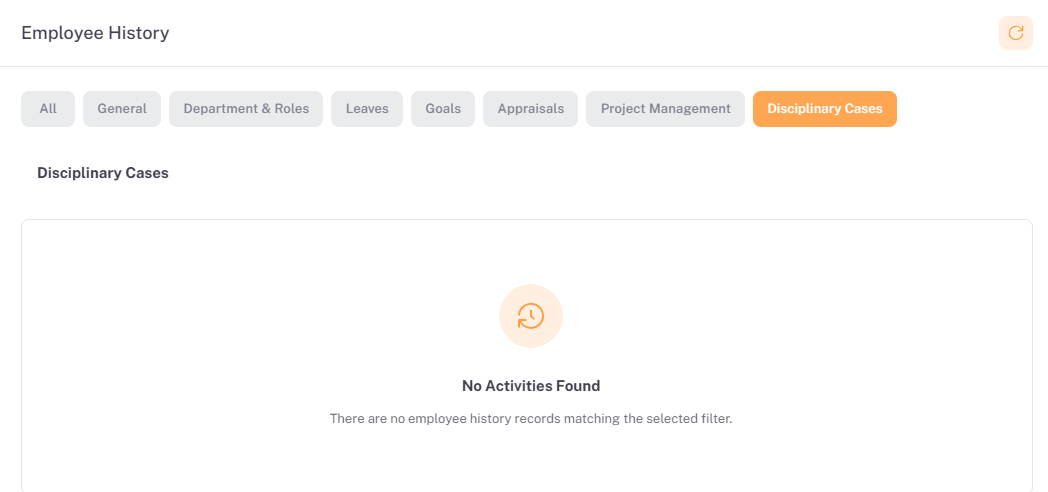
📜 Note: Categories with no recorded activity, such as Appraisals, Project Management, or Disciplinary Cases for an employee with no such history, display a "No Activities Found" empty state instead of a timeline.
Section 14:Territories Tab
The Territories tab manages which territories the employee is assigned to, and shows a log of territory assignment activity.
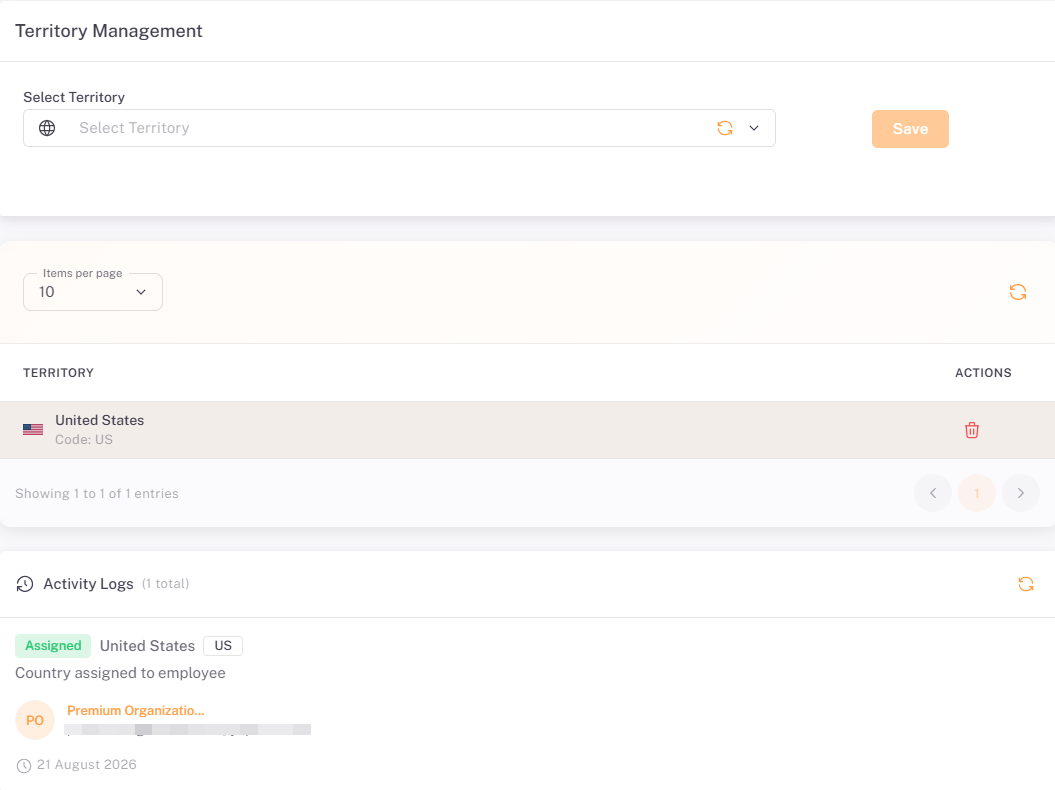
Assigning a Territory
- Select a territory from the Select Territory dropdown.
- Click Save to assign the territory to the employee.
Assigned Territories
Column | Description |
Territory | The assigned territory, shown with its flag and country code. |
Actions | Trash icon — remove the territory assignment. |
Activity Logs
The Activity Logs panel records the history of territory assignments for the employee, showing the action taken (e.g. Assigned), the territory affected, a short description, who performed the action, and the date it occurred.
Section 15: Login History Tab
The Login History tab shows the devices the employee has recently used to log in to the HRMS Portal.
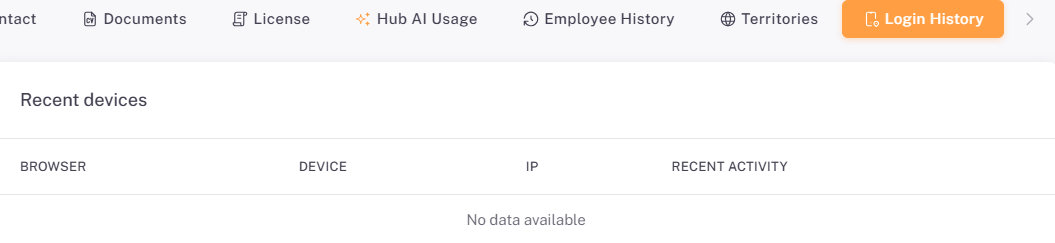
📜 Note: If the employee has not logged in from a new device recently, or device tracking data is unavailable, the table displays "No data available".
Summary
The following table provides a complete step-by-step summary of all key workflows in the Employees module:
# | Action / Step | Result |
1 | Access Employees List: Log in → Employees in left sidebar → Employees List. | Employees List page opens showing summary cards and the employee table. |
2 | Review Employees List: Employees → Employees List. | Listing of all employees with name, designation, contact number, country, role, and status. |
3 | Open an Employee Profile: Click the Eye icon for any employee. | Employee Profile page opens showing the profile summary panel and tab navigation. |
4 | Update Basic Information: Basic Information tab → edit Personal Identity, Demographic, Location, or System & Preferences fields → Click Update Profile. | Employee's personal and contact details are updated. |
5 | Update Contract: Contract tab → edit employment, department, and reporting fields → Click Save. | Employee's contract details are updated. |
6 | Review Leave: Open the Leave tab. | Leave balances by leave type are displayed. |
7 | Update Salary Info: Salary Info tab → edit Salary Information, Income, Deductions, or Payment Method → Click Save. | Employee's compensation and payment details are updated. |
8 | Assign a Goal: Goals tab → Click + Assign Goals. | New goal assigned to the employee and added to the Goals table. |
9 | Add Emergency Contact: Emergency Contact tab → Click + Add Contact. | New emergency contact added to the employee's record. |
10 | Add a Document: Documents tab → Click + Add Document. | New document uploaded to the employee's record. |
11 | Add a License: License tab → Click + Add New. | New license record added for the employee. |
12 | Review Hub AI Usage: Open the Hub AI Usage tab. | Employee's individual AI credit consumption and activity are displayed. |
13 | Review Employee History: Employee History tab → select a filter category. | Chronological log of changes for that category is displayed. |
14 | Assign a Territory: Territories tab → select a territory → Click Save. | Territory assigned to the employee and recorded in the Activity Logs. |
15 | Review Login History: Open the Login History tab. | Employee's recent login devices and activity are displayed. |
16 | Deactivate or Activate an Employee: Profile summary panel → Click Deactivate (or Activate). | Employee's portal access is revoked or restored, and the status badge updates immediately. |