

Overview
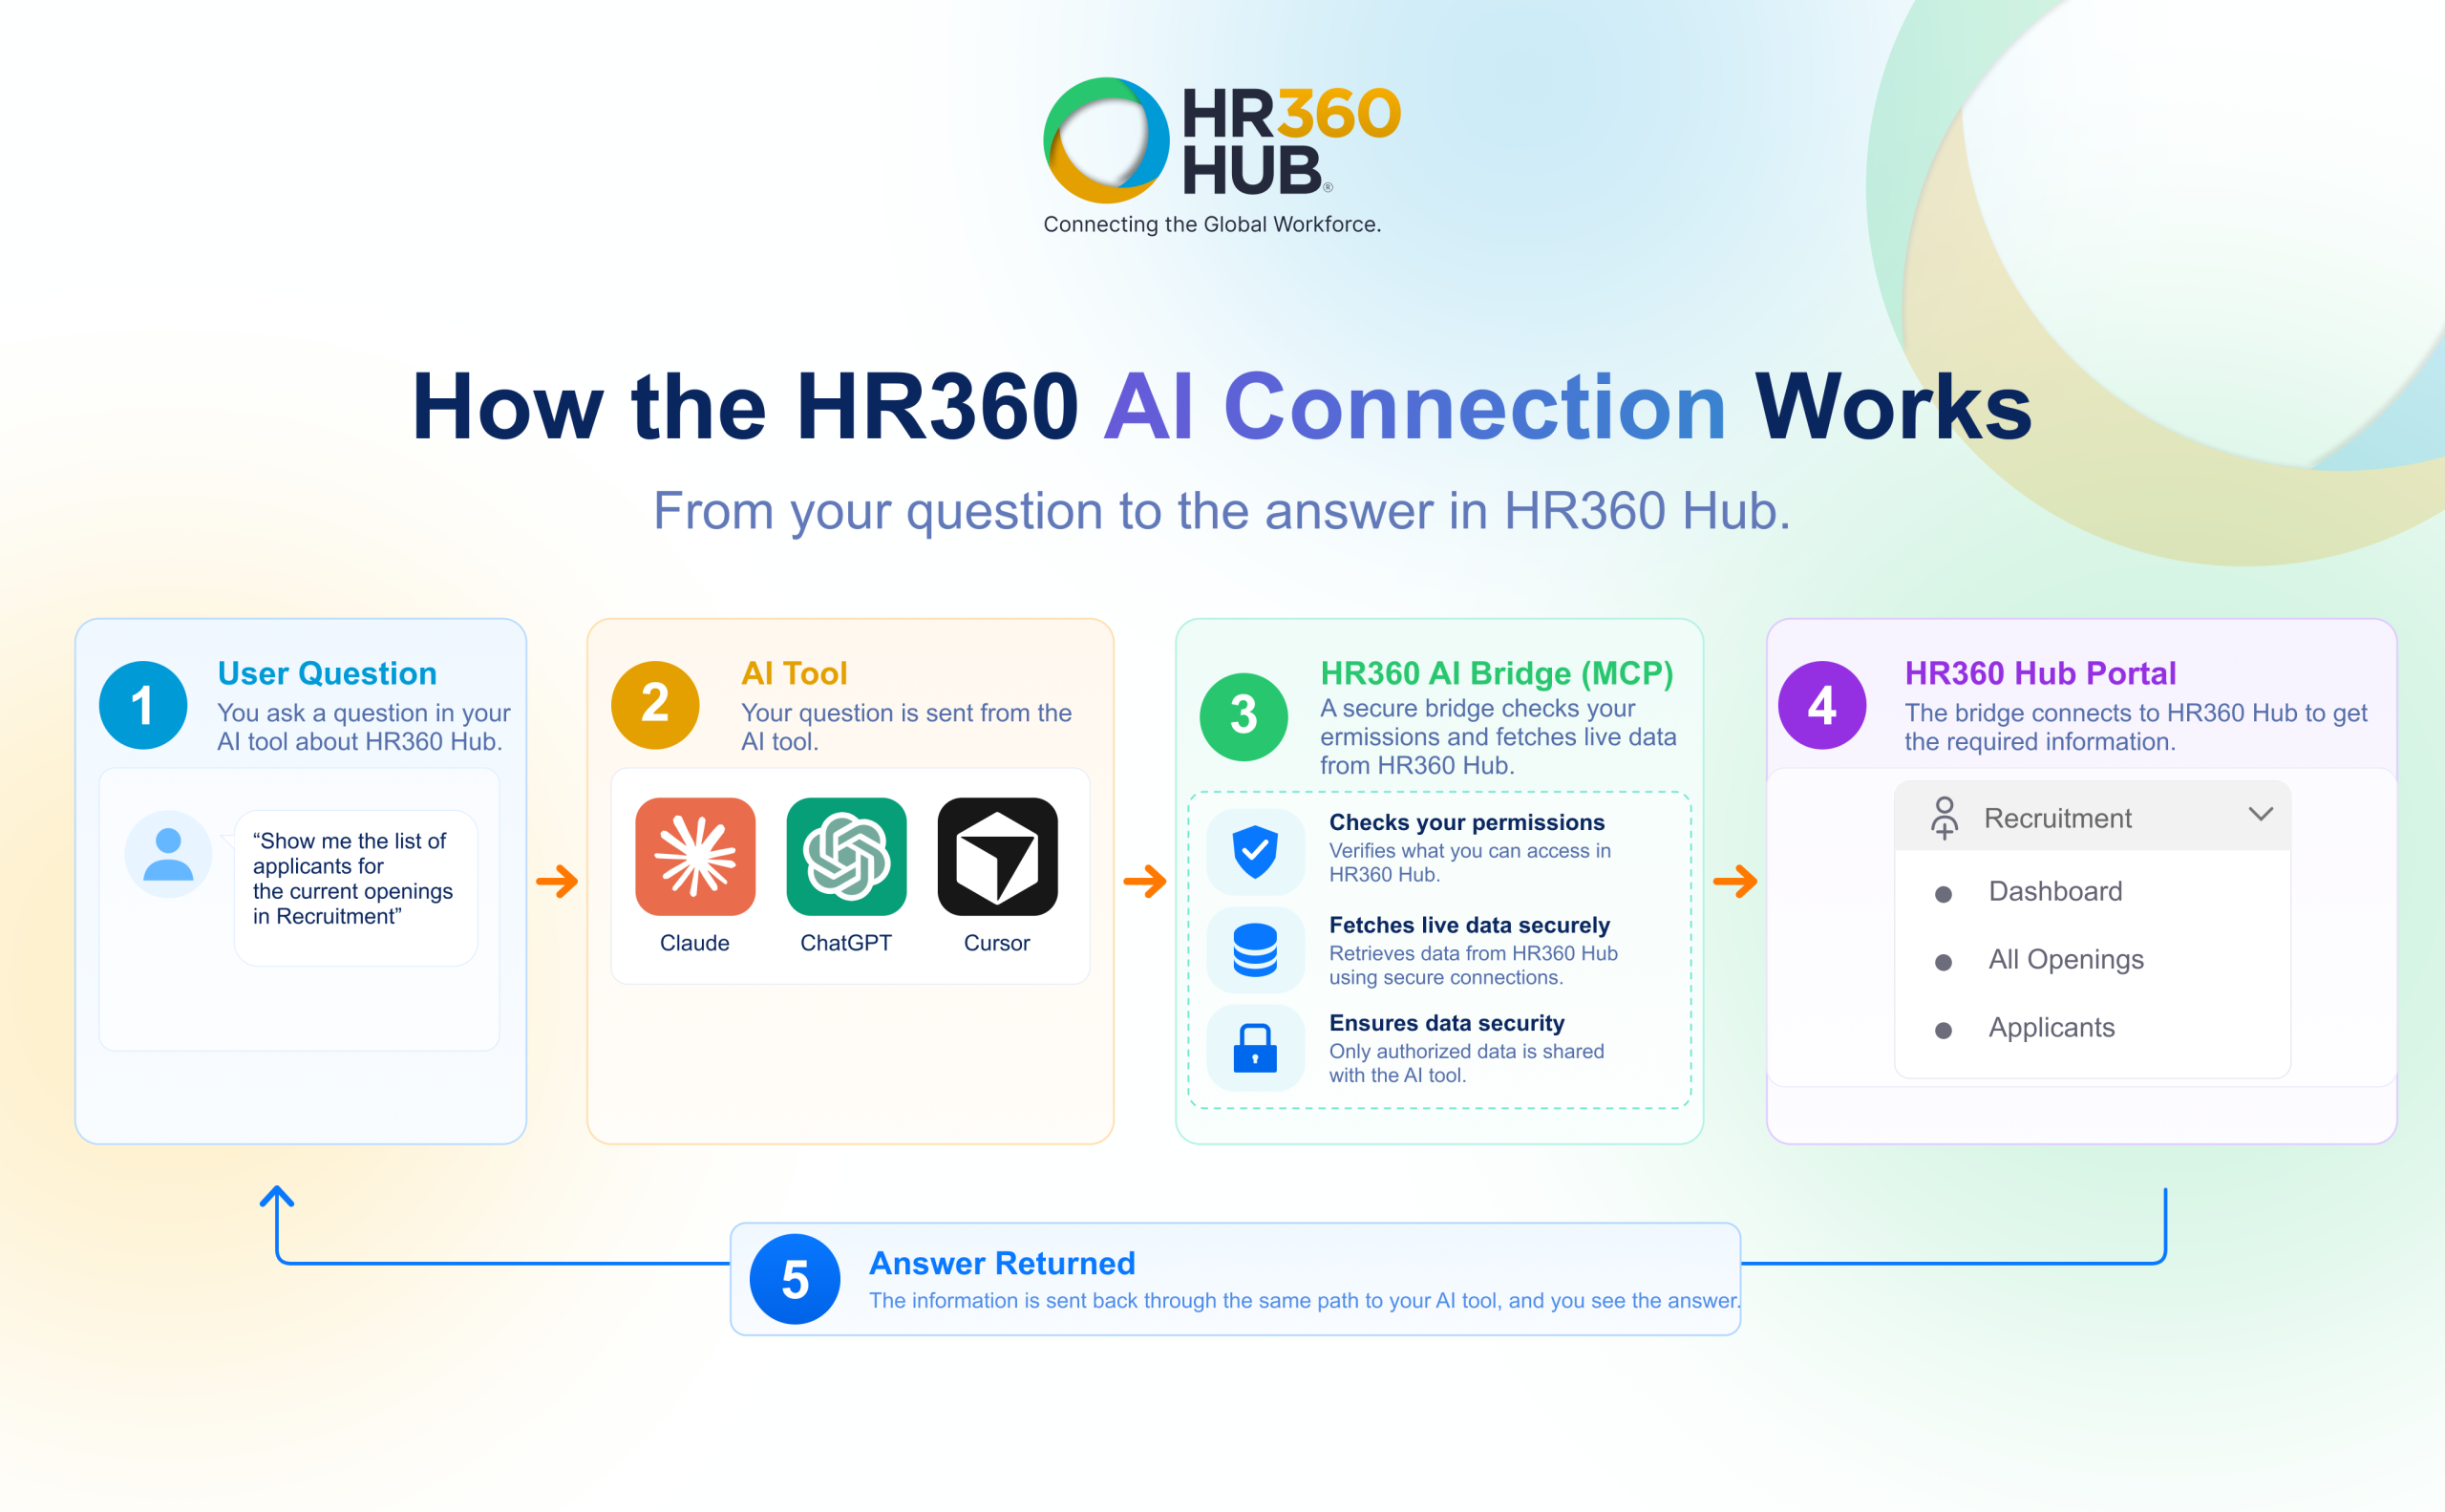
The AI Assistant (MCP) connection in HR360 Hub links an AI chat tool like Claude, Chat GPT or Cursor directly to your organization's HR360 Hub portal using the Model Context Protocol (MCP). Instead of opening menus, applying filters and exporting spreadsheets, users simply type a question in plain language and receive live answers about candidates, job openings and employees.
Every question travels from the AI tool through a secure bridge that checks the user's role permissions, and then to the HR360 Hub portal. The answer returns along the same path, so users only ever see data they are already allowed to see.
This guide covers:
- How the AI connection works and the everyday tasks it simplifies.
- The areas of HR360 Hub that the AI tool can read from.
- How to generate, copy, manage and revoke a secret key from My Profile.
- How to connect Claude (web),Chat GPT and desktop tools such as Cursor and Claude Desktop.
- Which tools are available and the role permission each one requires.
- Example prompts, security and privacy safeguards, and answers to common questions.
📜 Note: Access to the AI Connections tab and to each AI tool is controlled by role permissions. The baseline permission mcp.read is required for all users; without it, every request is rejected with a 403 Forbidden error.
Prerequisites
Before connecting an AI tool, ensure the following are in place:
- The user must be logged in toHR360 Hub with a role that includes the read permissions.
- The AI Connections tab must be visible under My Profile .If it is not, ask your HR360 Administrator to add permissions to your role under Roles & Permissions.
- The user must have an account with the AI tool being connected (Claude, Chat GPT, Cursor, Claude Desktop, Antigravity or Windsurf).
- Additional recruitment and employee permissions (listed in Section 5) are needed for each tool the user wants to use.
Section 1: Understanding theAI Connection
The HR360 AI Connection saves time on everyday HR tasks. Rather than navigating the portal, applying filters and exporting data, users ask a question and the AI tool retrieves the answer from HR360 Hub in real time.
1.1. Traditional Way vs. HR360 AI Way
The table below compares common tasks performed the traditional way with the same tasks performed through the AI connection.
Traditional Way | HR360 AI Way |
Open each applicant to read notes and call history before an interview. | Ask: "Summarize the recruiter call notes and interview history for candidate Tariq." |
Collect hiring numbers by hand for the weekly management slides. | Ask: "Summarize our hiring pipeline across all open jobs this month." |
Search the employee directory for contact details. | Ask: "Look up Sarah Jenkins from Marketing and share her email." |
Section 2: Supported Areas
The AI connection covers five areas of the HR360 Hub portal. The AI tool can read information from each area, subject to the user's role permissions.
Area | What You Can Do |
Recruitment Dashboard |
|
Job Openings |
|
Applicant Search |
|
Portal Settings |
|
Employee Directory |
|
📜 Note: The AI connection is read-only. The AI tool can retrieve and summarize information, but it can never create, change or delete records in HR360 Hub.
Section 3: Generating Your MCP Configuration
Desktop AI tools such as Cursor and Antigravity connect to HR360 Hub using an MCP configuration that is generated from the AI Connections tab. Users can create their own key and configuration in a few minutes, with no IT ticket required. The path is: My Profile → AI Connections → + Generate New Key.
The MCP Secret Key Generated window shows both a Secret Key and an MCP Configuration. Only the MCP Configuration is used; the secret key is not used anywhere on its own. Claude (web and desktop app) and Chat GPT do not need the MCP configuration, because they authenticate on their own through sign-in(OAuth).
⚠️ Important: The user's HR360 Hub account must have the MCP read permissions. Without it, the server rejects every request with 403 Forbidden. If the AI Connections tab is not visible, ask your HR360 Administrator to add MCP Connections to your role under Roles & Permissions.
3.1. Opening the AI Connections Tab
- Log in to HR360 Hub.
- Click the user avatar in the top‑right corner, then select My Profile from the dropdown menu.
- Click the AI Connections tab. The tab lists all keys you have created.
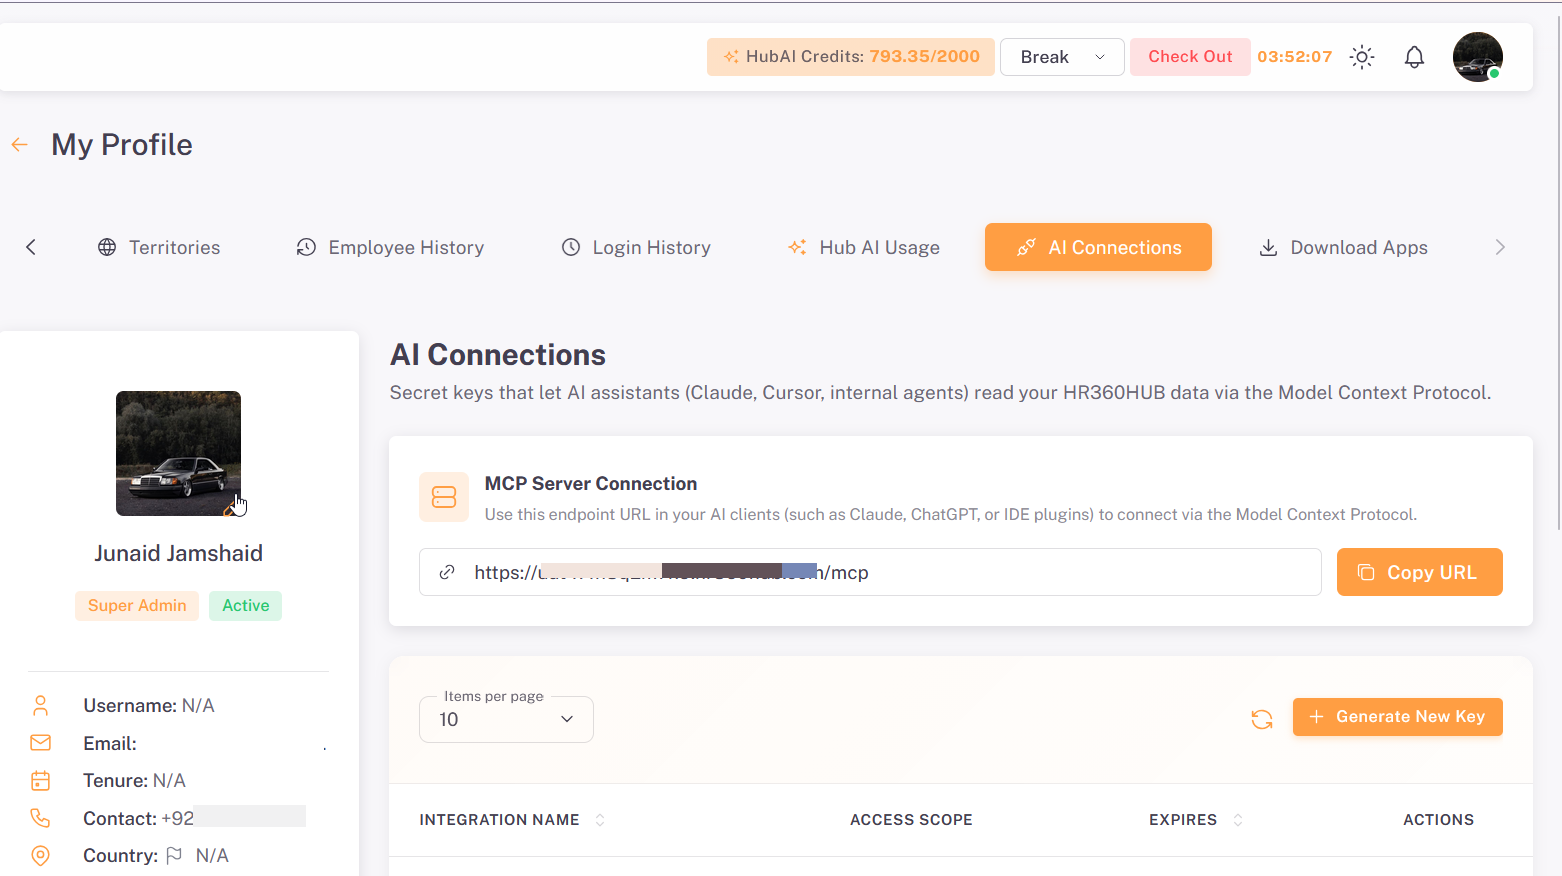
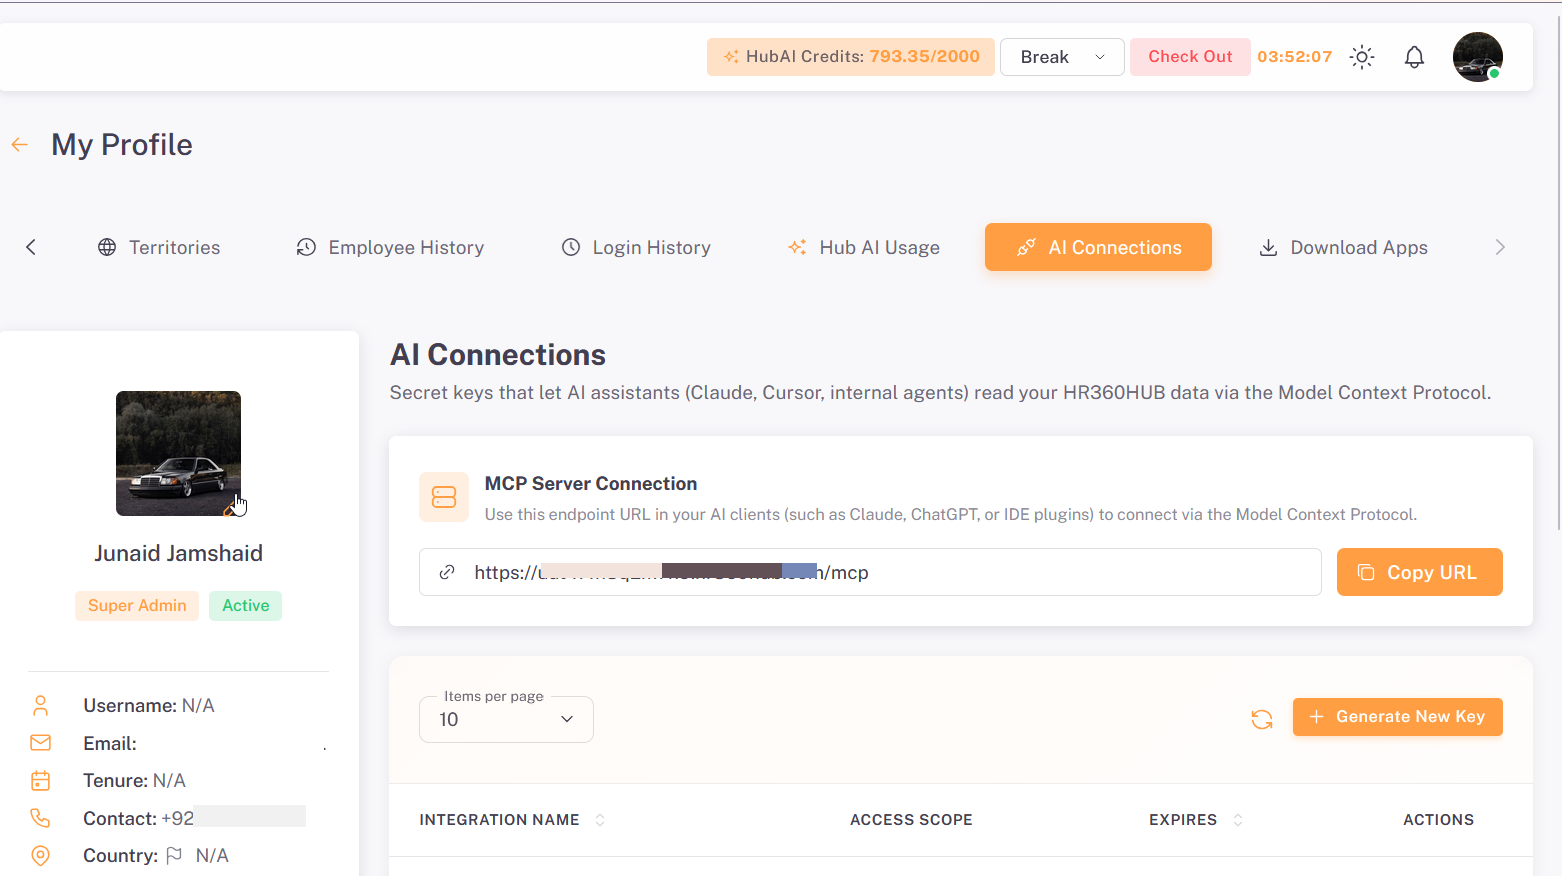
The AI Connections page contains the following elements:
Element | Description |
MCP Server Connection | Displays the MCP endpoint URL for your environment. Use this URL in your AI clients (such as Claude, Chat GPT or IDE plugins) to connect via the Model Context Protocol. |
Copy URL | Copies the MCP endpoint URL to the clipboard so it can be pasted into your AI tool's configuration. |
Items per page | Controls the number of keys displayed per page (default: 10). |
Refresh icon | Reloads the listing to reflect the latest changes. |
+ Generate New Key | Opens the Generate New Key window to create a new secret key. |
Key listing table | Lists each key with its Integration Name, Access Scope, Expiry date and Actions. |
3.2. Generating a New Key
Click + Generate New Key and complete the pop-up window as described below, then click Generate Key.
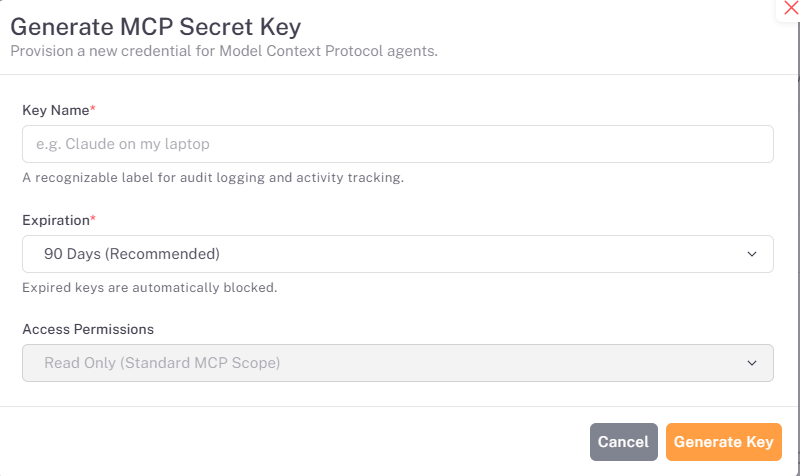
Field | Required | Description |
Key Name | Yes | Enter a clear name for tracking, e.g. Claude on my Laptop, Cursor IDE or Chat GPT Assistant. |
Expiration | Yes | Select 90 Days (recommended), 30 Days or 1 Year. Expired keys are blocked automatically. |
Access Permissions | Auto | Set automatically to Read Only, so the AI can read data but never change or delete it. |
3.3. Copying and Saving the Key
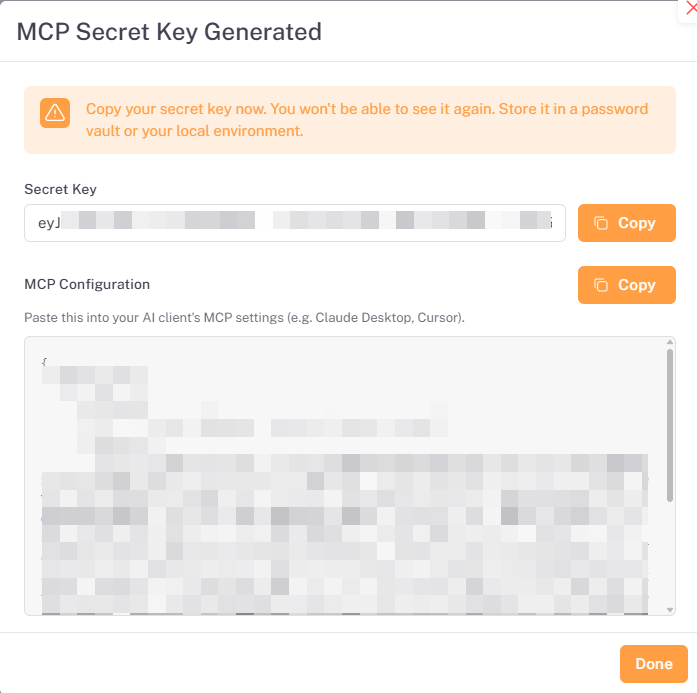
After the key is generated, an MCP Secret Key Generated window appears. It shows a Secret Key and an MCP Configuration block.
- Click Copy next to MCP Configuration to copy the configuration. This is the value used when adding the HR360 Hub MCP connector in desktop tools such as Cursor and Antigravity(see Section 4.3).
- Click Done to close the window.
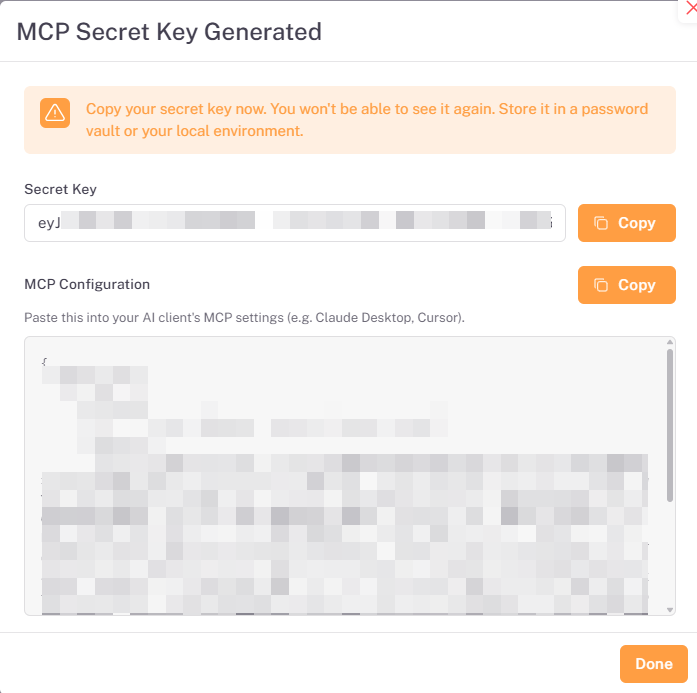
⚠️ Important: Copy the MCP Configuration now. The values cannot be shown again after the window is closed. If they are lost, revoke the key and generate a new one.
📜 Note: The MCP configuration is copied and used when adding the HR360 Hub MCP connector in desktop tools such as Cursor and Antigravity(Section 4.3).
📜 Note: TheMCP configuration is not needed when adding the connector in Claude(web and desktop app) or Chat GPT. These only need the server URL, copied using Copy URL in the MCP Server Connection section (see Figure2), and they authenticate by signing in, as described in Sections 4.1 and 4.2.
3.4. Managing and Revoking Keys
The AI Connections table shows each key's name, access scope(Read-only) and expiry date. To disconnect a tool or replace a laptop, click the red trash icon in the Actions column. The key stops working immediately.
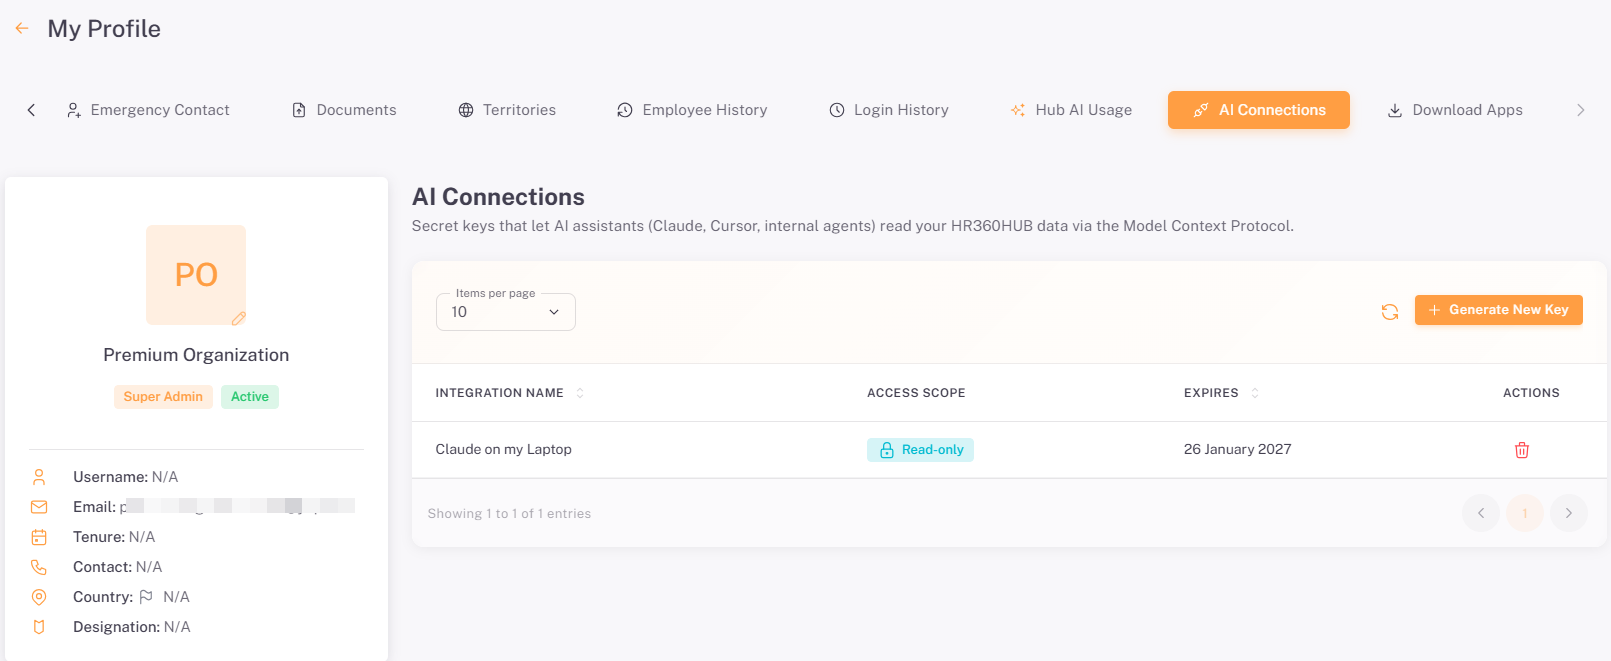
💡 Tip: Create a separate key for each tool or device (for example, one for your laptop and one for Cursor). If a device is lost, you can revoke just that key without disconnecting your other tools.
Section 4: Connecting Your AI Tool
Claude (web and desktop app) and Chat GPT connect with sign-in (OAuth) and need only the server address; no MCP configuration is required. Desktop development tools such as Cursor and Antigravity are connected by adding the MCP configuration generated in Section 3 to their MCP configuration file.
The server address for your environment can also be copied directly from the MCP Server Connection section on the AI Connections tab by clicking Copy URL.
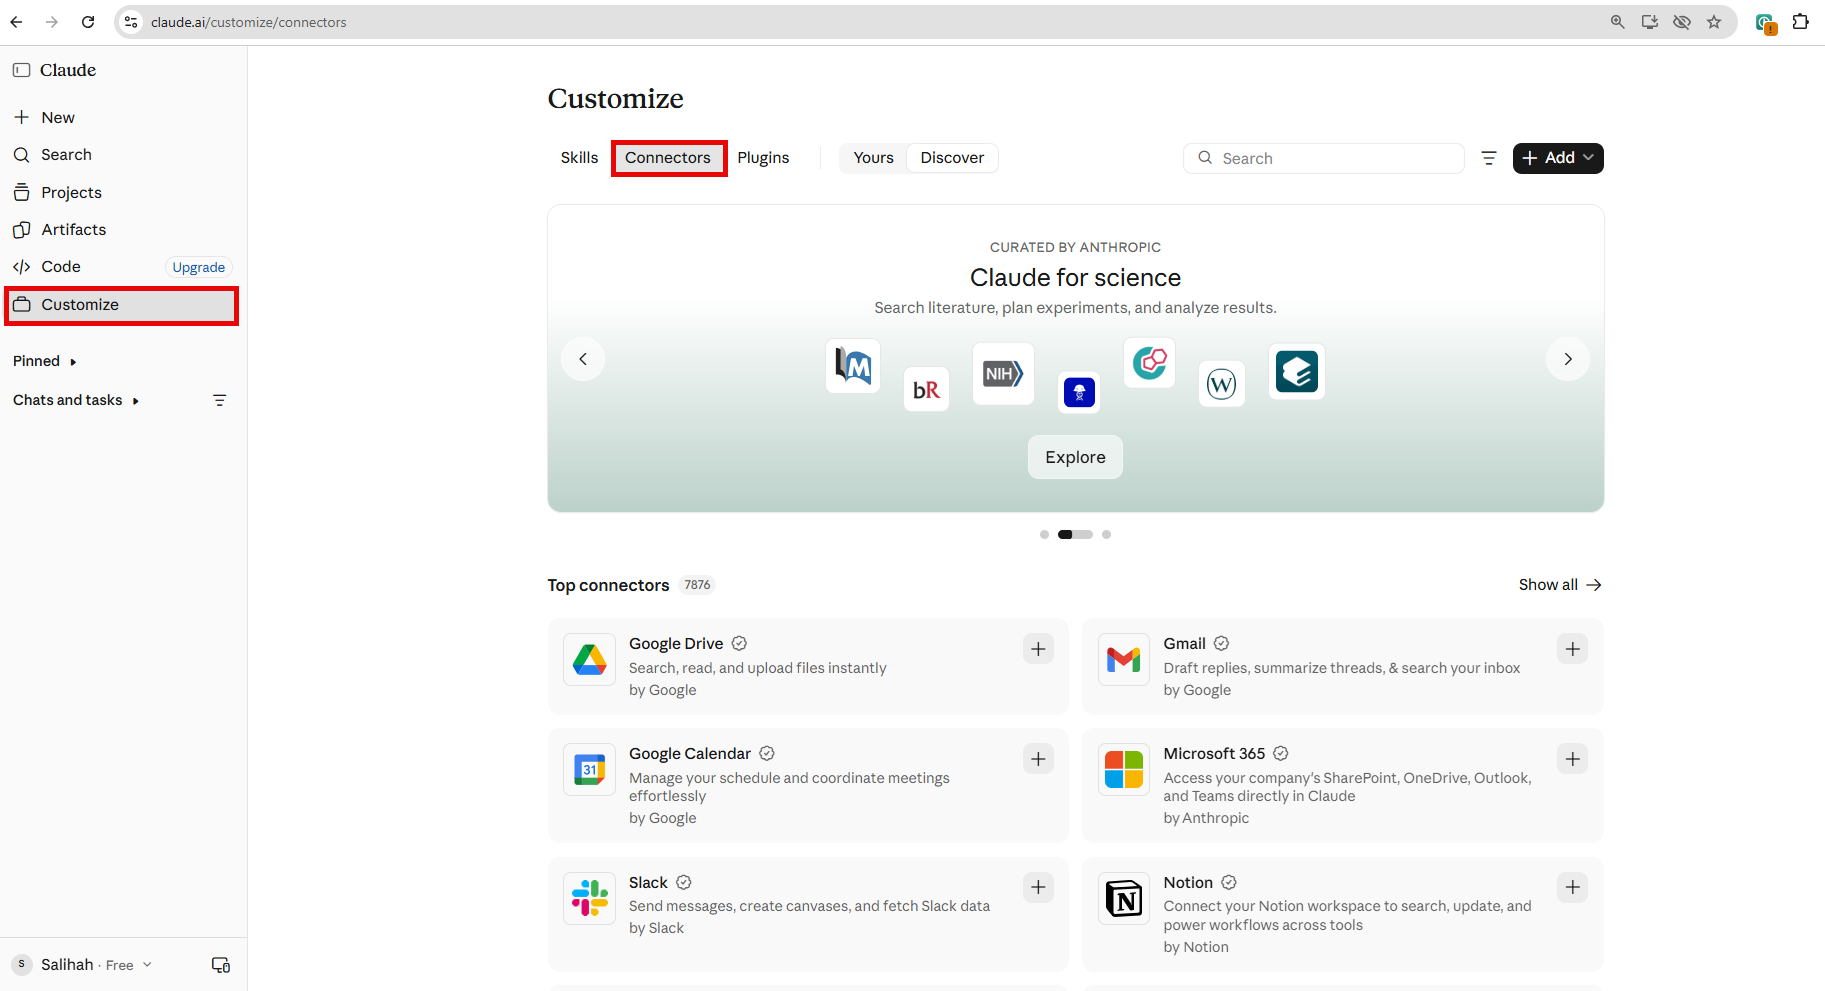
Open Claude at claude.ai. In the left sidebar, click Customize, then open the Connectors tab.
4.1. Claude (Web and Desktop App) — OAuth, No MCP Configuration Needed
The Claude desktop app adds the connector in the same way as Claude on the web, using the steps below.
- Open Claude (claude.ai or the Claude desktop app). In the left sidebar, click Customize, then open the Connectors tab.
- Click + Add and choose Add custom connector.
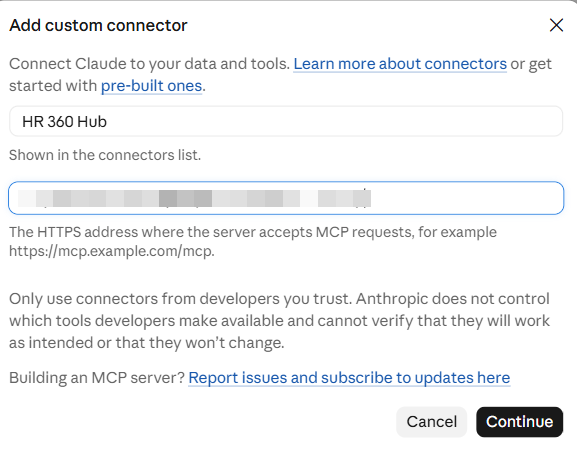
- Enter the name HR 360 Hub and the server address for your environment, then click Continue.
- Claude detects the sign-in method automatically (Sign in now) and registers the OAuth client automatically. Click Add.
- On the HR 360 Hub connector page, click Connect.
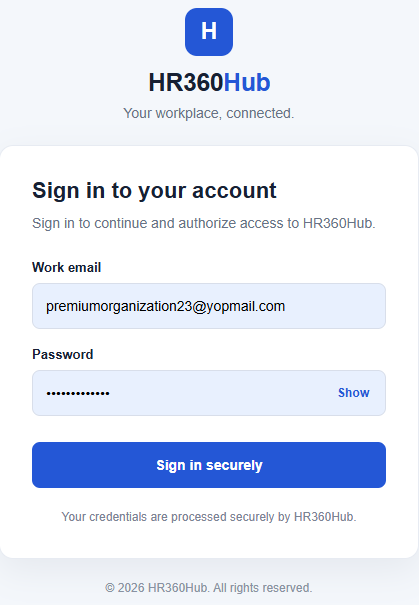
- If you are not logged in, you are sent to the HR360 Hub sign-in page. Sign in with your work email and password.
- On the Authorize Claude screen,review the requested permission (MCP read-only access) and click Authorize.
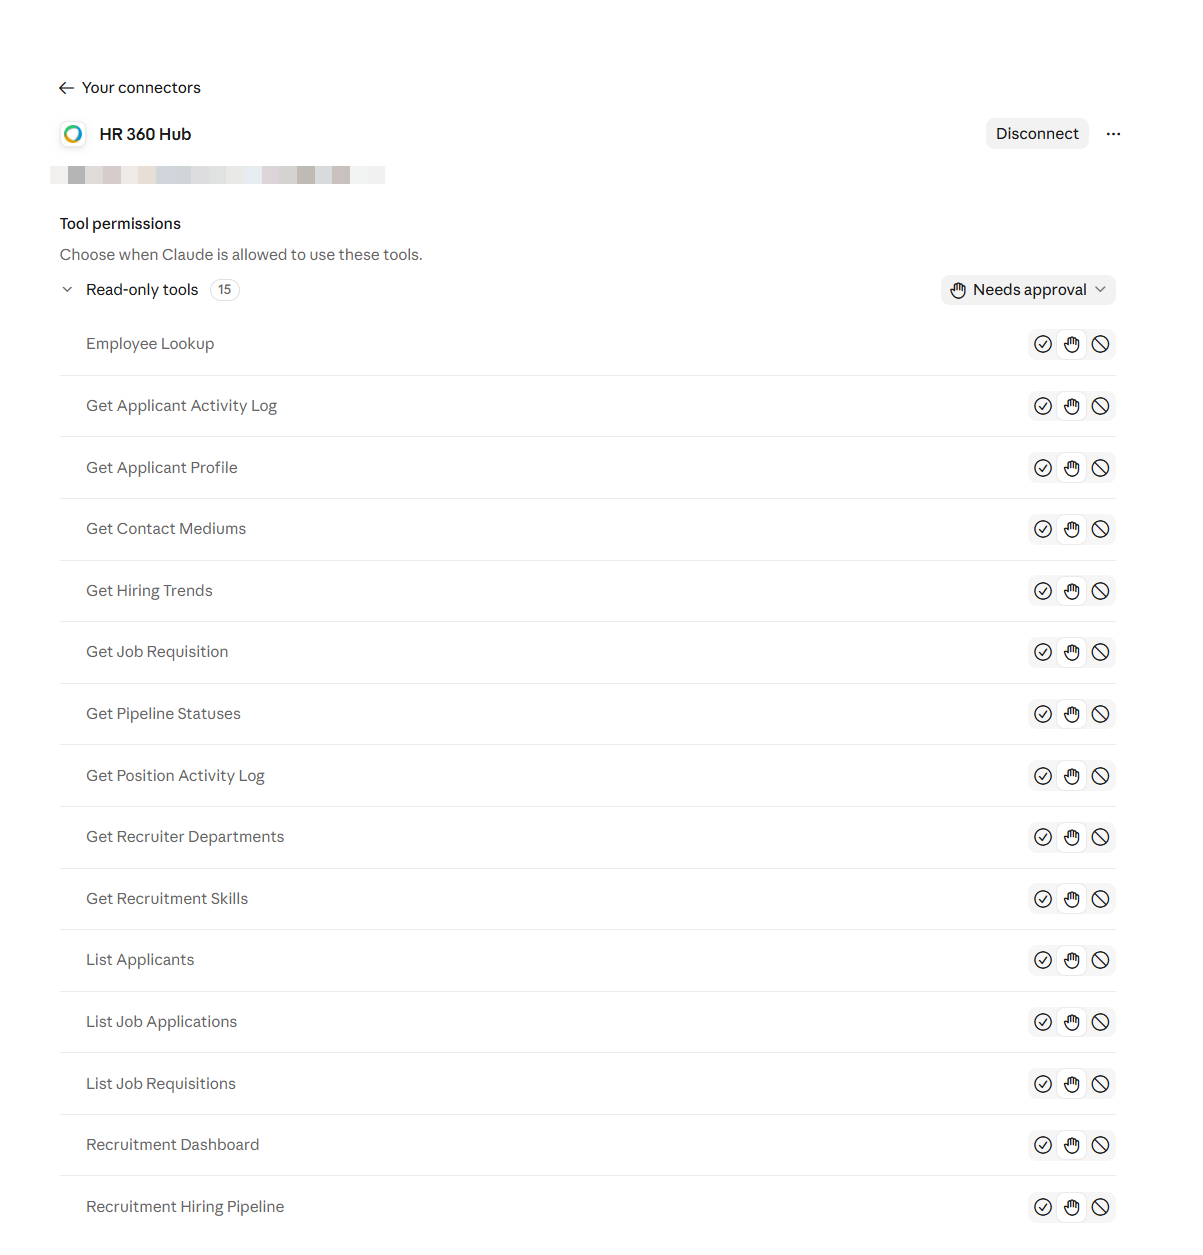
- Back in Claude, the connector page lists your allowed read-only tools (up to 15). The permission of each tool can be customized on this page (see Section 5.2).
4.2. Chat GPT
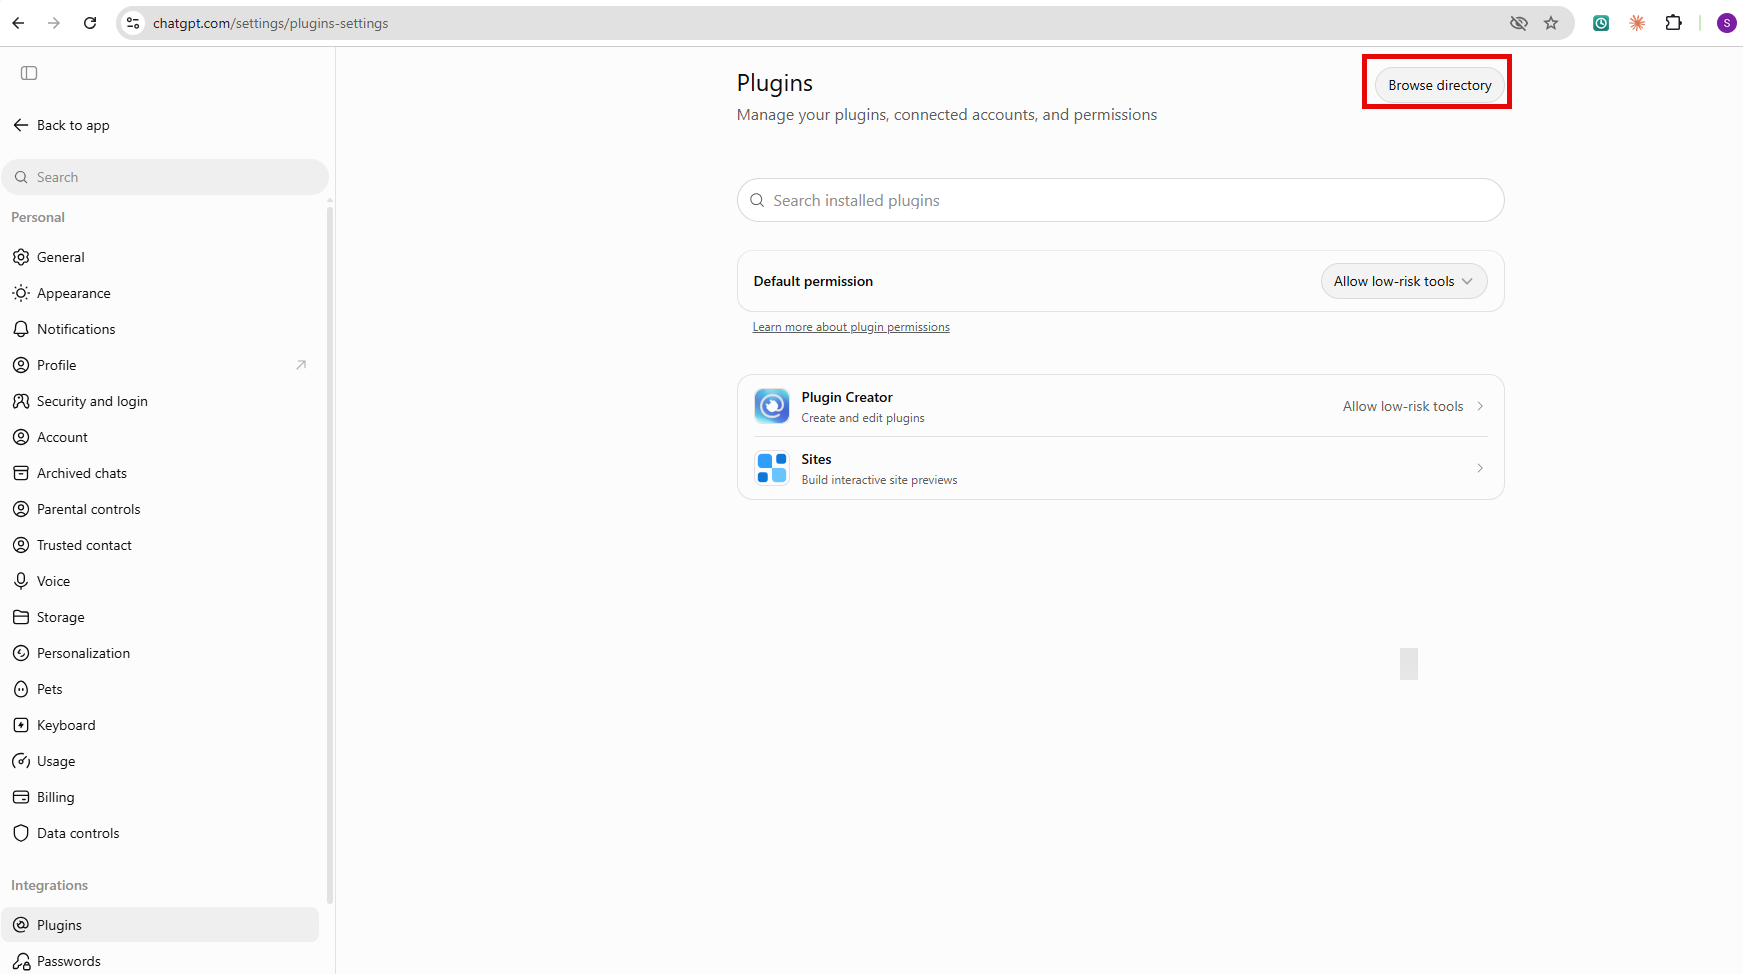
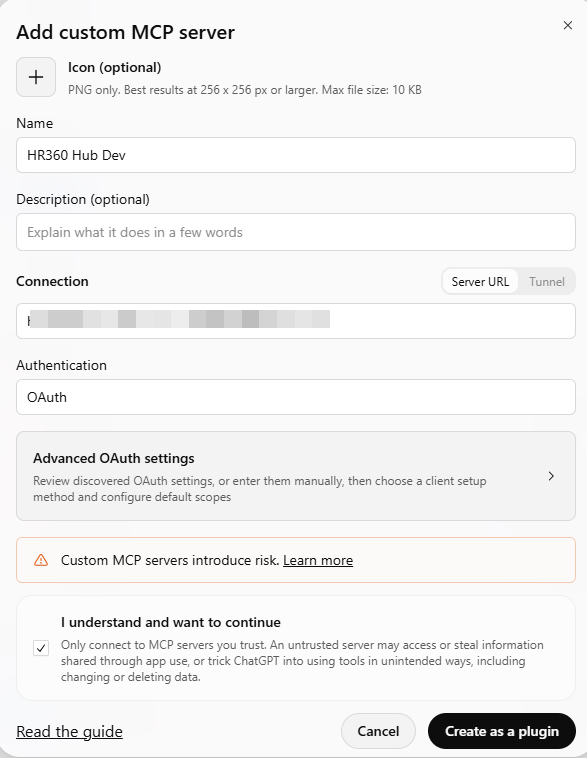
- Open Chat GPT → Settings → Integrations →Plugins.(or directly click on plugins if it is visible in the side bar menu after opening chat GPT)
- Click Browse directory, click the Add button and select Custom MCP server to add HR360 Hub as a plugin.
- Enter a Name (for example HR 360Hub).
- Enter the Server URL. It can be copied from the AI Connections tab under My Profile using Copy URL (see Figure 2).
- Tick the I understand and want to continue check box and click Create as a plugin.
- Sign in to HR360 Hub if asked, and approve access.

4.3. Desktop Tools (Cursor, Anti gravity, Windsurf)
Desktop tools such as Cursor and Antigravity connect by adding the MCP configuration generated in Section 3 to their MCP configuration file. No sign-in prompt is involved. Claude and Chat GPT do not use this configuration.
Use the route below to open the MCP configuration file in your tool:
Tool | How to Open the MCP Configuration File |
Cursor | Open Settings → Tools & MCP and click New MCP Server (shown as Add Custom MCP in some versions). Cursor opens the mcp.json file. In newer versions, the same option is under Customize → MCPs. |
Antigravity | In the agent side panel, click the … (more options) menu → MCP Servers → Manage MCP Servers → View raw config. Antigravity opens the mcp_config.json file. |
Windsurf | Open the mcp_config.json file, located at ~/.codeium/windsurf/mcp_config.json. |
- Generate a key and copy the MCP Configuration as described in Section 3.3.
- Open your tool's MCP configuration file using the route shown in the table above.
- Paste the copied configuration into the file. If the file already contains other servers, add the hr360-mcp entry inside the existing mcp Servers object. The server block shown below can be copied directly from the MCP Configuration box in the MCP Secret Key Generated window (Figure 4, Section 3.3); the secret key is not entered separately.
- Save the file and reload the tool. A green indicator confirms the connection.
{ "mcpServers": { "hr360-mcp": { "serverUrl": "https://hr360hub.com/mcp", "headers": { "Authorization": "YOUR_SECRET_KEY" } } } } | ||
💡 Tip: Always copy the configuration directly from the MCP Secret Key Generated window instead of typing it by hand. Never share the configuration or save it in public files.
Section 5: Tool Permissions
Each tool relies on the HR360 Hub role permission listed below, and HR360 Hub returns only the data that the user's role is allowed to access. The baseline permission mcp.read is required for all tools.
5.1. Available Tools and Required Permissions
# | Tool | Required Permission | What It Does |
1 | Employee Lookup | employees.access | Search employees by email or ID. |
2 | Recruitment Dashboard | recruitment.dashboard.access | Hiring stats and offer acceptance rate. |
3 | Recruitment Hiring Pipeline | recruitment.dashboard.access | Applicants per stage across all jobs. |
4 | Get Hiring Trends | recruitment.dashboard.access | Monthly hires vs. departures. |
5 | List Job Requisitions | recruitment.job.access | Search and filter job postings. |
6 | Get Job Requisition | recruitment.job.access | Job details, budget and openings. |
7 | List Job Applications | recruitment.job.access & recruitment.applicants.access | Candidates who applied to a job. |
8 | Get Position Activity Log | recruitment.job.access | Notes and recruiter logs for a job. |
9 | List Applicants | recruitment.applicants.access | Search by skill, salary, experience. |
10 | Get Applicant Profile | recruitment.applicants.access | Full candidate profile and history. |
11 | Get Applicant Activity Log | recruitment.applicants.access | Interview notes and call comments. |
12 | Get Recruitment Skills | recruitment.skills_settings.access | Skills list used in the portal. |
13 | Get Pipeline Statuses | recruitment.stage_status_settings.access | Recruitment stages and statuses. |
14 | Get Recruiter Departments | recruitment.recruiter_settings.access | Active recruiting departments. |
15 | Get Contact Mediums | recruitment.contact_medium_settings.access | Candidate sourcing channels. |
5.2. Controlling Tool Access in the Connector
In Claude, the permission of each tool can be customized from the connector page, as shown in Figure 12 (Section 4.1). For every tool, choose one of the following options:
Option | Description |
Allow | Claude can use the tool without asking for approval. |
Needs approval | Claude asks for the user's approval before using the tool. |
Blocked | Claude cannot use the tool. |
- In Claude, open Customize → Connectors and click HR 360 Hub.
- Under Tool permissions, find the tool in the Read-only tools list.
- Click the icon beside the tool: the tick for Allow,the hand for Needs approval, or the circle with a line for Blocked.
- To apply one option to every tool in the list, use the dropdown at the top of the list (for example Needs approval).
💡 Tip: Set a tool to Blocked if it should neverbe used, and to Needs approval if each use should be reviewed first.
Section 6: Example Prompts
No special commands are needed. Type naturally, or use the examples below as a starting point.
6.1. Candidate Search
- "Show me all candidates who applied for the Frontend Engineer role."
- "Are there applicants with at least 4 years of experience who know Python and Fast API?"
- "Find candidates who applied after October 1st with an expected salary under $8,000."
6.2. Candidate Profiles
- "Pull up the full profile for Tariq. What are his current salary and top skills?"
- "Summarize the interview notes and recruiter comments in Tariq's activity log."
- "Does Jane Doe have a resume attached, and which pipeline stage is she in?"
6.3. Job Openings
- "What full-time jobs are currently in Open status?"
- "Give me the description, budget and requirements for Senior DevOps Engineer."
- "Which open roles have zero applicants?"
6.4. Hiring Reports
- "How many jobs are open, how many applicants do we have, and what is our offer acceptance rate?"
- "Break down our pipeline: how many candidates are in Screening, Interview and Offer?"
- "How did hires and departures trend month by month this year?"
6.5. Employee Lookup
- "Look up Sarah Connor by her work email and tell me her title."
- "What is my own profile information in HR360?"
💡 Tip: Before an interview, ask: "I have an interview in 15 minutes with Alex Smith for the Backend Lead role. Summarize Alex's experience, key strengths and what the phone screen noted."
Section 7: Security and Privacy
Data accessed through the AI connection is protected by the same rules as the main HR360 Hub portal.
Safeguard | Description |
Role-based access | Users only see what they are allowed to see. Every answer follows role permissions. If a user lacks access, the AI tool tells them politely. |
Company data stays separate | Every request is tied to the company's domain, so data from other organisations can never be mixed in. |
Internal IDs are hidden | Database keys, user IDs and tokens are removed before the AI tool replies. |
No public model training | Recruitment data, resumes and employee records are never stored or used to train public AI models. |
Read-only, expiring keys | A key can only read data, it expires automatically, and it can be revoked at any time. |
Section 8: Frequently Asked Questions
Question | Answer |
Where do I find my secret key? | Go to My Profile → AI Connections and click + Generate New Key (see Section 3). |
What if I am not logged in when connecting Claude? | You are sent to the HR360 login page. After you sign in, you return to Claude automatically. |
Why do I see fewer than 15 tools? | Tools are filtered by your role. Ask your administrator to add the missing permissions, then reconnect (see Section 5). |
Why do I get "403 Forbidden"? | Your account is missing the mcp.read permission. Ask your administrator to add it under Roles & Permissions. |
Do I need to word questions a special way? | No. Ask naturally, then follow up for summaries, bullet points, comparison tables or draft interview emails. |
Can I use it on my phone? | Yes. Once connected, the Claude and ChatGPT mobile apps can use it too. |
How fresh is the data? | It is real-time. Any new application or job change is visible on your very next question. |
Summary
The following table provides a complete step-by-step summary of all key workflows for the AI Assistant (MCP) connection:
# | Action / Step | Result |
1 | Open AI Connections: Log in → My Profile → AI Connections tab. | The AI Connections tab opens, showing the MCP Server Connection URL (with Copy URL) and all keys created by the user. |
2 | Generate a Key: Click + Generate New Key → Enter Key Name → Select Expiration → Click Generate Key. | A read-only key is created and the MCP Secret Key Generated window appears, showing the Secret Key and the MCP Configuration. |
3 | Copy the MCP Configuration: Click Copy next to MCP Configuration → Click Done. | The configuration is copied for use in Cursor or Antigravity. The Secret Key is not used on its own, and the values cannot be shown again after the window is closed. |
4 | Revoke a Key: On the AI Connections listing, click the red trash icon in the Actions column. | The key stops working immediately and the tool is disconnected. |
5 | Connect Claude (Web and Desktop App): Customize → Connectors → + Add → Add custom connector → Enter HR 360 Hub and server URL → Continue → Add → Connect → Sign in → Authorize (no MCP configuration needed). | The connector page lists the allowed read-only tools (up to 15). |
6 | Connect ChatGPT: chatgpt.com → Settings → Integrations → Plugins → Browse directory → Add → Custom MCP server → Enter Name and Server URL → Tick I understand → Create as a plugin → Sign in and approve (no MCP configuration needed). | ChatGPT is connected to HR360 Hub. |
7 | Connect Desktop Tools (Cursor, Antigravity): Generate key and copy the MCP Configuration → Open the tool's MCP configuration file → Paste the server block → Save and reload. | A green indicator confirms the desktop tool is connected. |
8 | Control Tool Access: Customize → Connectors → HR 360 Hub → Tool permissions → Set each tool to Allow, Needs approval or Blocked. | Claude uses each tool according to the selected permission. |
9 | Ask Questions: Type a natural-language question in the AI tool, such as a candidate search, job lookup or hiring report. | Live, read-only answers from HR360 Hub are returned according to the user's role permissions. |