

Overview
The Appraisals module in HR360 Hub provides a structured way to review employee performance and process salary increments. It brings together appraisal cycles, the goals assigned to employees, and a multi-level approval flow, so that every increment is reviewed by the reporting manager and the head of department before it is finalized.
The Appraisals module contains the following areas that work together to support the appraisal process:
Appraisal Cycle: Lists the evaluation cycles configured in the portal and lets HR/Admin users open a cycle to see the employees and departments eligible for appraisal, and to process increments.
Team Approval: Used by reporting managers to review the increments submitted for their team members before they move to the head of department.
Department Approval: Used by heads of department to review the increments that have already been approved by the reporting manager.
This guide covers:
- How to access the Appraisals module from the left sidebar.
- How to view the Appraisal Cycle listing and open a cycle.
- How to view the eligible employees and eligible departments of a cycle.
- How reporting managers review increments under Team Approval.
- How heads of department review increments under Department Approval.
An increment moves through the following stages once it has been submitted:
Stage | Who acts | What happens |
Manager Review | Reporting Manager | The manager reviews the increment under Team Approval and either approves or rejects it. |
Department Review | Head of Department | After manager approval, the increment appears under Department Approval for the head of department to review. |
Active / Complete | System | Once the required approvals are done, the increment is applied and recorded against the employee. |
Rejected | HR/Admin | If a manager rejects the increment, it goes back to HR/Admin for revision and resubmission. |
📜 Note: Access to the Appraisals module and its actions is controlled by role permissions. Users must have the relevant Appraisals access to view cycles, process increments, or approve requests.
Prerequisites
Before working with the Appraisals module, ensure the following are in place:
- The user must be logged in with a role that has access to the Appraisals module.
- An appraisal (evaluation) cycle must already exist. Cycles are created only from Portal Settings > Evaluation Cycle, which is covered in a separate document.
- Employees must be assigned the relevant evaluation cycle when they are created or edited in the Employee module. Only these employees appear as eligible in the cycle.
- Goals must be assigned to employees separately, either from the Performance Hub module or from the employee profile.
- Each employee should have a reporting manager, and each department should have a department head, so the approval flow can route correctly.
Section 1: Accessing the Appraisals Module
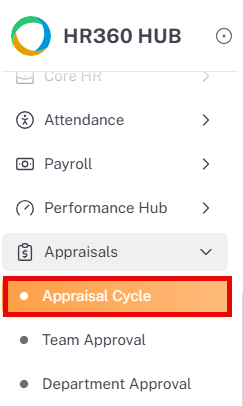
After logging in to HR360 Hub, follow the steps below to access the Appraisals module.
- From the left sidebar, click on Appraisals to expand the sub-menu.
- The sub-menu displays Appraisal Cycle, Team Approval, and Department Approval.
- Click on Appraisal Cycle to open the Appraisal Cycle listing.
Section 2: Appraisal Cycle Listing
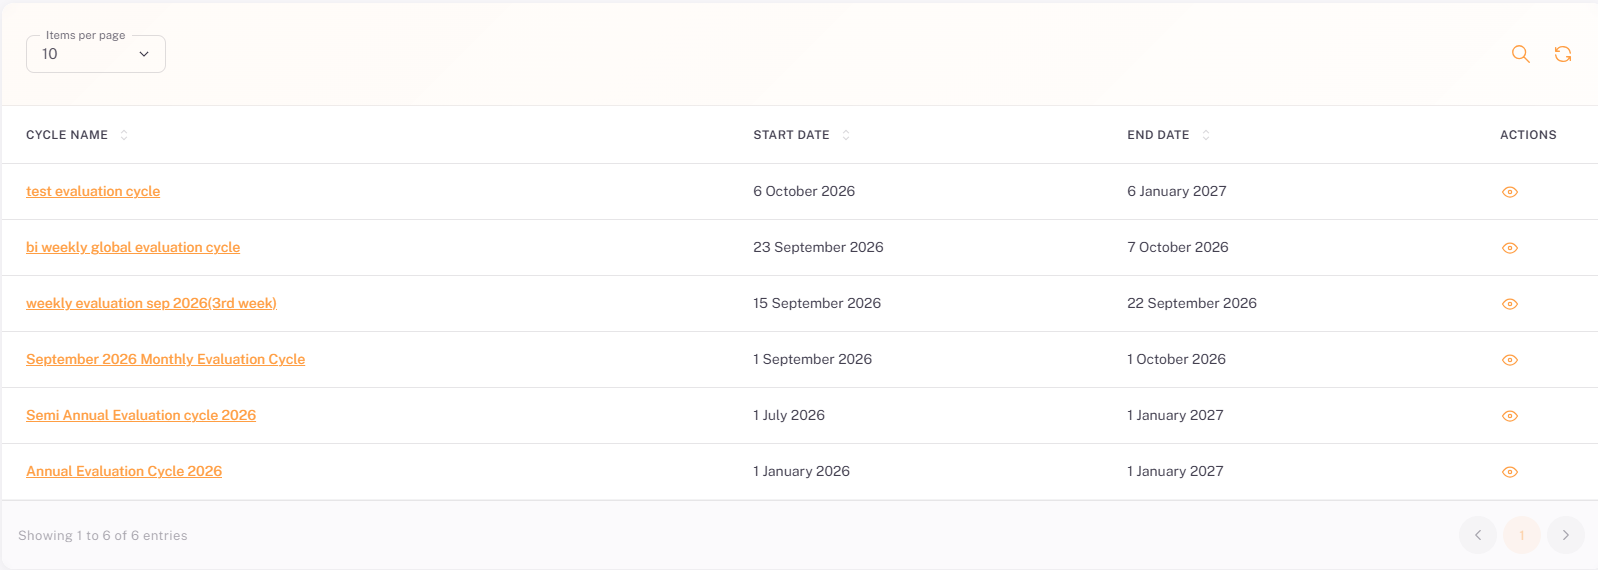
The Appraisal Cycle page lists every evaluation cycle configured in the portal, along with its dates and current status. Use it to find the cycle whose appraisals you want to manage.
2.1. Listing Table
Column | Description | Sortable |
Cycle Name | The name of the evaluation cycle, e.g. Annual Performance Review 2026. The name is a link that opens the cycle. | Yes |
Start Date | The date the cycle begins. | Yes |
End Date | The date the cycle ends. | Yes |
Actions | Eye icon — opens the cycle to view its eligible employees and departments. | No |
2.2. Page Controls
- Items per page selector: Controls the number of records displayed per page.
- Search icon: Filter cycles by name or other fields.
- Refresh icon: Reload the listing to reflect the latest changes.
- Pagination controls: Navigate through pages using the page buttons at the bottom of the listing.
📜 Note: Appraisal cycles cannot be created from this page. To create or configure a cycle, go to Portal Settings > Evaluation Cycle.
Section 3: Viewing an Appraisal Cycle
Clicking the cycle name or the Eye icon on the Appraisal Cycle listing opens the cycle details. The page has two tabs, Employees and Departments, which show who is eligible for appraisal in this cycle, either individually or grouped by department.
3.1. Eligible Employees
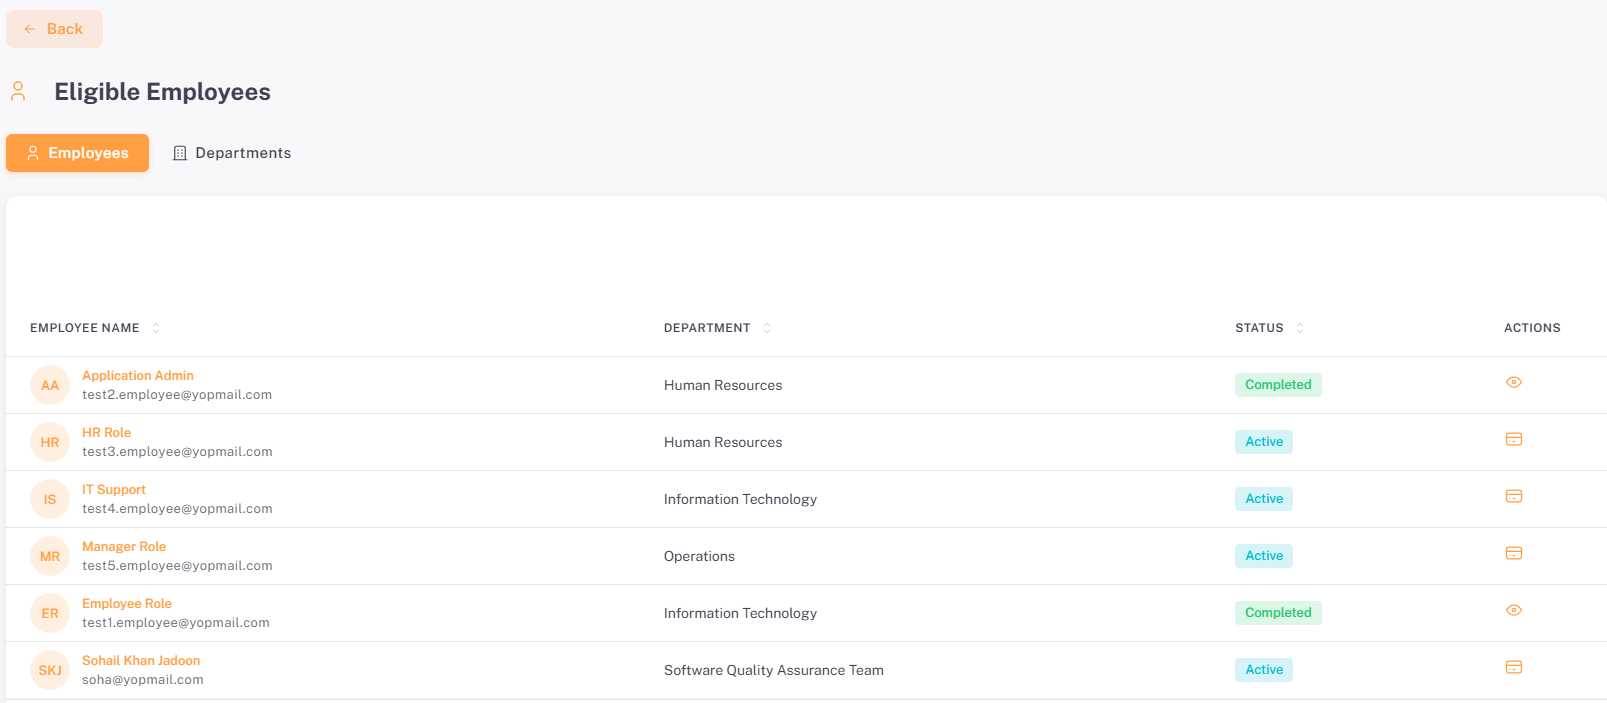
The Employees tab lists every employee who has been assigned this evaluation cycle. Employees are assigned a cycle when they are created or edited in the Employee module.
Column | Description | Sortable |
Employee Name | The employee’s name and email address, with an avatar showing their initials. | Yes |
Department | The department the employee belongs to. | Yes |
Status | The employee’s current status, shown as a badge, e.g. Active. | Yes |
Actions | Process Increment icon — opens the increment form for the employee, when an increment has to be processed. | No |
💡 Tip: Use the Process Increment icon in the Actions column to go directly to the increment form for an employee. The steps are covered in Section 4.
3.2. Eligible Departments
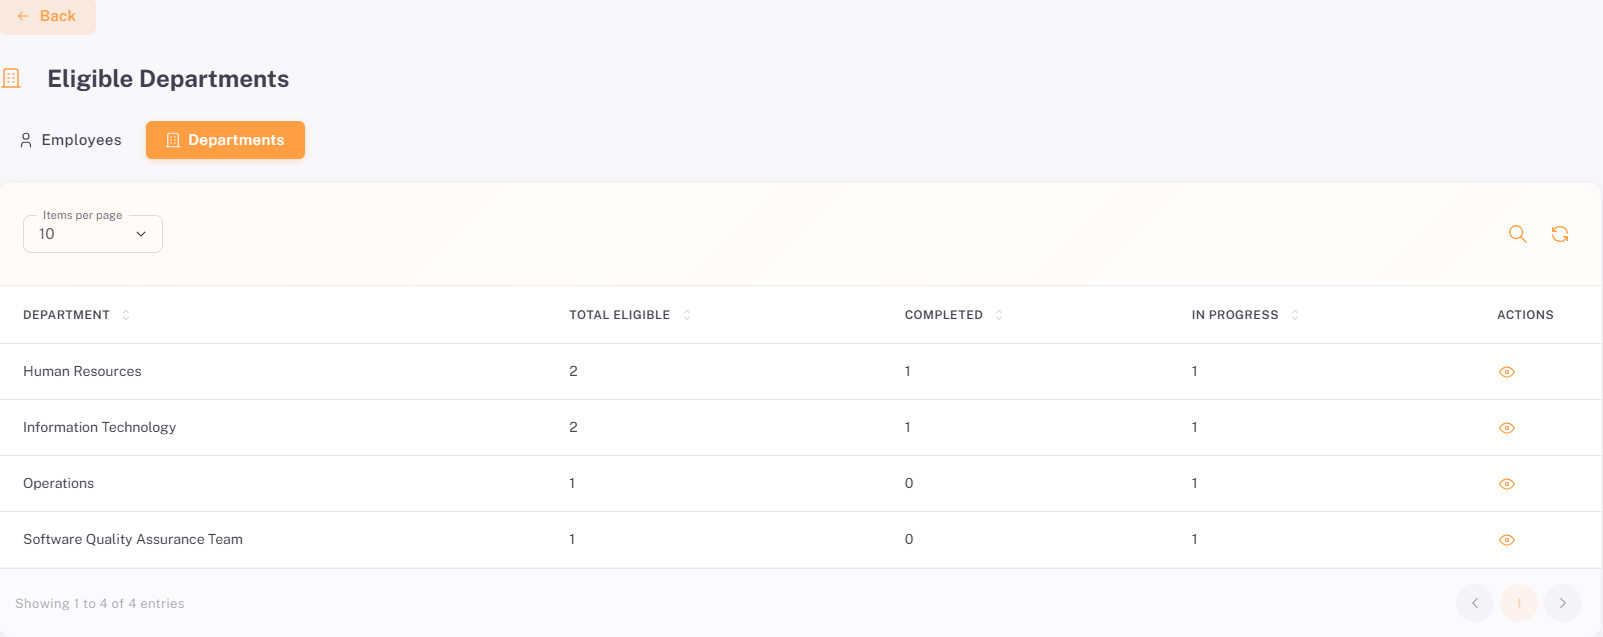
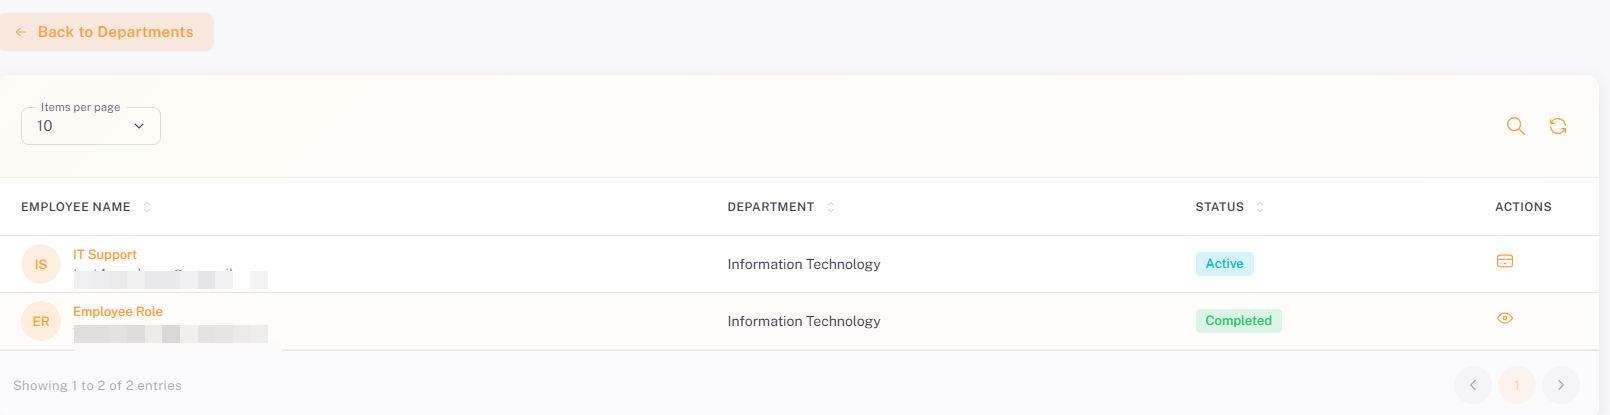
The Departments tab lists the departments whose employees have been selected as eligible for this cycle. Departments that have no eligible employees do not appear.
Column | Description | Sortable |
Department | The name of the department. | Yes |
Total Eligible | The number of employees in the department who are eligible for this cycle. | Yes |
Completed | The number of eligible employees whose increment has been completed. | Yes |
In Progress | The number of eligible employees whose increment is still in progress. | Yes |
Actions | Eye icon — opens the list of eligible employees for that department. | No |
Clicking the Eye icon for a department shows only the eligible employees of that department. Click Back to Departments to return to the Departments tab.
Section 4:Processing an Increment
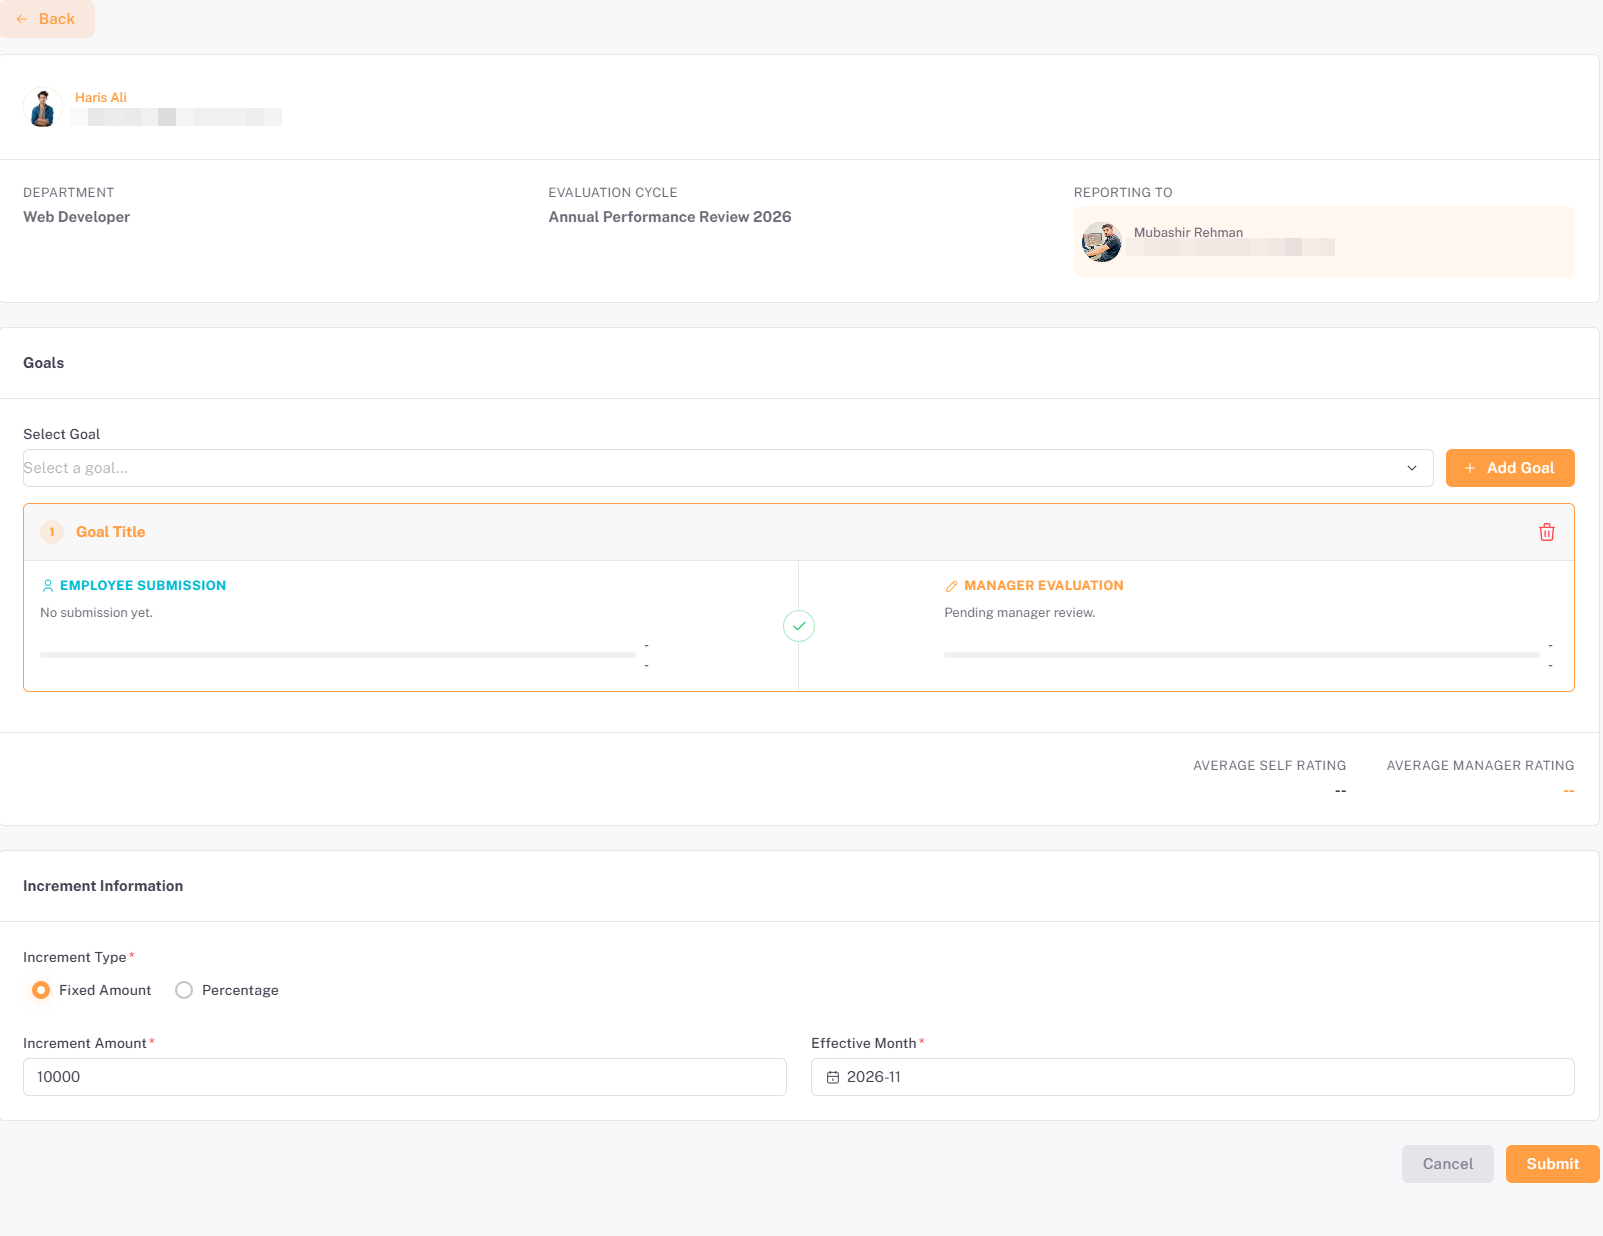
To process an increment for an employee, click the Process Increment icon in the Actions column of the Employees tab (or of a department’s employee list). The increment form opens for the selected employee.
4.1. Employee Details
The top of the page confirms who the increment is for. It displays the employee’s name and email address, along with the following details:
Detail | Description |
Department | The department the employee belongs to. |
Evaluation Cycle | The evaluation cycle the increment is being processed under, e.g. Annual Performance Review 2026. |
Reporting To | The employee’s reporting manager, who will review the increment first. |
4.2. Goals
The Goals section lets you attach the employee’s goals to the increment so that their ratings can be reviewed alongside it. Use the Select Goal dropdown to choose a goal, then click Add Goal. Each added goal appears as a card that can be removed with the trash icon.
Each goal cardis split into two halves:
- Employee Submission: Shows what the employee submitted for the goal and their self rating. It displays "No submission yet." until the employee submits the goal.
- Manager Evaluation: Shows the manager’s review and rating. It displays "Pending manager review." until the manager approves the goal.
The Average Self Rating and Average Manager Rating at the bottom of the Goals section summarize the ratings across all added goals. They display dashes until ratings are available.
⚠️ Important: Goals are not created here. Goals are assigned to an employee separately in the Performance Hub module or from the employee profile. Ratings are added only after the employee completes and submits the goal and the manager approves it.
4.3. Increment Information
Field | Required | Description |
Increment Type | Yes | Select Fixed Amount to give a set amount, or Percentage to give a percentage of the current salary. |
Increment Amount | Yes | Enter the increment value. The label reflects the selected type. |
Effective Month | Yes | Select the month from which the increment takes effect, shown in YYYY-MM format, e.g. 2026-11. |
4.4. Submitting the Increment
- Add the relevant goals for the employee, if required.
- Select the Increment Type, enter the Increment Amount, and choose the Effective Month.
- Click Submit to send the increment into the approval flow, or click Cancel to close the form without saving.
📜 Note: Once submitted, the increment goes to the employee’s reporting manager for review under Team Approval.
4.5. Viewing a Processed Increment
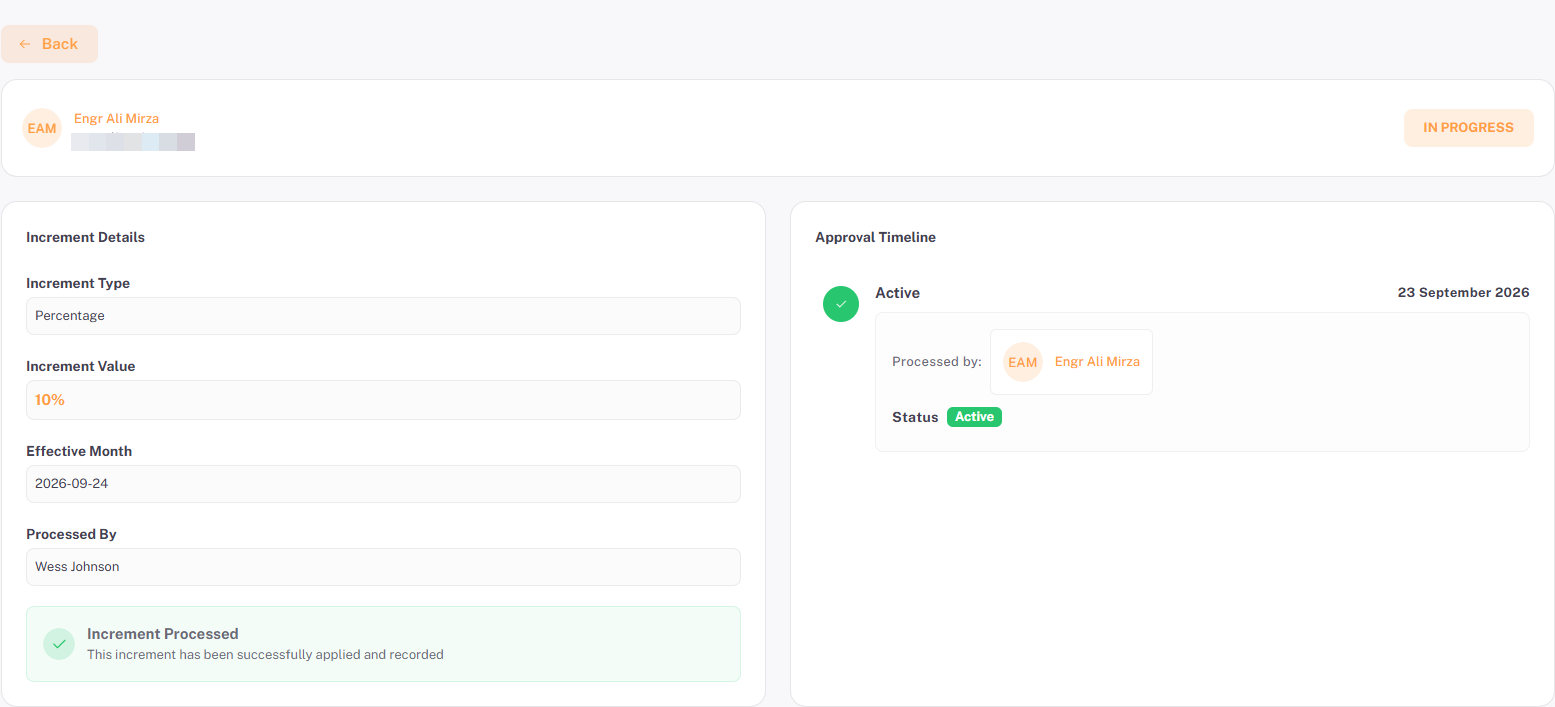
Once an increment has been processed, its record shows the increment details on the left and an Approval Timeline on the right. The badge at the top-right of the page shows the increment’s current status.
Field | Description |
Increment Type | Whether the increment is a Fixed Amount or a Percentage. |
Increment Value | The value of the increment, e.g. 10% or 10000(fixed). |
Effective Month | The date from which the increment applies. |
Processed By | The user who processed the increment. |
Increment Processed | A confirmation banner stating that the increment has been successfully applied and recorded. |
Approval Timeline | Each status the increment has moved through, with the date, the user who processed it, and the resulting status. |
Section 5: Team Approval
Team Approval shows the increments submitted for the reporting manager’s team. Every increment must be approved by the reporting manager before it can go to the head of department.
5.1. Accessing Team Approval
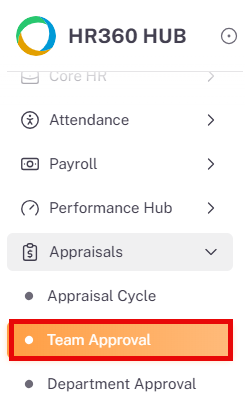
- From the left sidebar, click on Appraisals to expand the sub-menu.
- Click on Team Approval.
5.2. Team Approval Listing
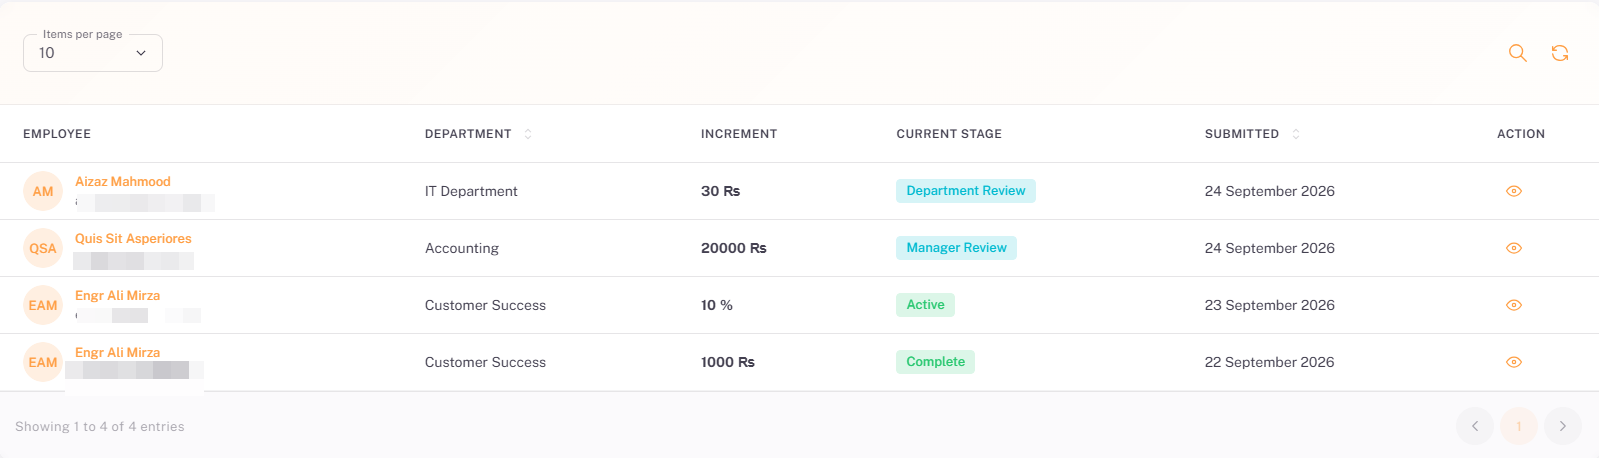
Column | Description | Sortable |
Employee | The employee’s name and email address, with an avatar showing their initials. | No |
Department | The department the employee belongs to. | Yes |
Increment | The increment value, shown in Rs for a fixed amount or % for a percentage. | No |
Current Stage | The stage the increment is currently at, shown as a badge, e.g. Manager Review, Department Review, Active, or Complete. | No |
Submitted | The date the increment was submitted. | Yes |
Action | Eye icon — opens the increment record. | No |
5.3. Reviewing an Increment
Click the Eye icon for an increment that is at the Manager Review stage. The page shows the increment details on the left and the Pipeline Overview on the right, with Approve and Reject buttons at the top.
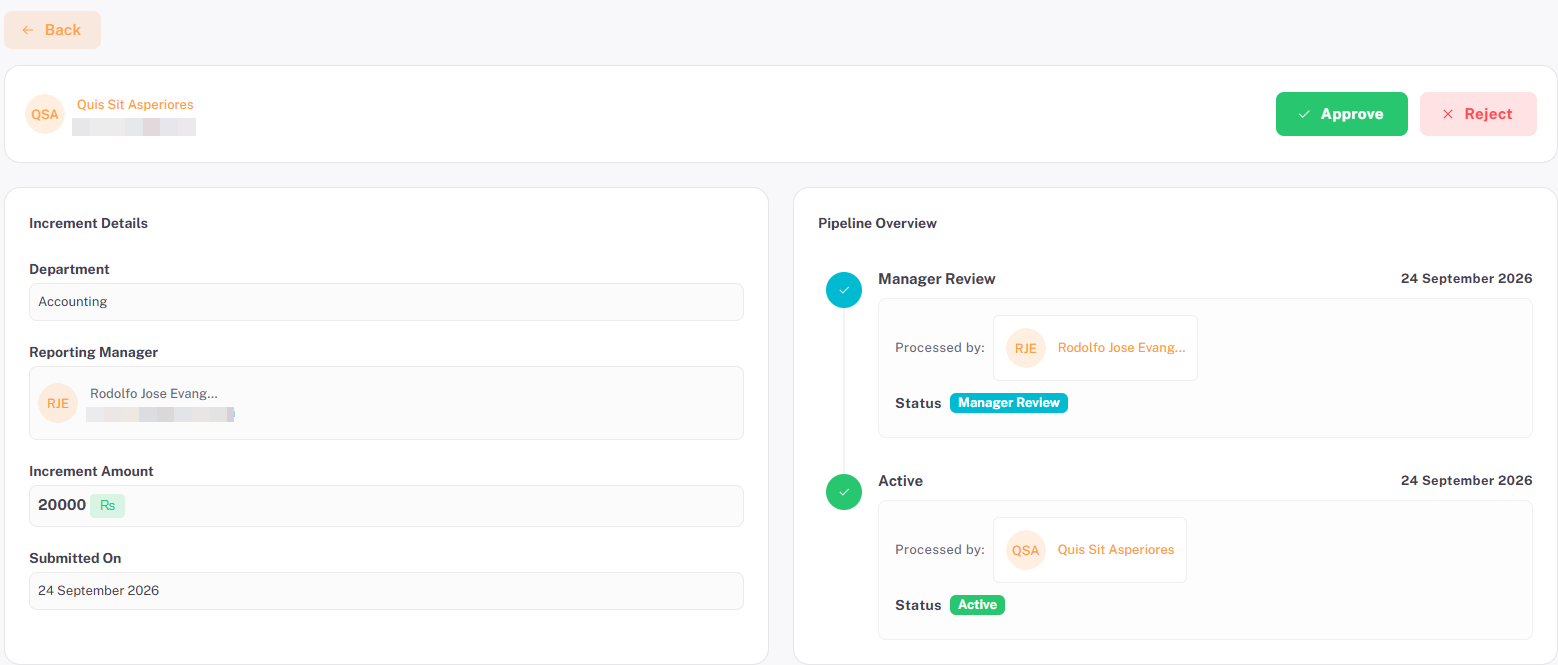
Panel | Description |
Increment Details | Shows the employee’s department, reporting manager, increment amount, and the date the increment was submitted. |
Pipeline Overview | A timeline of every stage the increment has passed through, with the date, the user who processed it, and the status. |
5.4. Approving or Rejecting an Increment
- Click Approve to approve the increment. It moves to the head of department and appears under Department Approval.
- Click Reject to reject the increment. It goes back to HR/Admin for revision and resubmission.
⚠️ Warning: A rejected increment does not go to the head of department. HR/Admin must revise it and resubmit it, after which it starts the approval flow again.
5.5. Viewing Increments at Later Stages
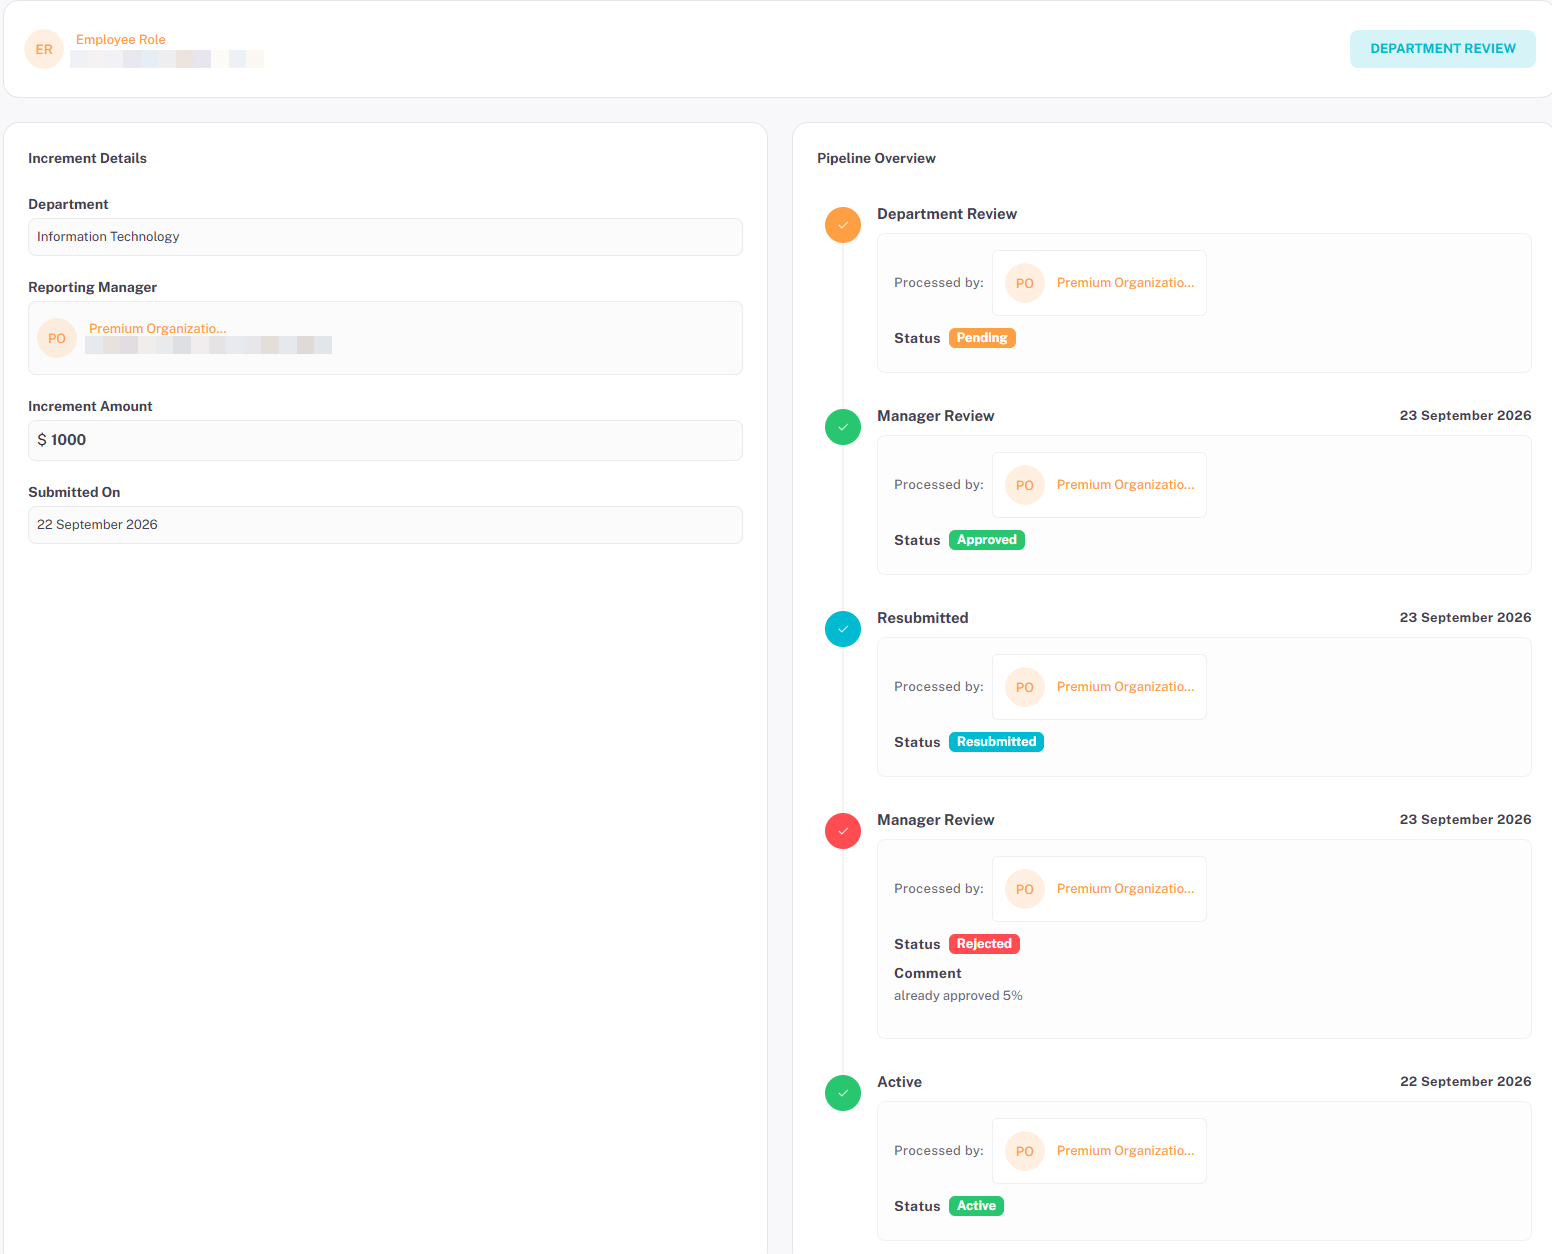
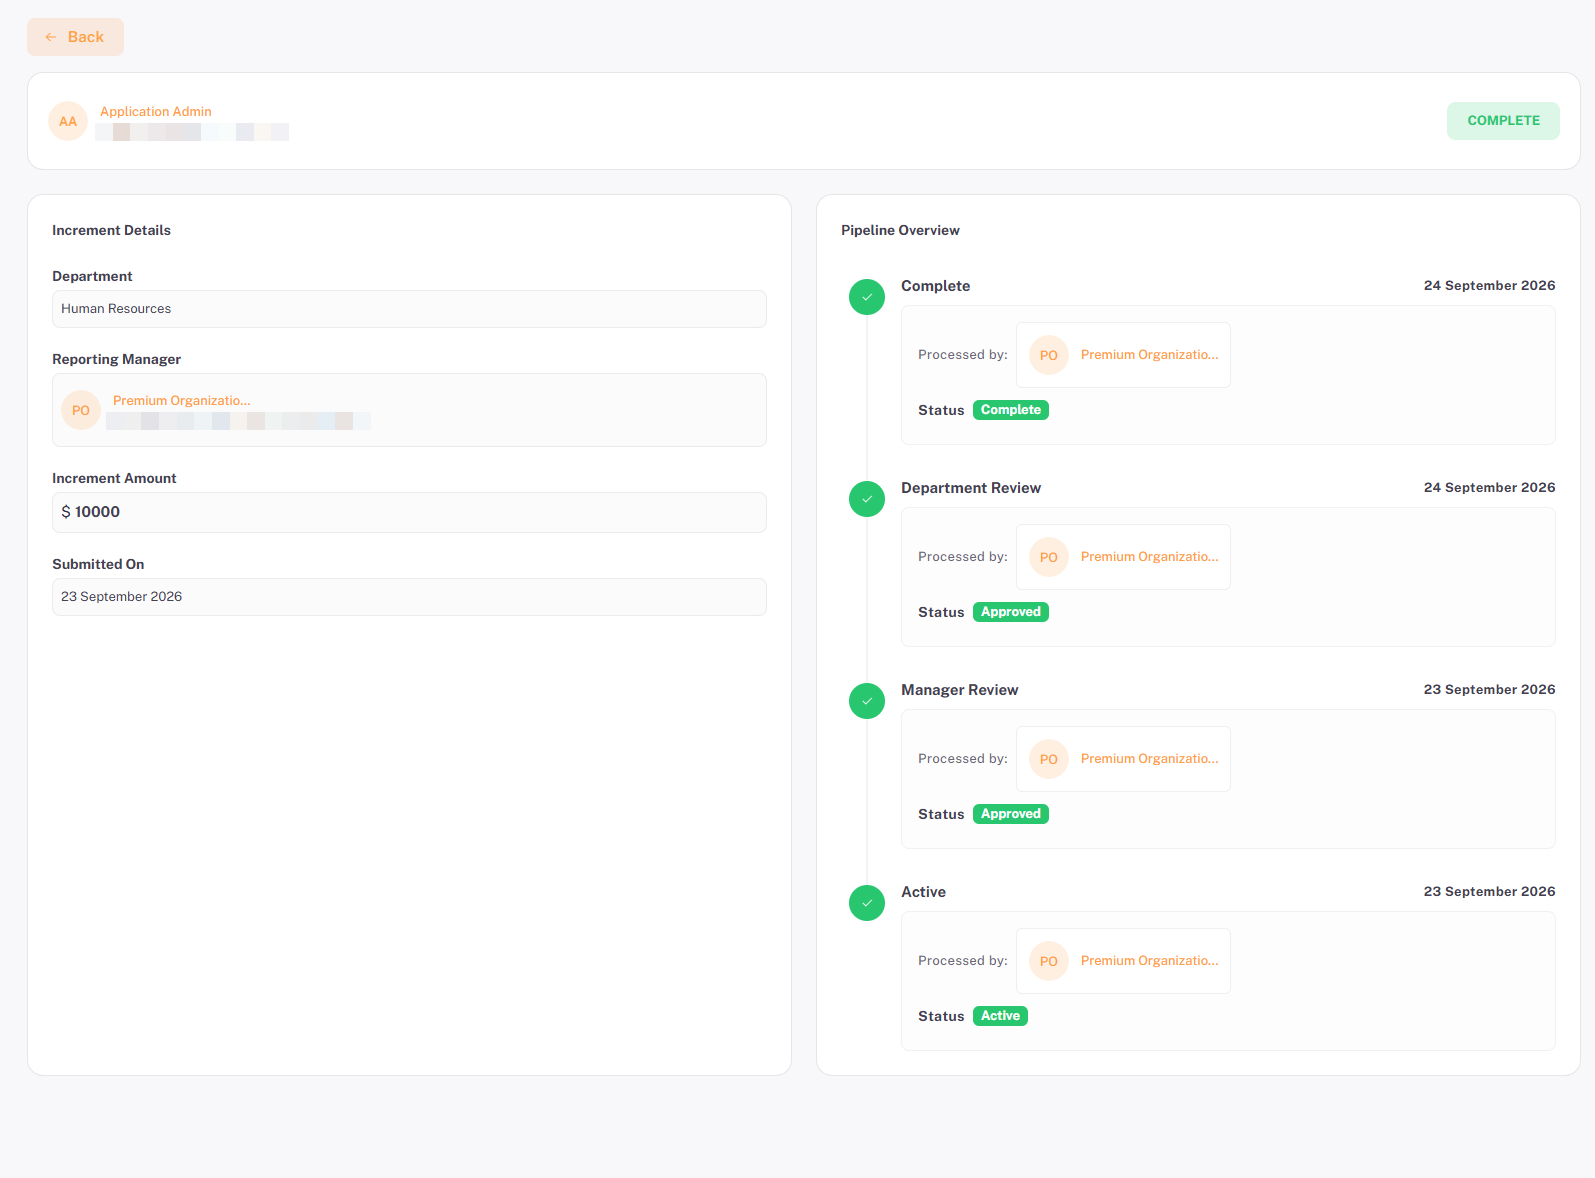
Increments that have already moved beyond the manager’s review remain visible in the listing. Opening one shows the same layout, with the Pipeline Overview recording each stage, who processed it, its status, and any comment entered.
An increment at the Department Review stage shows the manager’s approval and comment, and the department review still pending.
An increment at the Complete stage shows every approval in the timeline.
Section 6:Department Approval
Department Approval shows the increments that have been approved by the reporting manager and are awaiting the head of department’s approval.
6.1. Department Approval Listing
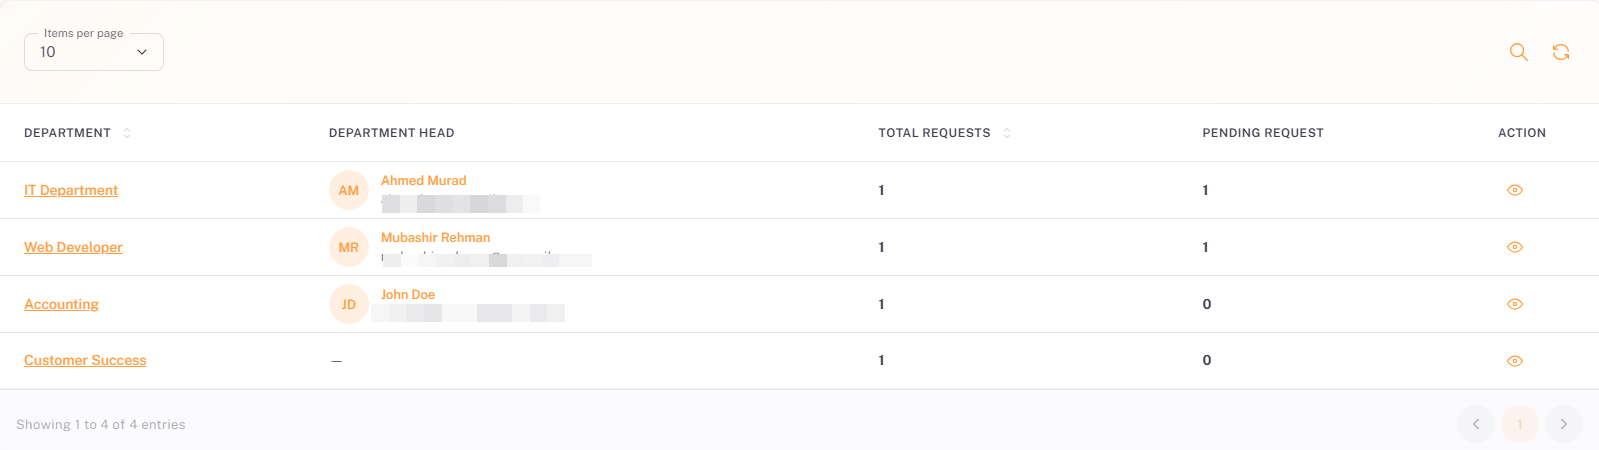
To access it, click on Appraisals in the left sidebar to expand the sub-menu, then click on Department Approval. The page lists each department with the number of increment requests it has.
Column | Description | Sortable |
Department | The name of the department. The name is a link that opens the department’s requests. | Yes |
Department Head | The head of the department, with name and email address. Displays a dash if no head has been assigned. | No |
Total Requests | The total number of increment requests for the department. | Yes |
Pending Request | The number of requests still awaiting the department head’s review. | No |
Action | Eye icon — opens the department’s increment requests. | No |
6.2. Department Requests
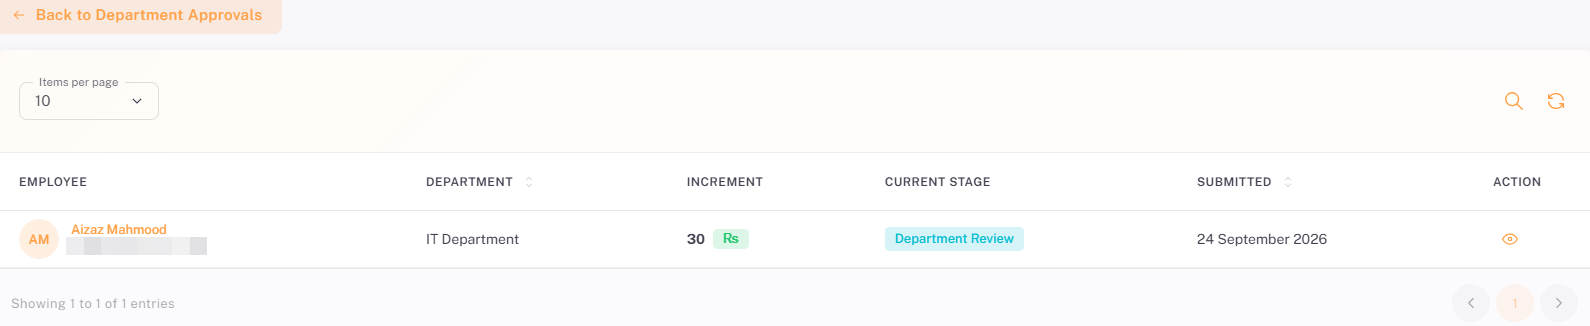
Clicking a department or its Eye icon opens the list of increment requests for that department. The columns match the Team Approval listing: Employee, Department, Increment, Current Stage, Submitted, and Action. Click Back to Department Approvals to return to the department list.
6.3. Reviewing a Request
Click the Eye icon for a request to open the increment record. The record uses the same layout as in Team Approval, with the Increment Details on the left and the Pipeline Overview on the right. The Pipeline Overview shows the manager’s approval and comment, and the Department Review stage awaiting the head of department.
💡 Tip: Use the Pending Request column on the listing to quickly see which departments still have increments waiting for the head of department’s review.
Summary
The following table provides a complete step-by-step summary of all key workflows in the Appraisals module:
# | Action / Step | Result |
1 | Access Appraisals: Log in → Appraisals in left sidebar → Appraisal Cycle. | The Appraisal Cycle listing opens, showing every evaluation cycle with its dates and status. |
2 | View an Appraisal Cycle: Click the cycle name or the Eye icon. | The cycle opens with the Employees and Departments tabs showing who is eligible for appraisal. |
3 | Review Eligible Employees: Open a cycle → Employees tab. | Employees assigned the evaluation cycle are listed with their department and status. |
4 | Review Eligible Departments: Open a cycle → Departments tab → Click the Eye icon for a department. | Departments show eligible, completed, and in-progress counts; opening one lists that department’s eligible employees. |
5 | Process an Increment: Click the Process Increment icon in the Actions column → Add goals → Select Increment Type, enter Amount and Effective Month → Click Submit. | The increment is submitted and goes to the reporting manager for review under Team Approval. |
6 | View a Processed Increment: Open the increment record. | Increment details and the Approval Timeline show each stage, who processed it, and its status. |
7 | Review Team Increments: Appraisals → Team Approval → Click the Eye icon for an increment. | The increment details and Pipeline Overview are displayed for the manager’s review. |
8 | Approve an Increment: On Team Approval, open an increment at Manager Review → Click Approve. | The increment moves to the head of department and appears under Department Approval. |
9 | Reject an Increment: On Team Approval, open an increment at Manager Review → Click Reject. | The increment goes back to HR/Admin for revision and resubmission. |
10 | Review Department Increments: Appraisals → Department Approval → Select a department → Click the Eye icon for a request. | Increments approved by the manager are displayed for the head of department’s review. |