

Overview
Processing an employee’s increment in HR360 Hub is an end-to-end workflow that runs across four areas of the portal: the evaluation cycle is configured in Portal Settings, the cycle and the employee’s goals are assigned in the Employee and Performance Hub modules, the goal itself is completed and approved between the employee and their manager, and the increment is finally processed and approved in the Appraisals module.
This guide walks through the complete workflow in the order it happens, so that HR/Admin users, employees, and managers can see how their part fits into the larger process:
- Set up the evaluation cycle in Portal Settings> Evaluation Cycle.
- Assign the cycle to the relevant employees from the Employee module.
- Assign goals relevant to the cycle to those employees from Performance Hub.
- Employee completes and submits the goal, along with a self rating.
- Reporting manager reviews and approves the goal, giving a manager rating.
- HR/Admin processes the increment from the Appraisals module, attaching the employee’s goals and the increment details.
- The increment moves into approval, first with the reporting manager and then the head of department.
📜 Note: This guide focuses on the sequence of steps needed to take an employee from an assigned evaluation cycle to a submitted increment. The Appraisals module itself, including Team Approval and Department Approval, is covered in full in the Appraisals Module User Guide.
Prerequisites
Before starting the increment processing workflow, ensure the following are in place:
- The user must be logged in with a role that has access to Portal Settings, the Employee module, Performance Hub, and Appraisals, as relevant to the step being performed.
- At least one department and reporting manager must be configured in the system.
- The employee being processed must already exist in the Employee module.
Section 1: Setting Up the Evaluation Cycle
An increment can only be processed under an evaluation cycle, so the first step is to create or confirm the cycle in Portal Settings. This is also where an existing cycle can be edited.
1.1. Accessing Evaluation Cycle Settings
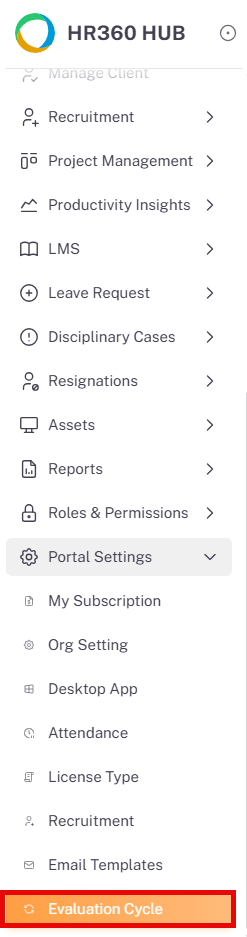
- From the left sidebar, click on Portal Settings to expand the sub-menu.
- Click on Evaluation Cycle to open the Evaluation Cycle listing.
1.2. Evaluation Cycle Listing
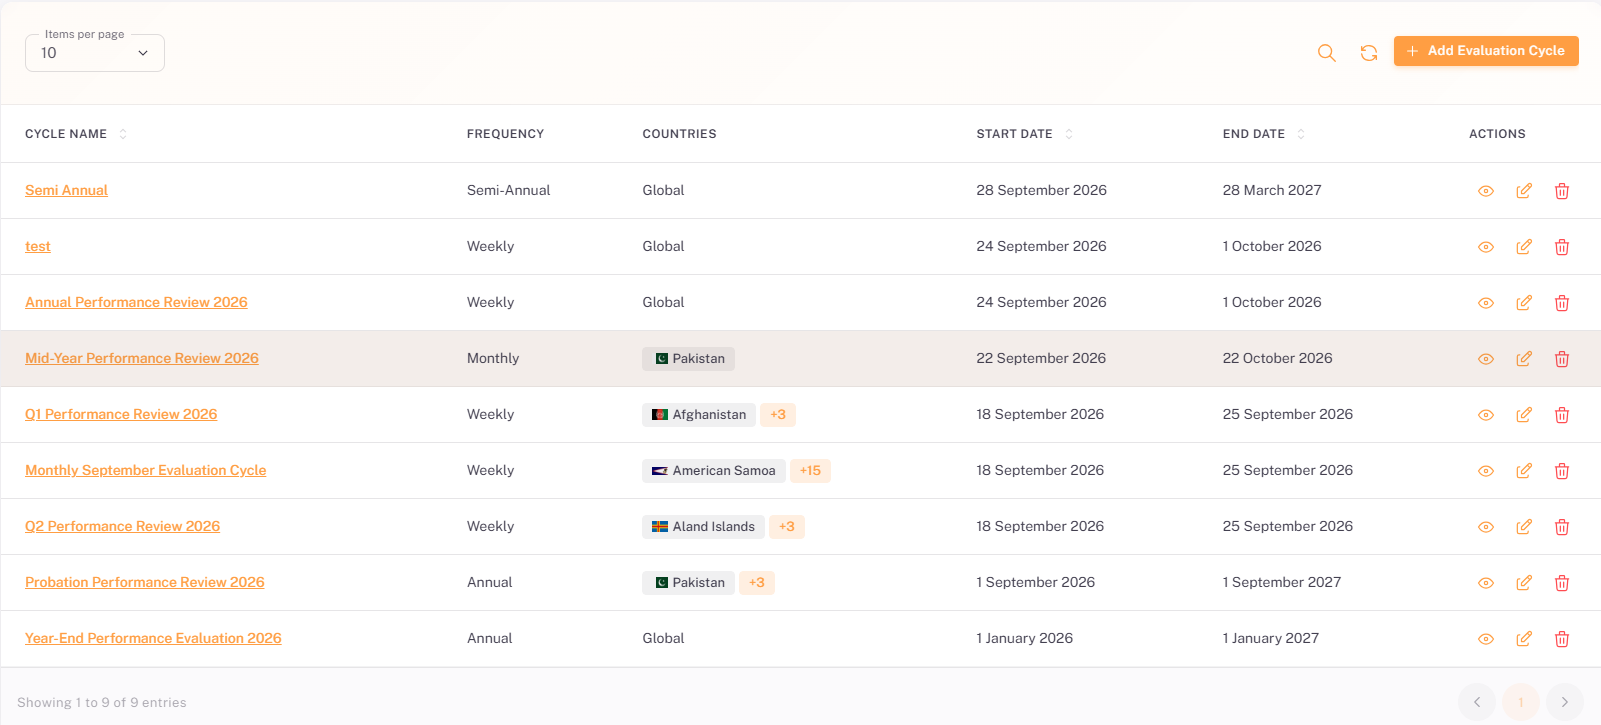
The listing shows every evaluation cycle already configured, along with its frequency, the countries it applies to, its start and end dates, and the actions available.
Column | Description |
Cycle Name | The name of the evaluation cycle. The name is a link that opens the cycle. |
Frequency | How often the cycle recurs, e.g. Weekly, Monthly, Quarterly, Semi-Annual, or Annual. |
Countries | The countries the cycle applies to, or Global if it applies organization-wide. |
Start Date / End Date | The dates the cycle runs between. For most frequencies, the End Date is calculated automatically from the Start Date. |
Actions | Eye icon — view the cycle. Pencil icon — edit the cycle. Trash icon — delete the cycle. |
1.3. Creating an Evaluation Cycle
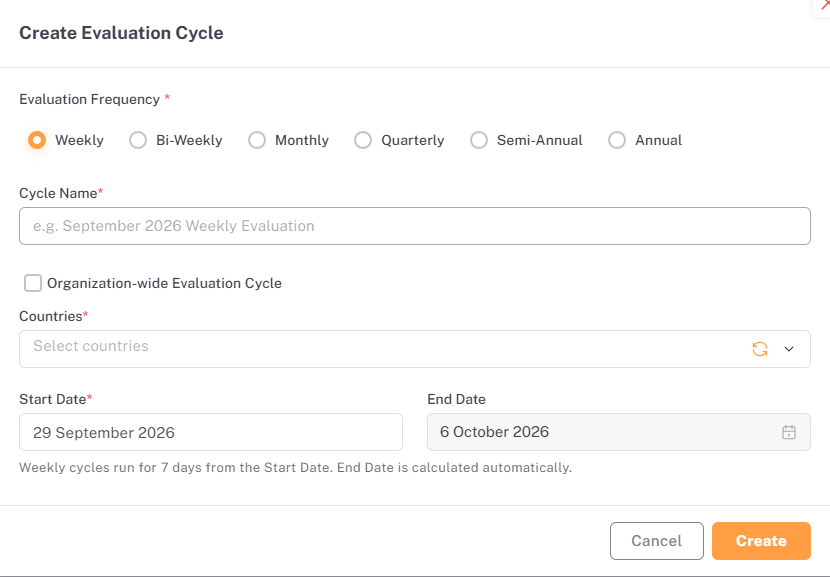
Click + Add Evaluation Cycle on the listing page to open the Create Evaluation Cycle form.
Field | Required | Description |
Evaluation Frequency | Yes | Select how often the cycle recurs: Weekly, Bi-Weekly, Monthly, Quarterly, Semi-Annual, or Annual. |
Cycle Name | Yes | Enter a name for the cycle, e.g. September 2026 Weekly Evaluation. |
Organization-wide Evaluation Cycle | No | Check this to apply the cycle to every country. When checked, the Countries field is disabled. |
Countries | Yes, unless organization-wide | Select the countries the cycle applies to. |
Start Date | Yes | Select the date the cycle begins. |
End Date | No | For most frequencies this is calculated automatically from the Start Date and Frequency, and cannot be edited directly. |
Once the fields are filled in, click Create to save the cycle, or Cancel to close the form without saving.
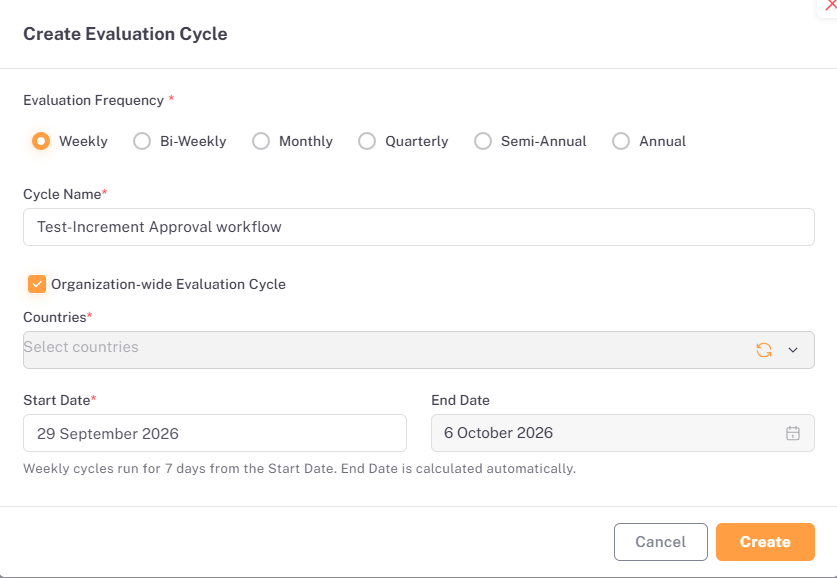
The new cycle appears in the listing page of the Evaluation Cycle.
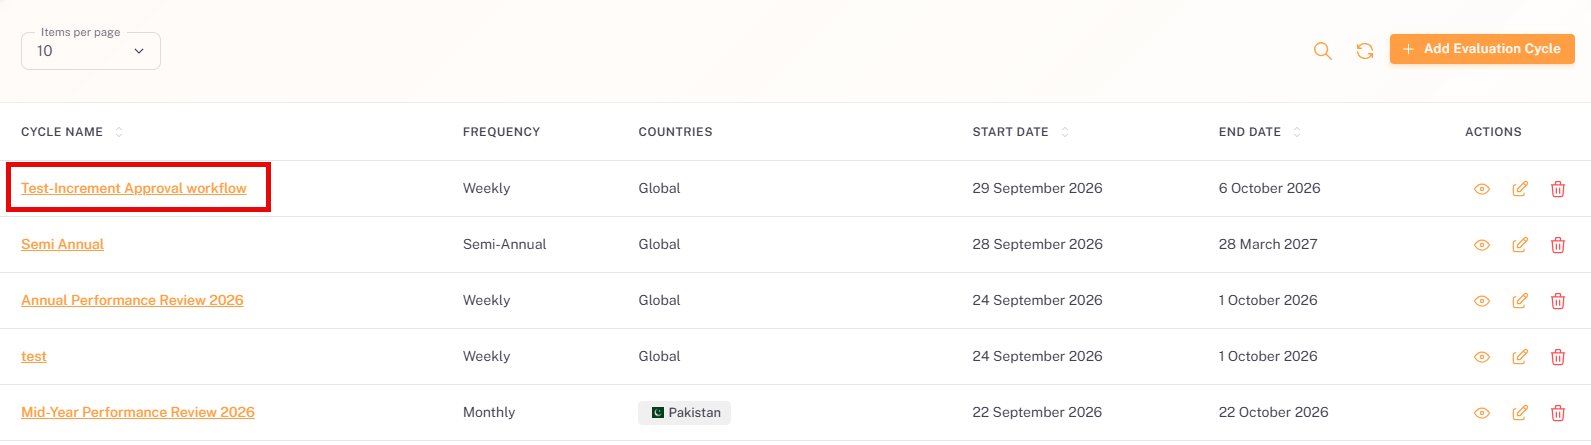
💡 Tip: To edit an existing cycle instead of creating a new one, click the Pencil icon in the Actions column for that cycle.
Section 2: Assigning the Evaluation Cycle to Employees
Creating a cycle does not, by itself, make any employee eligible for appraisal under it. The cycle must be assigned to each employee before increments can be processed for them. This is done from the Employee module, either while creating a new employee or while editing an existing one.
2.1. Assigning a Cycle to a New Employee
Go to Dashboard> Employee > Employee List and click + Add Employee to open the Add New Employee form. The Evaluation Cycle field appears under Employment Details, alongside the employee’s department, designation, and reporting manager.
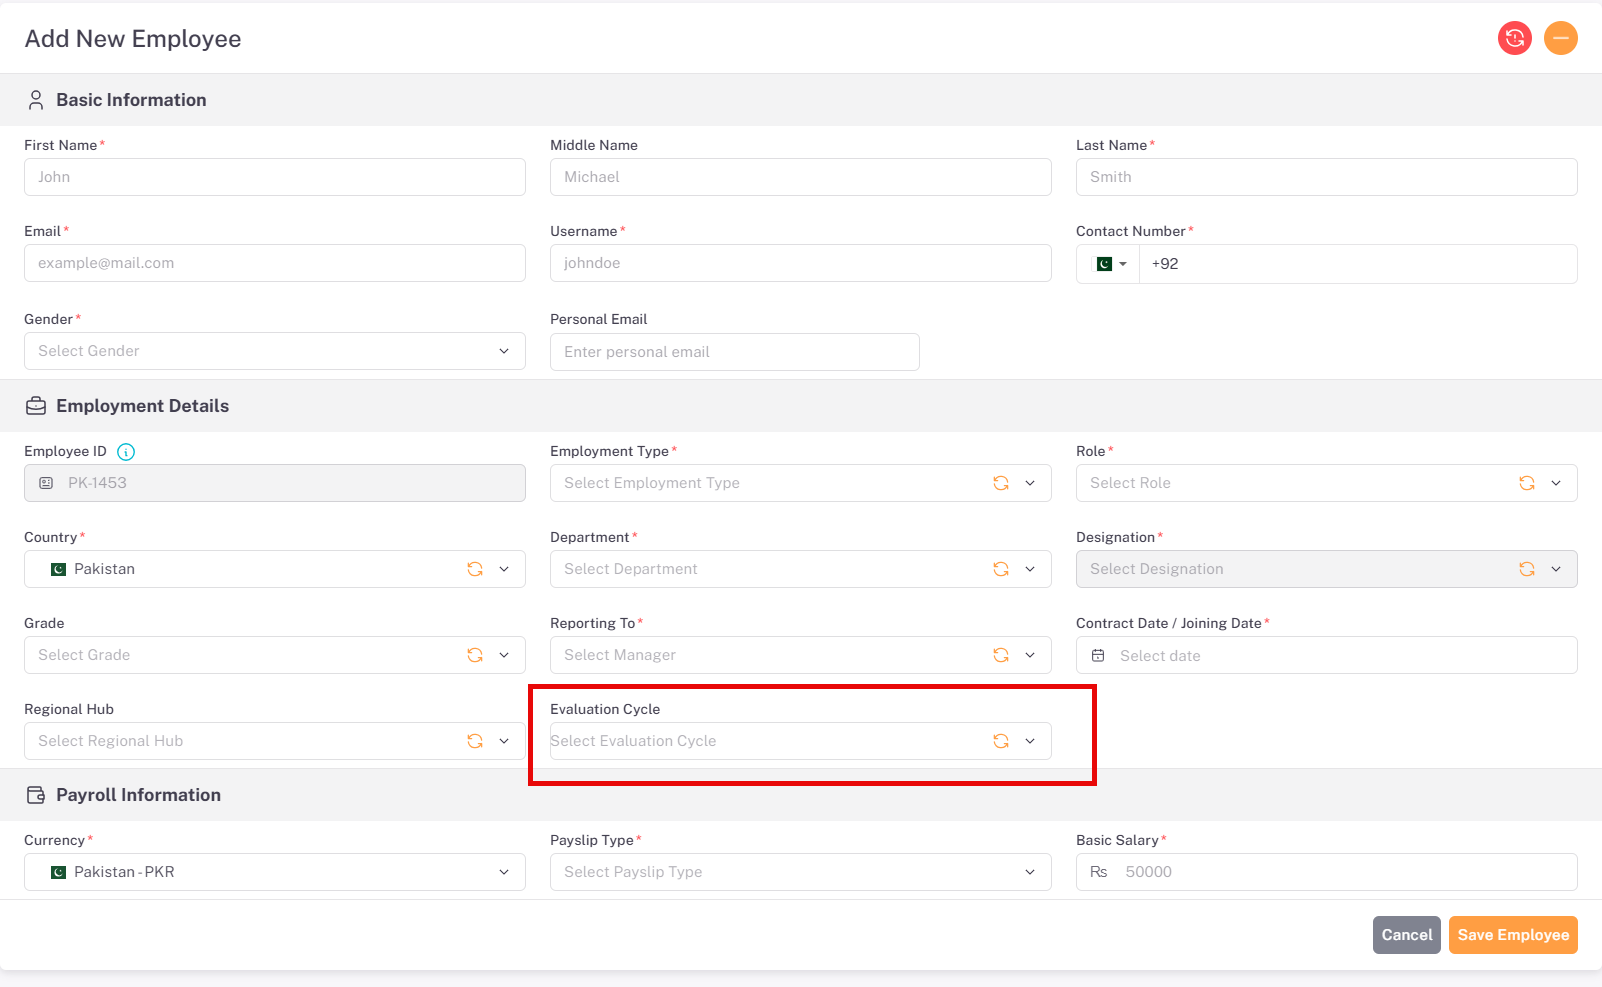
📜 Note: The evaluation cycles available in the dropdown menu are determined by the country assigned to the employee. Only cycles configured for that specific country will appear as options for selection.
📜 Note: Organization-wide Evaluation Cycles appear in the dropdown menu for all employees, regardless of the country assigned to their profiles.
2.2. Assigning a Cycle to an Existing Employee
To assign or change the cycle for an employee who already exists, open the employee’s profile from the Employee List and go to the Contract tab. The Evaluation Cycle field is shown alongside the employee’s department, grade, and reporting manager.
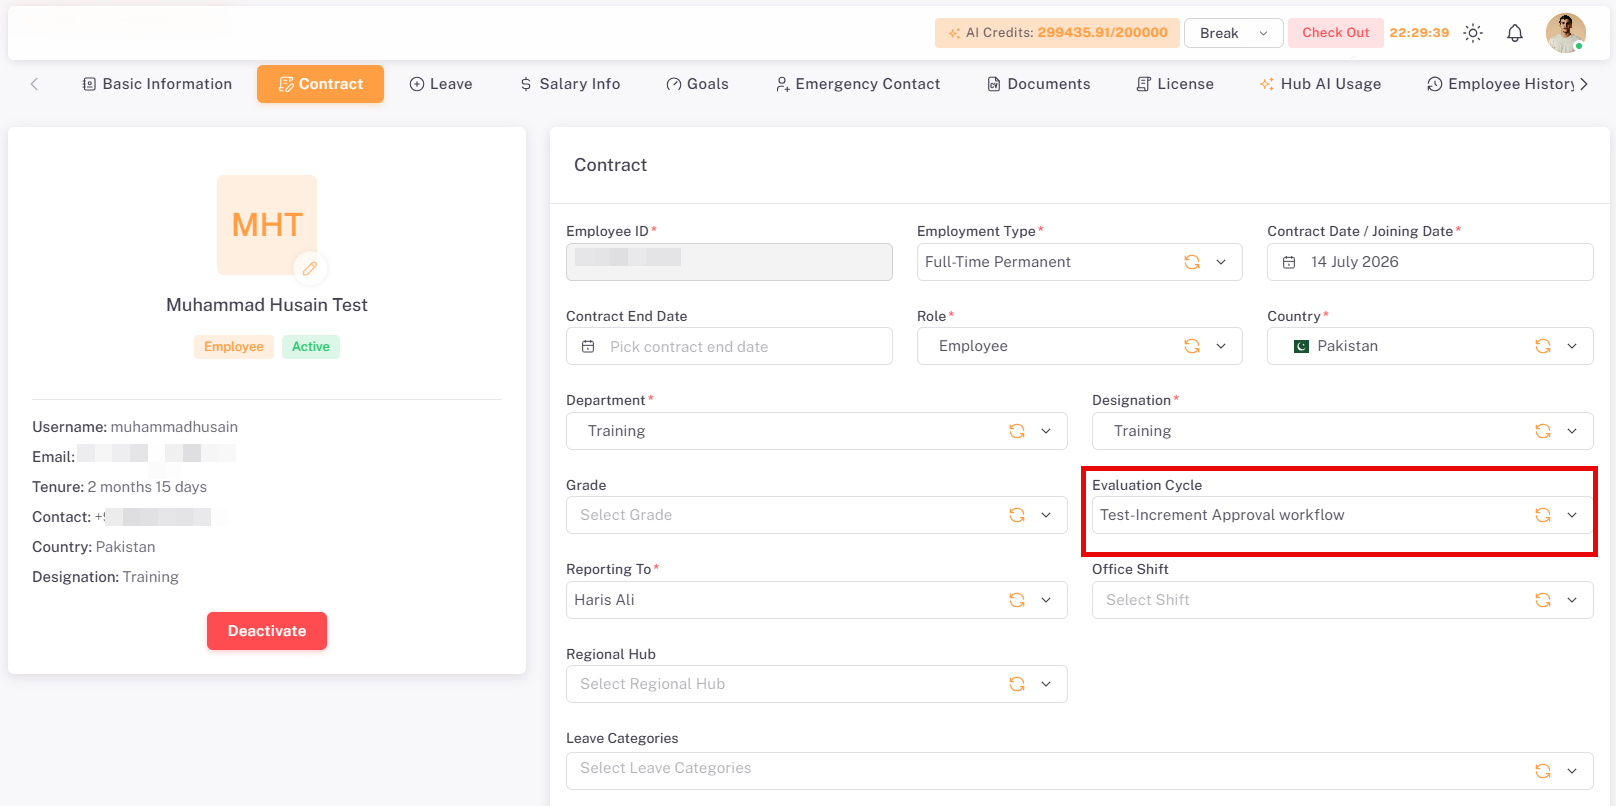
⚠️ Important: An employee only becomes eligible for a cycle’s appraisal once the Evaluation Cycle field has been set on their profile. Employees without a cycle assigned do not appear in that cycle’s Eligible Employees or Eligible Departments listings.
💡 Tip: Once an employee's country is selected, the evaluation cycle dropdown automatically filters to display only those cycles associated with that country, as well as any applicable organization-wide cycles.
Section 3: Assigning Goals to the Employee
Before an increment can be processed, the employee should also have the relevant goals assigned to them for the evaluation cycle. Goals are not assigned from the Appraisals module, they are assigned separately, either from the Performance Hub module (Assign Goals) or from the employee’s own profile.
📜 Note: Goal assignment is covered in full in the Goal Assignment Workflow User Guide. This guide picks up from the point where a goal has already been assigned to the employee and is ready to be completed.
Section 4: Employee Goal Submission
Once a goal has been assigned, the employee works on it and then submits it for their manager’s review, along with a self rating and a supporting document.
4.1. Viewing Assigned Goals
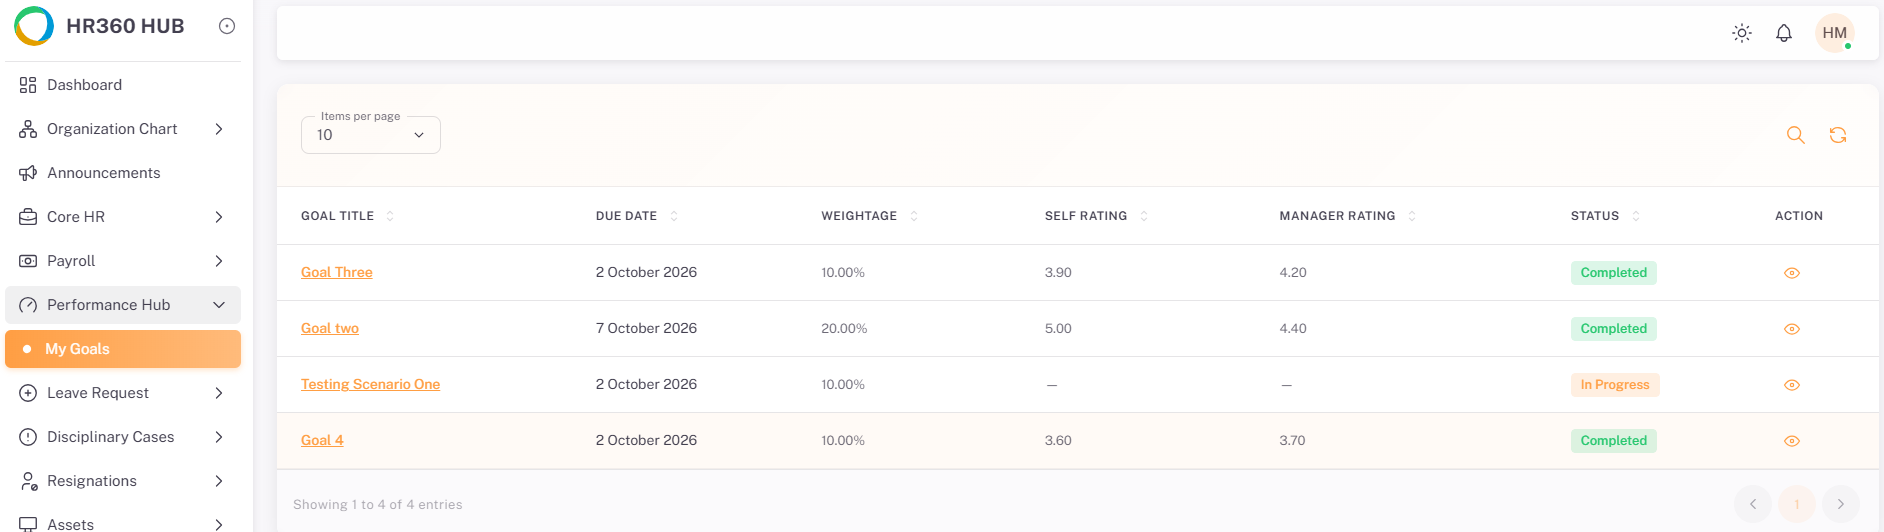
The employee logs in and goes to Performance Hub > My Goals to see the list of goals assigned to them, along with each goal’s due date, weightage, self rating, manager rating, and status.
Column | Description |
Goal Title | The name of the goal. The title is a link that opens the goal. |
Due Date | The date the goal is due. |
Weightage | The goal’s weight toward the overall appraisal, shown as a percentage. |
Self Rating | The employee’s own rating of the goal, once submitted. Shows a dash until submitted. |
Manager Rating | The manager’s rating of the goal, once approved. Shows a dash until approved. |
Status | The goal’s current status, e.g. In Progress, Awaiting Review, or Completed. |
4.2. Opening a Goal
The employee clicks the title of the goal they want to submit. This opens the goal’s details page, with the goal’s current status (e.g. In Progress) shown at the top, along with its due date, weightage, self rating, manager rating, and the Submit Goal button.
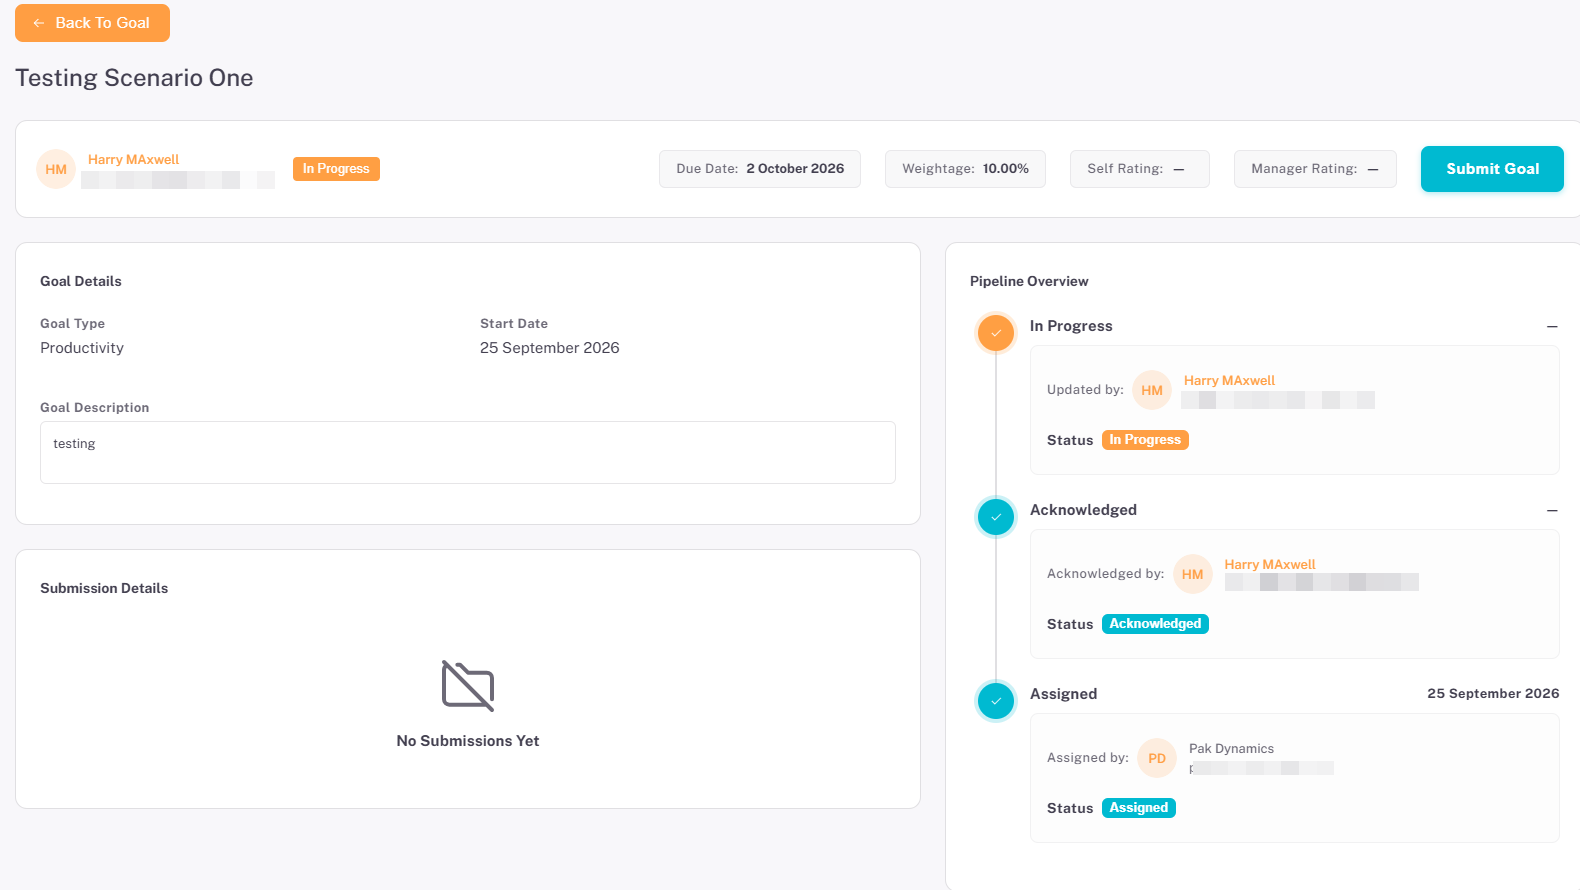
Field | Description |
Goal Type / Start Date | The category the goal belongs to, e.g. Productivity, and the date it started. |
Goal Description | The description of the goal entered when it was assigned. |
Submission Details | Shows “No Submissions Yet” until the employee has submitted the goal. |
Self Rating / Manager Rating | Show a dash until the goal has been submitted and approved. |
Pipeline Overview | The stages the goal has passed through so far — Assigned, Acknowledged, and In Progress — with the date and user for each. |
Submit Goal | Opens the Submit Goal Work dialog, used to submit the goal for review. |
4.3. Submitting a Goal
Clicking Submit Goal opens the Submit Goal Work dialog, where the employee adds a summary comment of the completed activities, gives a self rating, and attaches a document relevant to the goal.
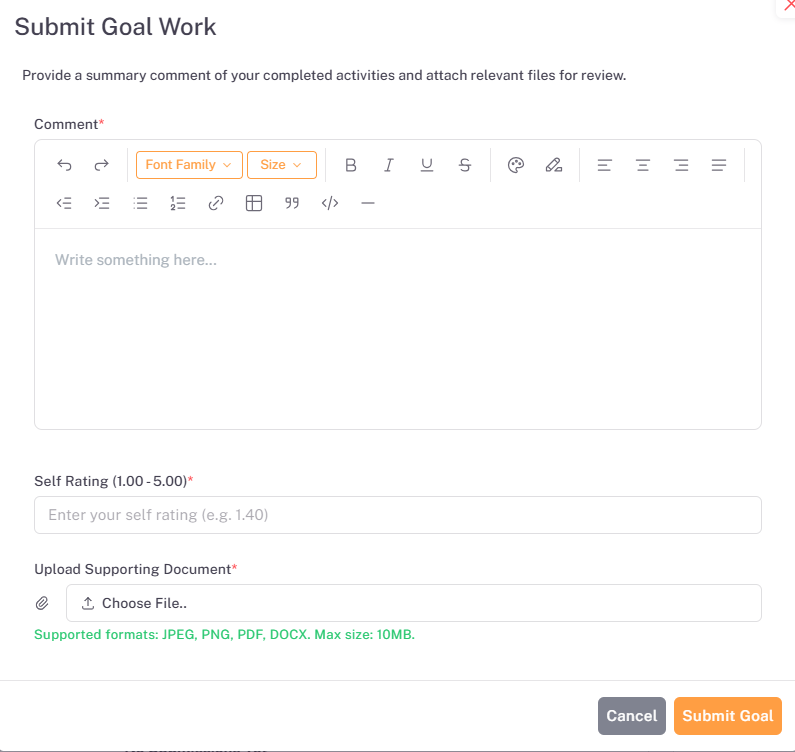
Field | Required | Description |
Comment | Yes | Enter a summary of the work completed for the goal using the rich-text editor. |
Self Rating (1.00 – 5.00) | Yes | Enter the employee’s own rating for the goal, e.g. 1.40. |
Upload Supporting Document | Yes | Click Choose File to attach a document relevant to the goal. Supported formats: JPEG, PNG, PDF, DOCX. Maximum size: 10MB. |
Click Submit Goal in the dialog to submit the goal for review, or Cancel to close it without submitting.
4.4. Awaiting Manager Review
Once submitted, the goal’s status changes to Awaiting Review and remains so until the reporting manager reviews it. The goal’s details page now also shows the employee’s self rating, the Submission Details, and a Submitted stage in the Pipeline Overview.
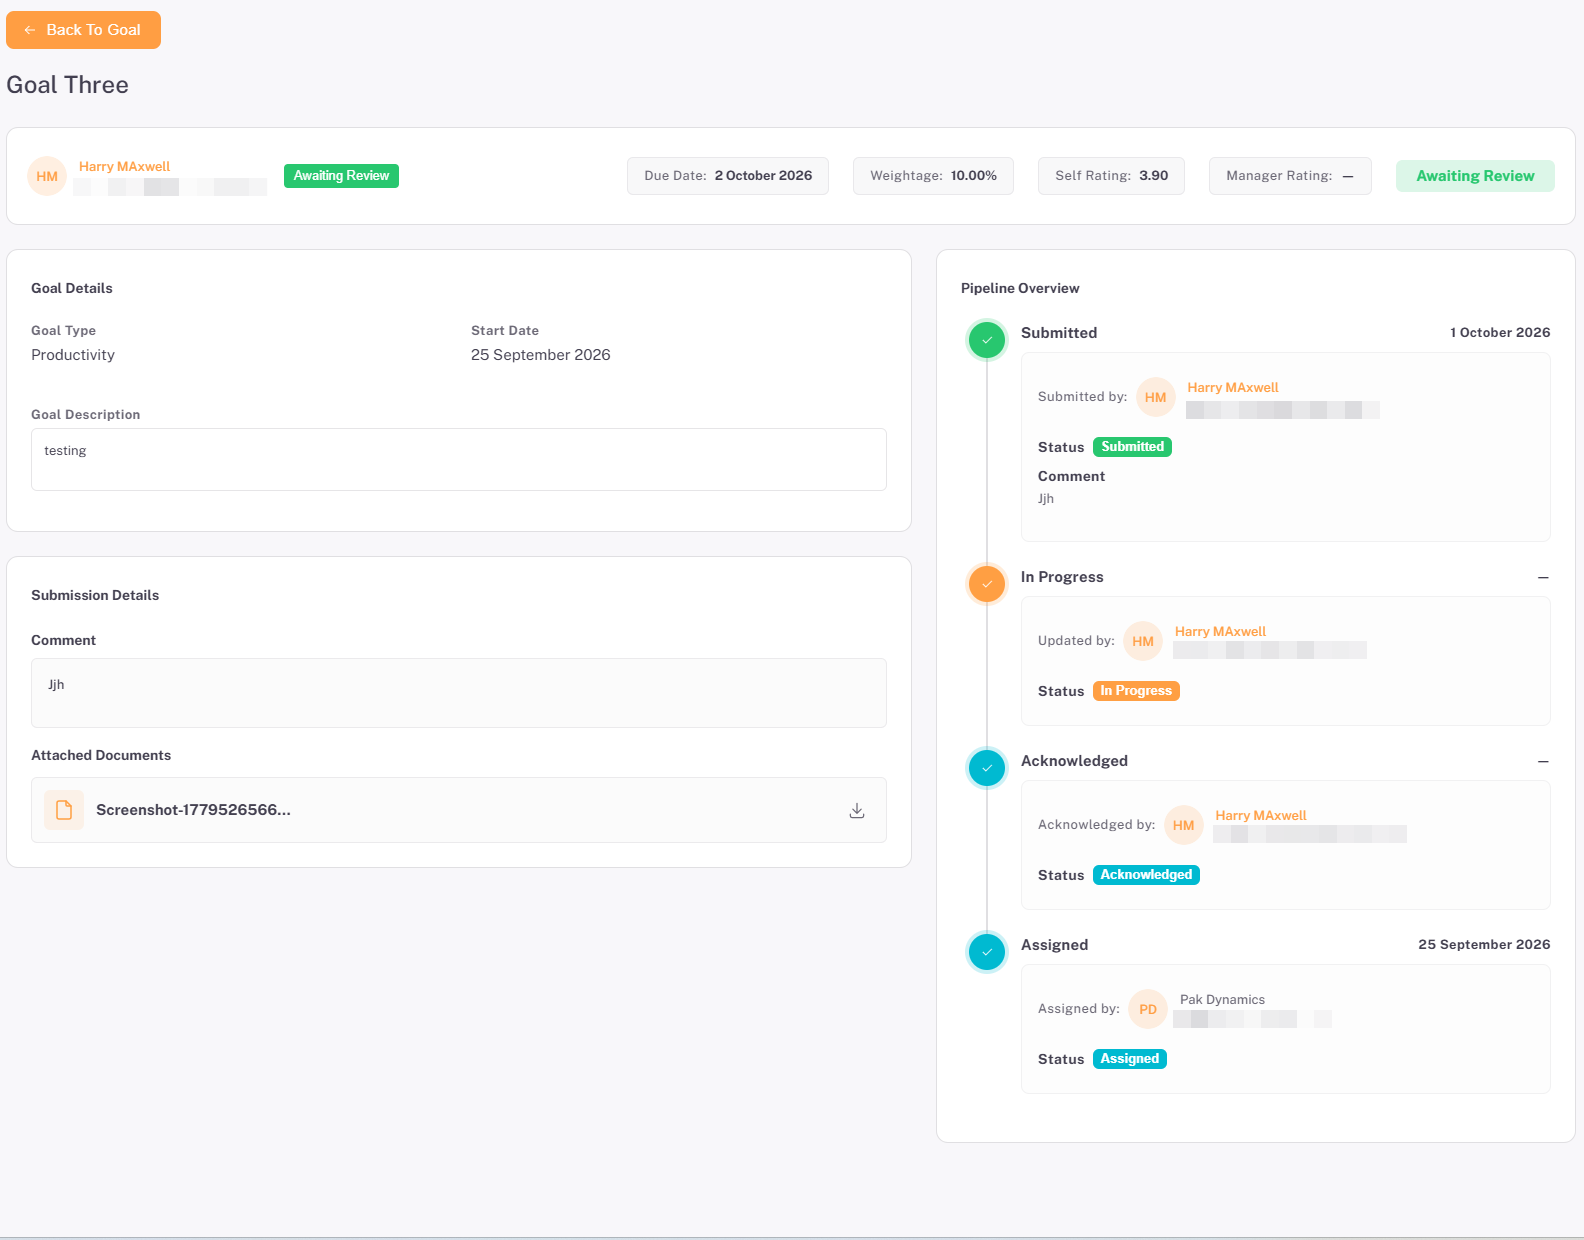
Field | Description |
Goal Type / Start Date | The category the goal belongs to, e.g. Productivity, and the date it started. |
Comment | The employee’s notes describing the work completed for the goal. |
Attached Documents | Any supporting files the employee has uploaded with their submission. |
Self Rating | The rating the employee gives their own submission, shown at the top of the page. |
Pipeline Overview | The stages the goal has passed through — Assigned, Acknowledged, In Progress, and Submitted — with the date and user for each. |
📜 Note: Once submitted, the goal’s status changes to Awaiting Review and it becomes visible to the reporting manager for approval..
Section 5: Manager Goal Approval
After an employee submits a goal, their reporting manager reviews it, adds a manager rating, and approves or rejects the submission.
5.1. Locating the Submission
The manager logs in and goes to Performance Hub > All Goals to see every goal assigned to their team, along with its Created By and Goal Status details.
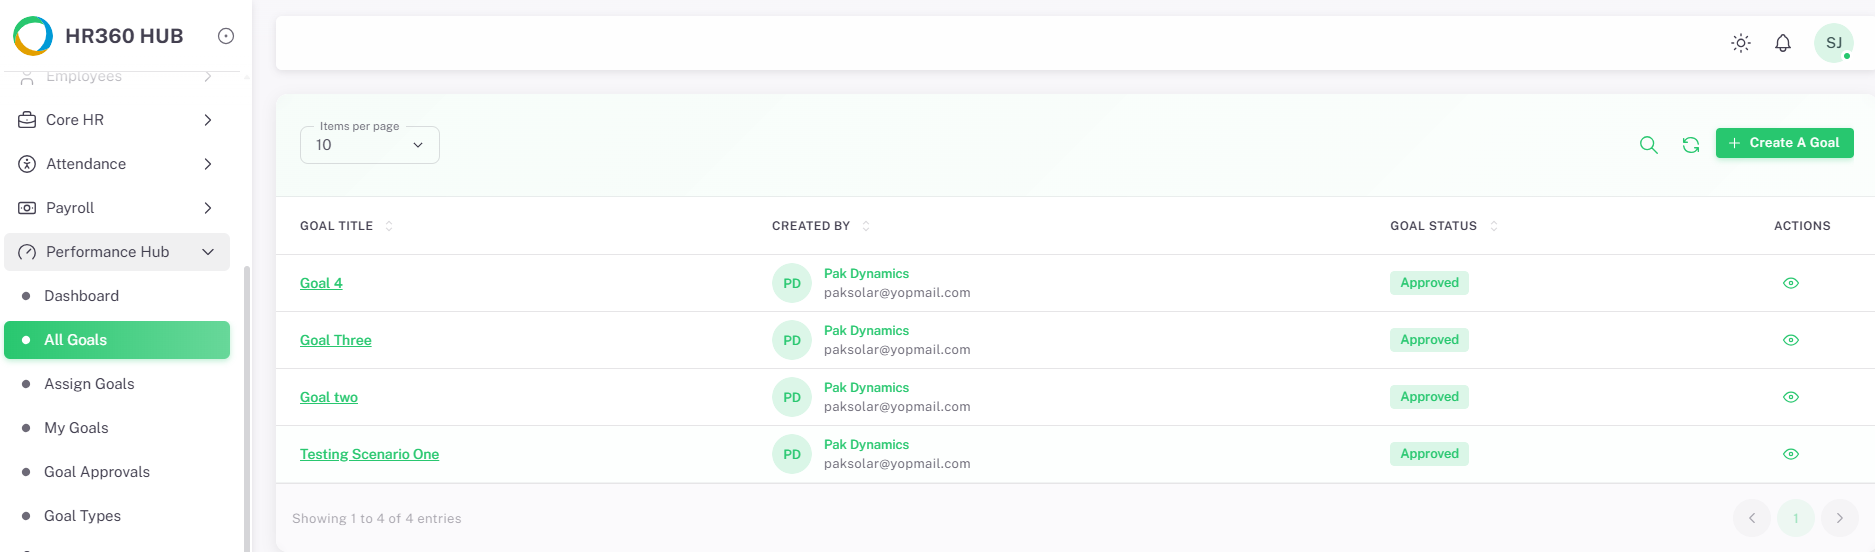
Clicking the title of a goal opens it with three tabs: Goal Details, Assignees, and Activity Logs. The manager opens the Assignees tab to see every employee in their team who has been assigned this goal.
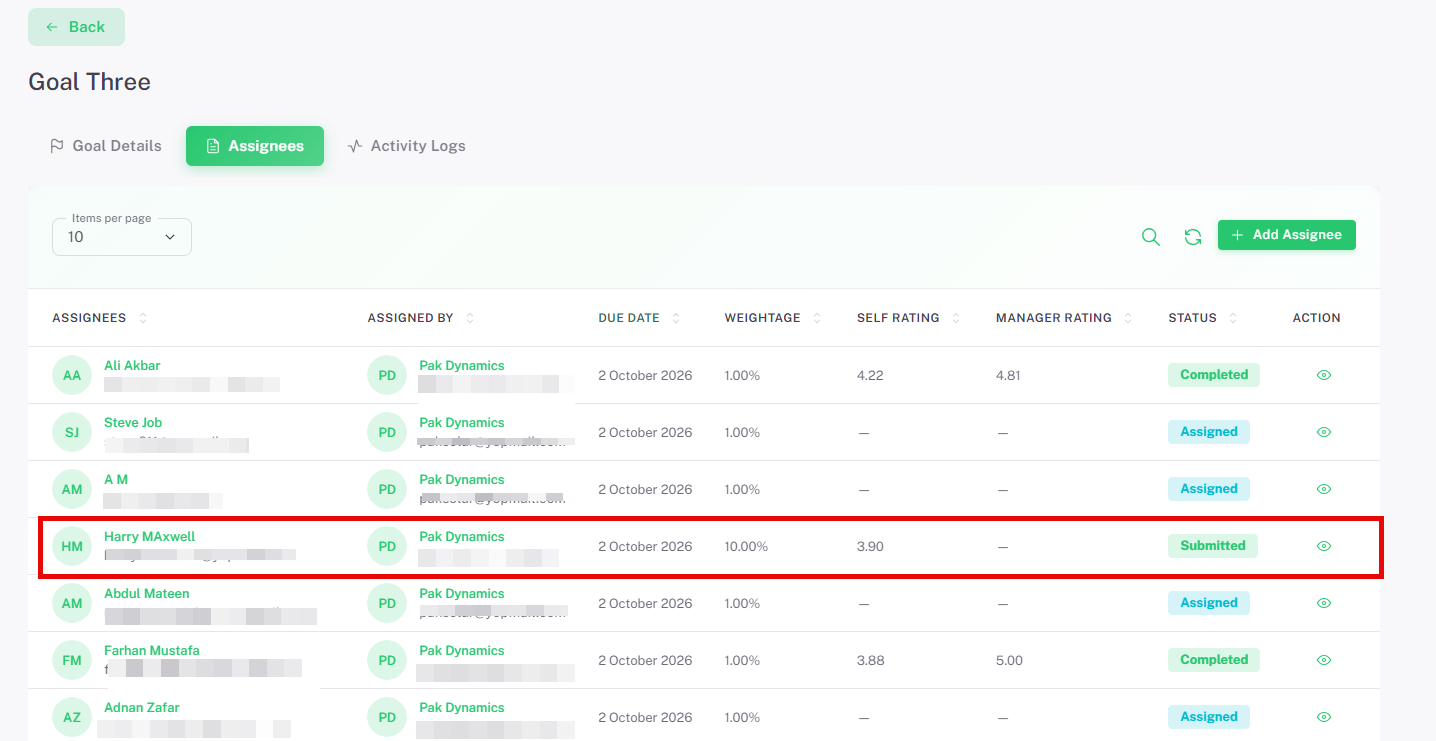
Column | Description |
Assignees | The employee the goal is assigned to, with their email address. |
Assigned By | The user who assigned the goal. |
Due Date | The date the goal is due for this employee. |
Weightage | The goal’s weight toward this employee’s overall appraisal, shown as a percentage. |
Self Rating / Manager Rating | The employee’s own rating and the manager’s rating. Each shows a dash until it has been given. |
Status | The employee’s progress on the goal, e.g. Assigned, Submitted, or Completed. |
Action | Eye icon — opens the employee’s goal. |
Click the Eye icon for the employee whose status is Submitted to open their submission for review.
5.2. Reviewing and Approving the Goal
Opening a goal that is awaiting review shows the same Goal Details and Pipeline Overview the employee sees, along with the employee’s submission, and Approve Submission and Reject buttons at the top of the page.
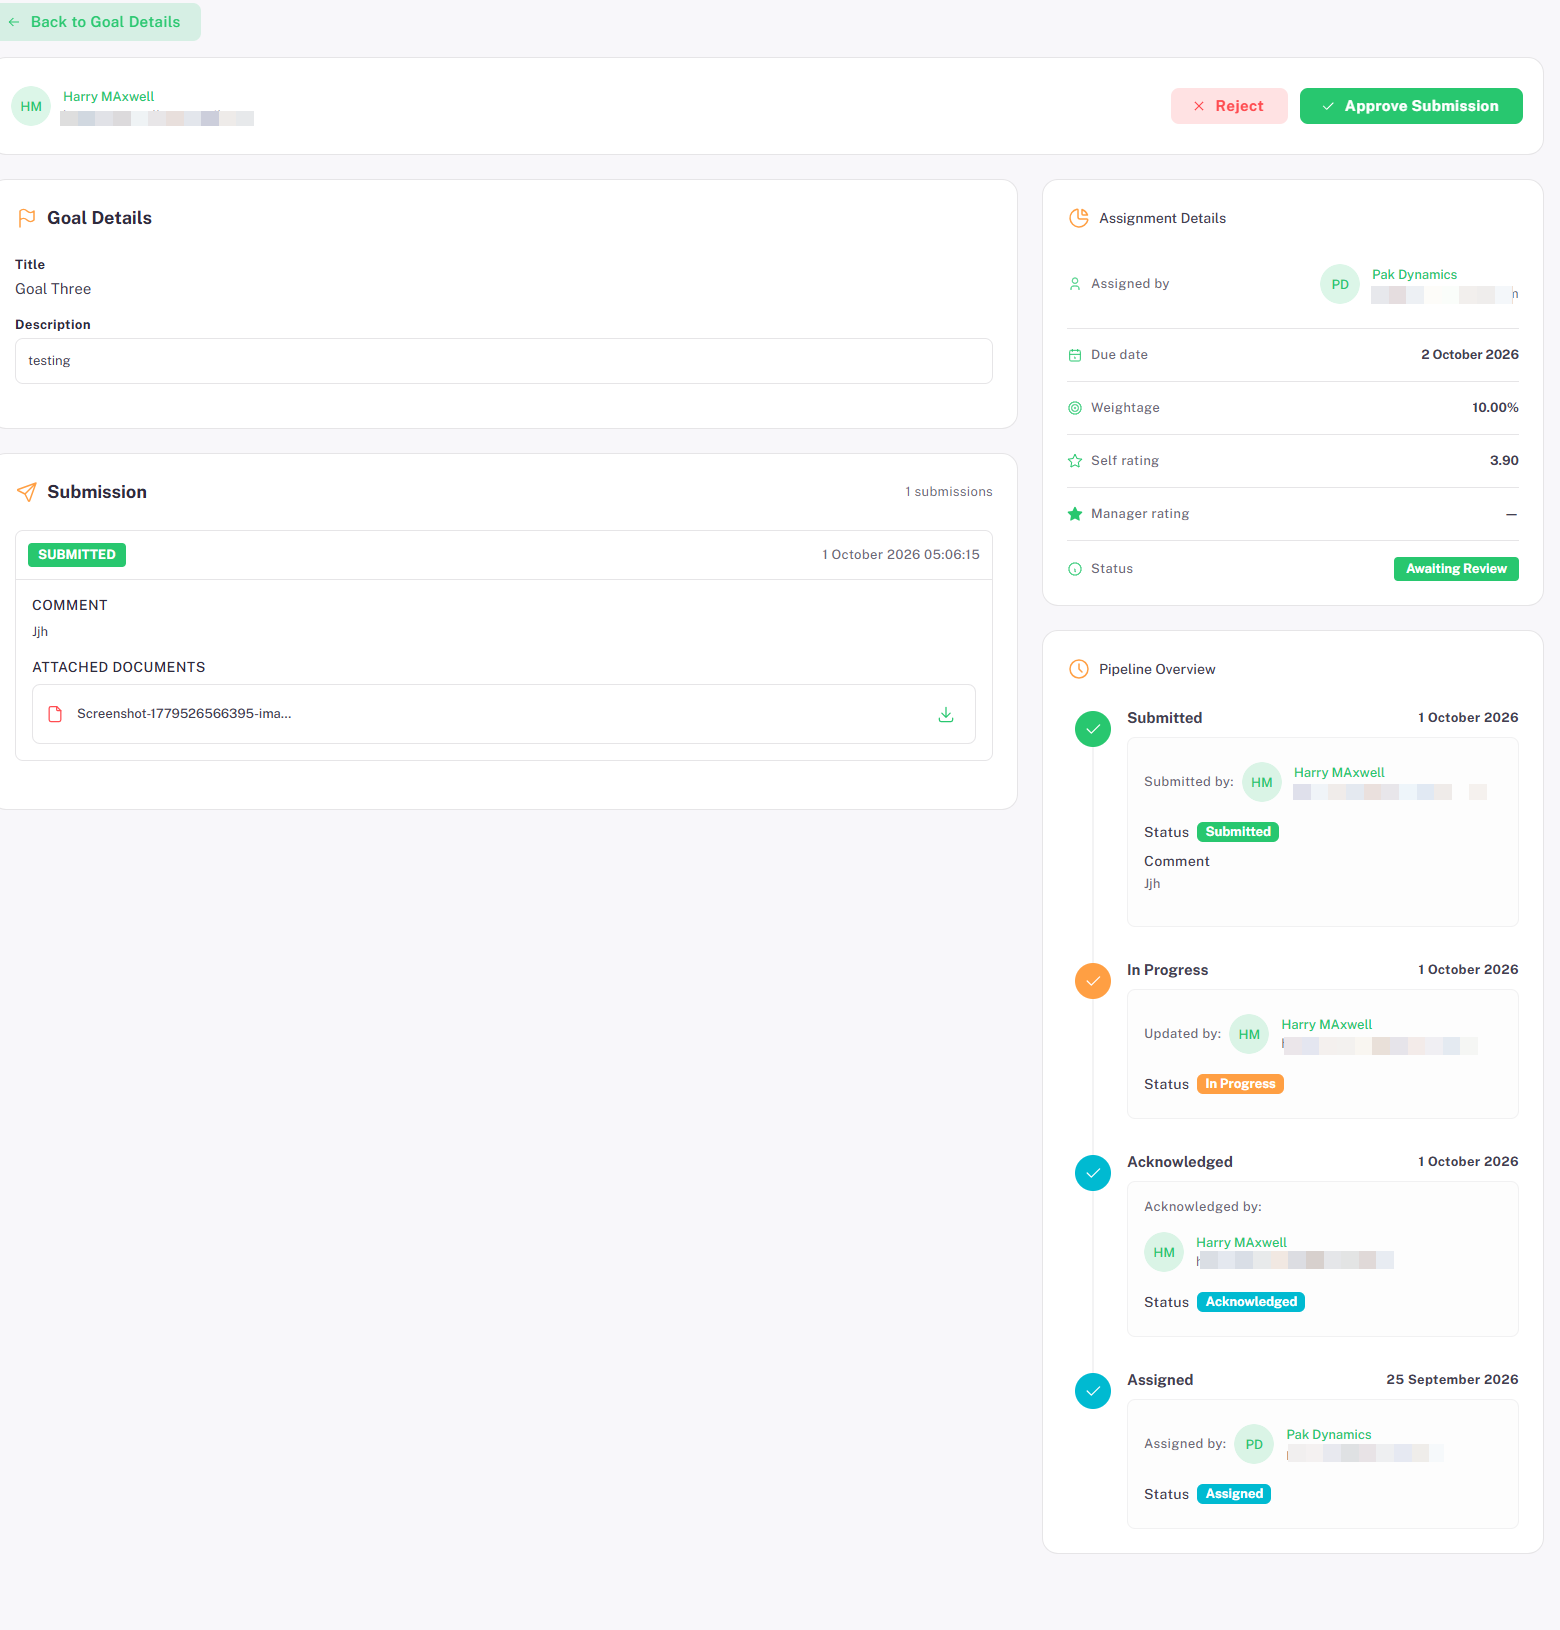 |
Panel | Description |
Goal Details | The goal’s title, description, and any attachments. |
Submission | The employee’s submitted comment, attached documents, and the submission date. |
Assignment Details | Who assigned the goal, the due date, weightage, self rating, manager rating, and current status. |
Pipeline Overview | The full history of the goal, from Assigned through to Submitted. |
Click Approve Submission to open the approval dialog.
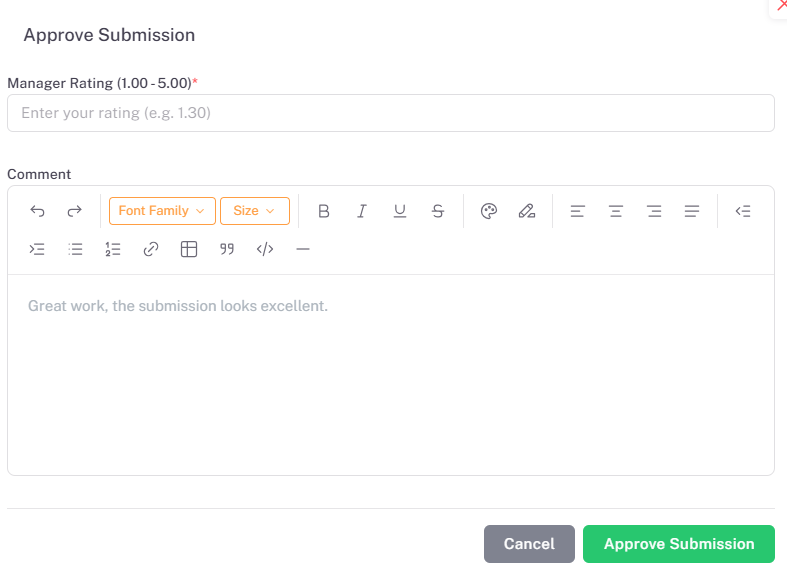
Field | Required | Description |
Manager Rating (1.00 – 5.00) | Yes | Enter the manager’s rating for the goal. |
Comment | No | Enter notes on the submission using the rich-text editor. |
Click Approve Submission in the dialog to confirm the approval, or Cancel to close it without approving. Clicking Reject instead of Approve Submissions ends the goal back to the employee for revision.
⚠️ Important: A goal’s Self Rating and Manager Rating only populate once the employee has submitted the goal and the manager has approved it. These ratings are what appear against the goal when it is later attached to an increment in the Appraisals module, where they are averaged across all the goals attached.
Section 6:Processing the Increment
With the evaluation cycle set up, the employee assigned to it, and their goals submitted and approved, the increment itself can now be processed from the Appraisals module.
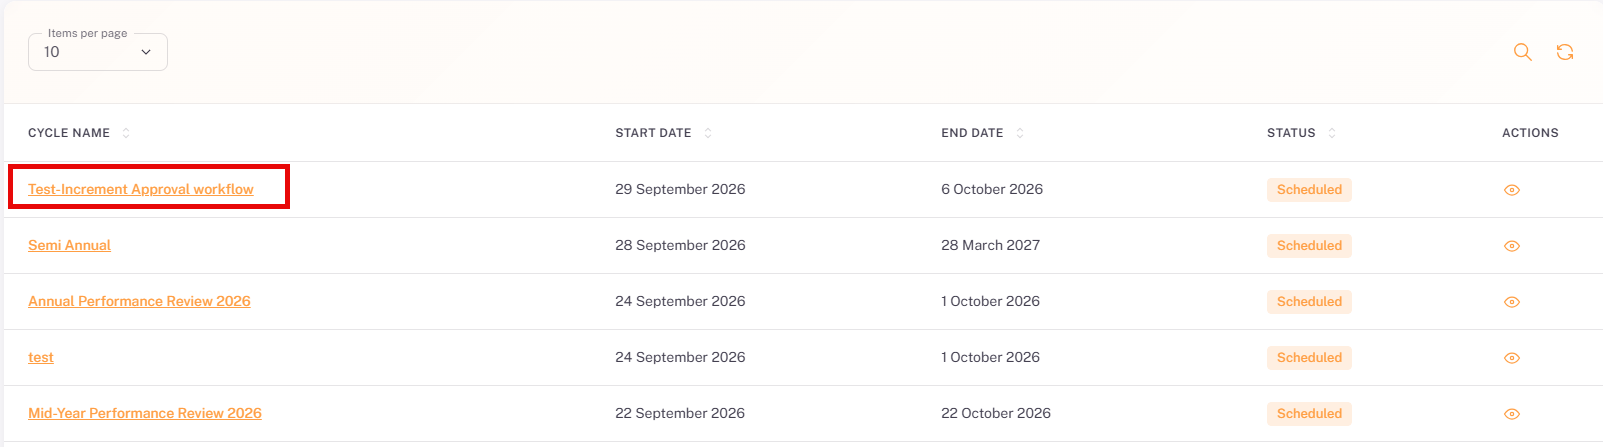
6.1. Opening the Appraisal Cycle
- From the left sidebar, click on Appraisals to expand the sub-menu.
- Click on Appraisal Cycle.
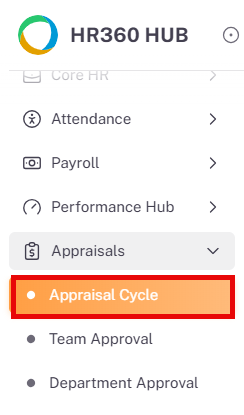
- On the Appraisal Cycle listing, click on the selected evaluation cycle .
6.2. Eligible Employees
Opening the cycle shows the Eligible Employees tab, listing every employee who has this cycle assigned to their profile.
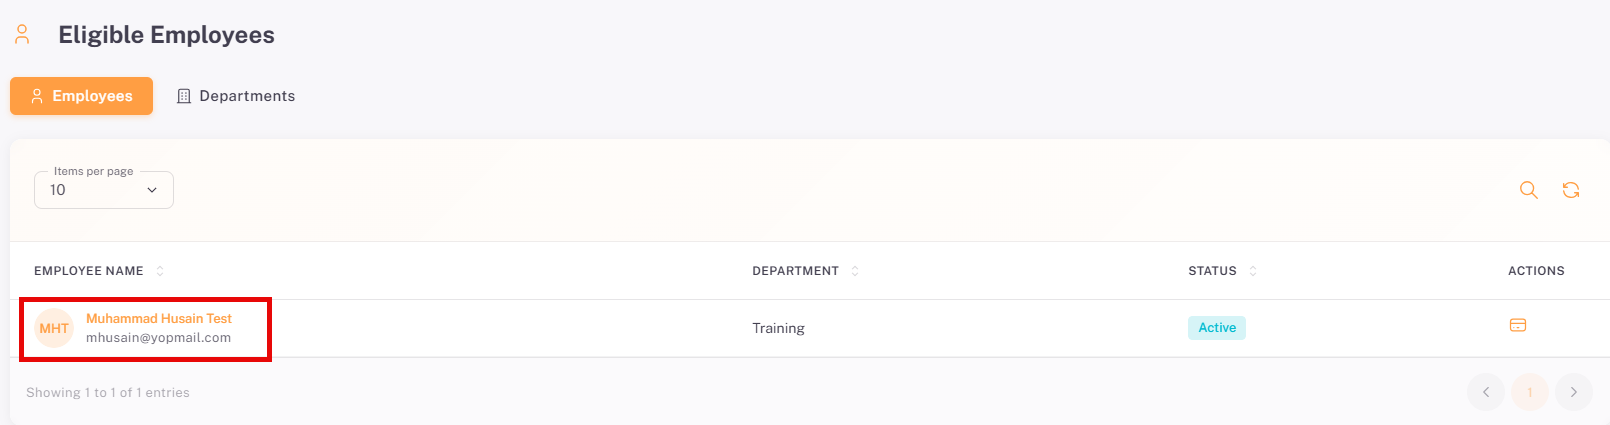
💡 Tip: If an employee expected to appear here is missing, confirm that the evaluation cycle has been set on their profile, as described in Section 2.
6.3. Selecting Goals and Adding Increment Information
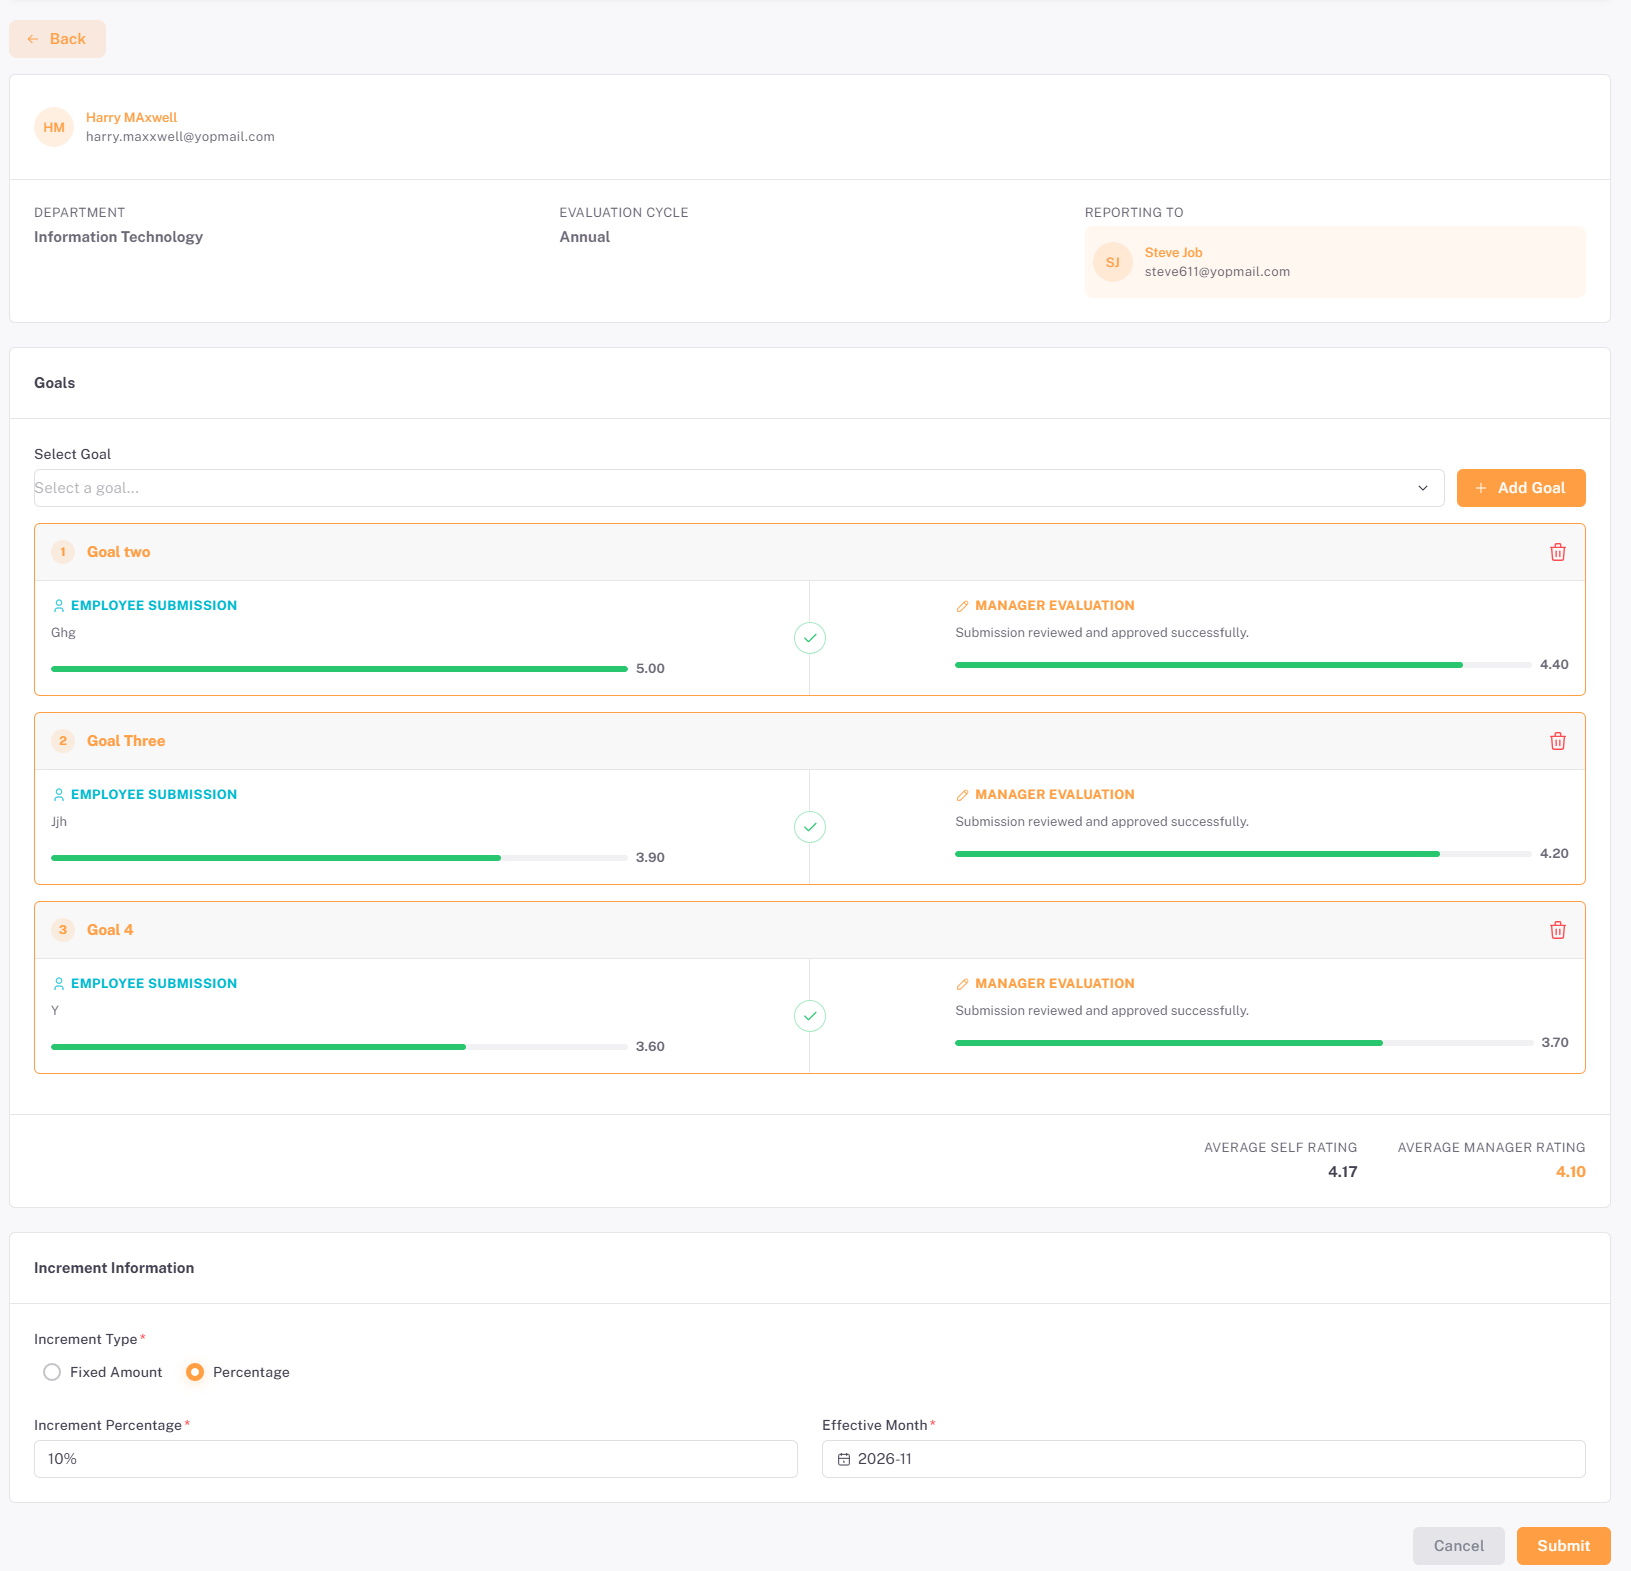
Click the Process Increment icon in the Actions column for the employee. This opens the increment form, showing the employee’s details, the Goals section, and the Increment Information section together.
Section | Description |
Employee Details | Confirms the employee’s department, the evaluation cycle the increment falls under, and their reporting manager. |
Goals | Use the Select Goal dropdown to choose a goal assigned to the employee and click Add Goal. Each added goal shows the employee’s submission and self rating beside the manager’s evaluation and manager rating. Below the goals, the Average Self Rating and Average Manager Rating are calculated across all added goals. |
Increment Information | Set the Increment Type (Fixed Amount or Percentage), the Increment Amount or Increment Percentage, and the Effective Month. |
When more than one goal is added, the form averages the ratings so that the employee’s overall performance can be reviewed at a glance. In the example above, the three goals carry self ratings of 5.00, 3.90, and 3.60 and manager ratings of 4.40, 4.20,and 3.70, giving an Average Self Rating of 4.17 and an Average Manager Rating of 4.10.
💡 Tip: Compare the Average Self Rating with the Average Manager Rating to see how the employee’s view of their performance matches the manager’s evaluation, and use both when deciding the appraisal.
6.4 Submitting the Increment
- Select the relevant goal or goals for the employee from the Select Goal dropdown, clicking Add Goal for each.
- Choose the Increment Type, enter the Increment Amount (or Increment Percentage when Percentage is selected), and select the Effective Month.
- Click Submit to complete increment processing from the HR/Admin side, or click Cancel to close the form without saving.
📜 Note: Submitting the increment does not finalize it. It moves next to the employee’s reporting manager for approval under Team Approval, and then to the head of department under Department Approval, before it is applied. This approval flow is covered in the Appraisals Module User Guide.
Summary
The following table provides a complete step-by-step summary of the increment processing workflow, from setting up the evaluation cycle through to submitting the increment:
# | Action / Step | Result |
1 | Set up the Evaluation Cycle: Portal Settings → Evaluation Cycle → Add Evaluation Cycle (or edit an existing cycle). | A new evaluation cycle is created, or an existing one updated, and appears on the Evaluation Cycle listing. |
2 | Assign the cycle to employees: Set the Evaluation Cycle field on each employee’s profile. | The employee becomes eligible for appraisal under that cycle. |
3 | Assign the cycle when creating or editing an employee: Employee → Employee List → Add Employee, or open an existing employee’s Contract tab. | The Evaluation Cycle field is set on the employee’s profile. |
4 | Assign relevant goals to the employee: Performance Hub → Assign Goals, or from the employee’s profile. | The employee has goals assigned that can later be attached to their increment. |
5 | Employee submits the goal: My Goals → Open the goal → Submit Goal → Add comment, self rating, and supporting document → Submit Goal. | The goal status changes to Awaiting Review and becomes visible to the reporting manager. |
6 | Manager approves the goal: All Goals → Open the goal → Assignees tab → Open the Submitted employee → Approve Submission → Add manager rating and comment. | The goal is approved, and the manager rating is recorded against the employee’s self rating. |
7 | Open the Appraisal Cycle: Appraisals → Appraisal Cycle → Select the cycle. | The Eligible Employees and Eligible Departments for the cycle are displayed. |
8 | Select the employee: On the Eligible Employees tab, locate the employee. | The employee’s record and Process Increment action are available. |
9 | Open the increment form: Click the Process Increment icon in the Actions column. | The increment form opens, showing the employee’s details, Goals section, and Increment Information. |
10 | Attach goals: Select Goal → Add Goal, for each relevant goal. | The goal’s submission, evaluation, and ratings are attached to the increment, and the average self and manager ratings are calculated. |
11 | Enter increment details: Select Increment Type → Enter Increment Amount or Percentage → Select Effective Month. | The increment value and effective date are set. |
12 | Submit the increment: Click Submit. | Increment processing is completed from the HR/Admin side, and the increment is sent for manager approval. |
13 | Increment moves to approval: The increment proceeds automatically to Team Approval, then Department Approval. | The reporting manager and head of department review and approve the increment before it is applied. |