

Overview
The HR360 Hub desktop application runs on the employee’s computer and works together with the HR360 Hub Portal to record activity, such as keyboard and mouse activity counts, idle time, and screenshots, for the Productivity Insights features. On Linux, the application is installed using a ready-made installer script, install.sh, which is supplied inside a zip file named HR360Hub-linux-x64 followed by the build date and time.
The installer does most of the work automatically. It installs the application for the current user, sets up screen capture, checks the screenshot tools, and offers to add two small GNOME Shell extensions. The user only needs to run the script and answer a few prompts.
This guide explains how to:
- Download and extract the installer, and open it in a terminal.
- Prepare and run the installer.
- Answer the installer’s prompts, and understand what each answer means.
- Enter the sudo password when requested.
- Confirm the installation and open the app.
- Resolve the most common installation messages.
📜 Note: The steps in this guide were captured on a Fedora system running a GNOME Wayland session. Package names and prompts may differ slightly on other Linux distributions or desktop sessions.
Prerequisites
Before starting the installation, ensure the following are in place:
- The computer is running Linux with the GNOME desktop (for example, Fedora with GNOME).
- The HR360Hub-linux zip file, as provided by your organization, has been downloaded to the computer, for example into the Downloads folder.
- The user has sudo (administrator) rights and knows their account password.
- The computer is connected to the internet, as system packages and GNOME Shell extensions are installed from online sources.
- The user is logged in to the computer with the account that will use the app, since the app is installed for the current user only.
Section 1: Installation Workflow
The diagram below shows the whole installation from start to finish in nine steps. Orange steps are actions you take; the grey step is carried out by the installer on its own. Follow the steps from top to bottom, and refer to Section 2 for the detailed instructions and screenshots for each one.
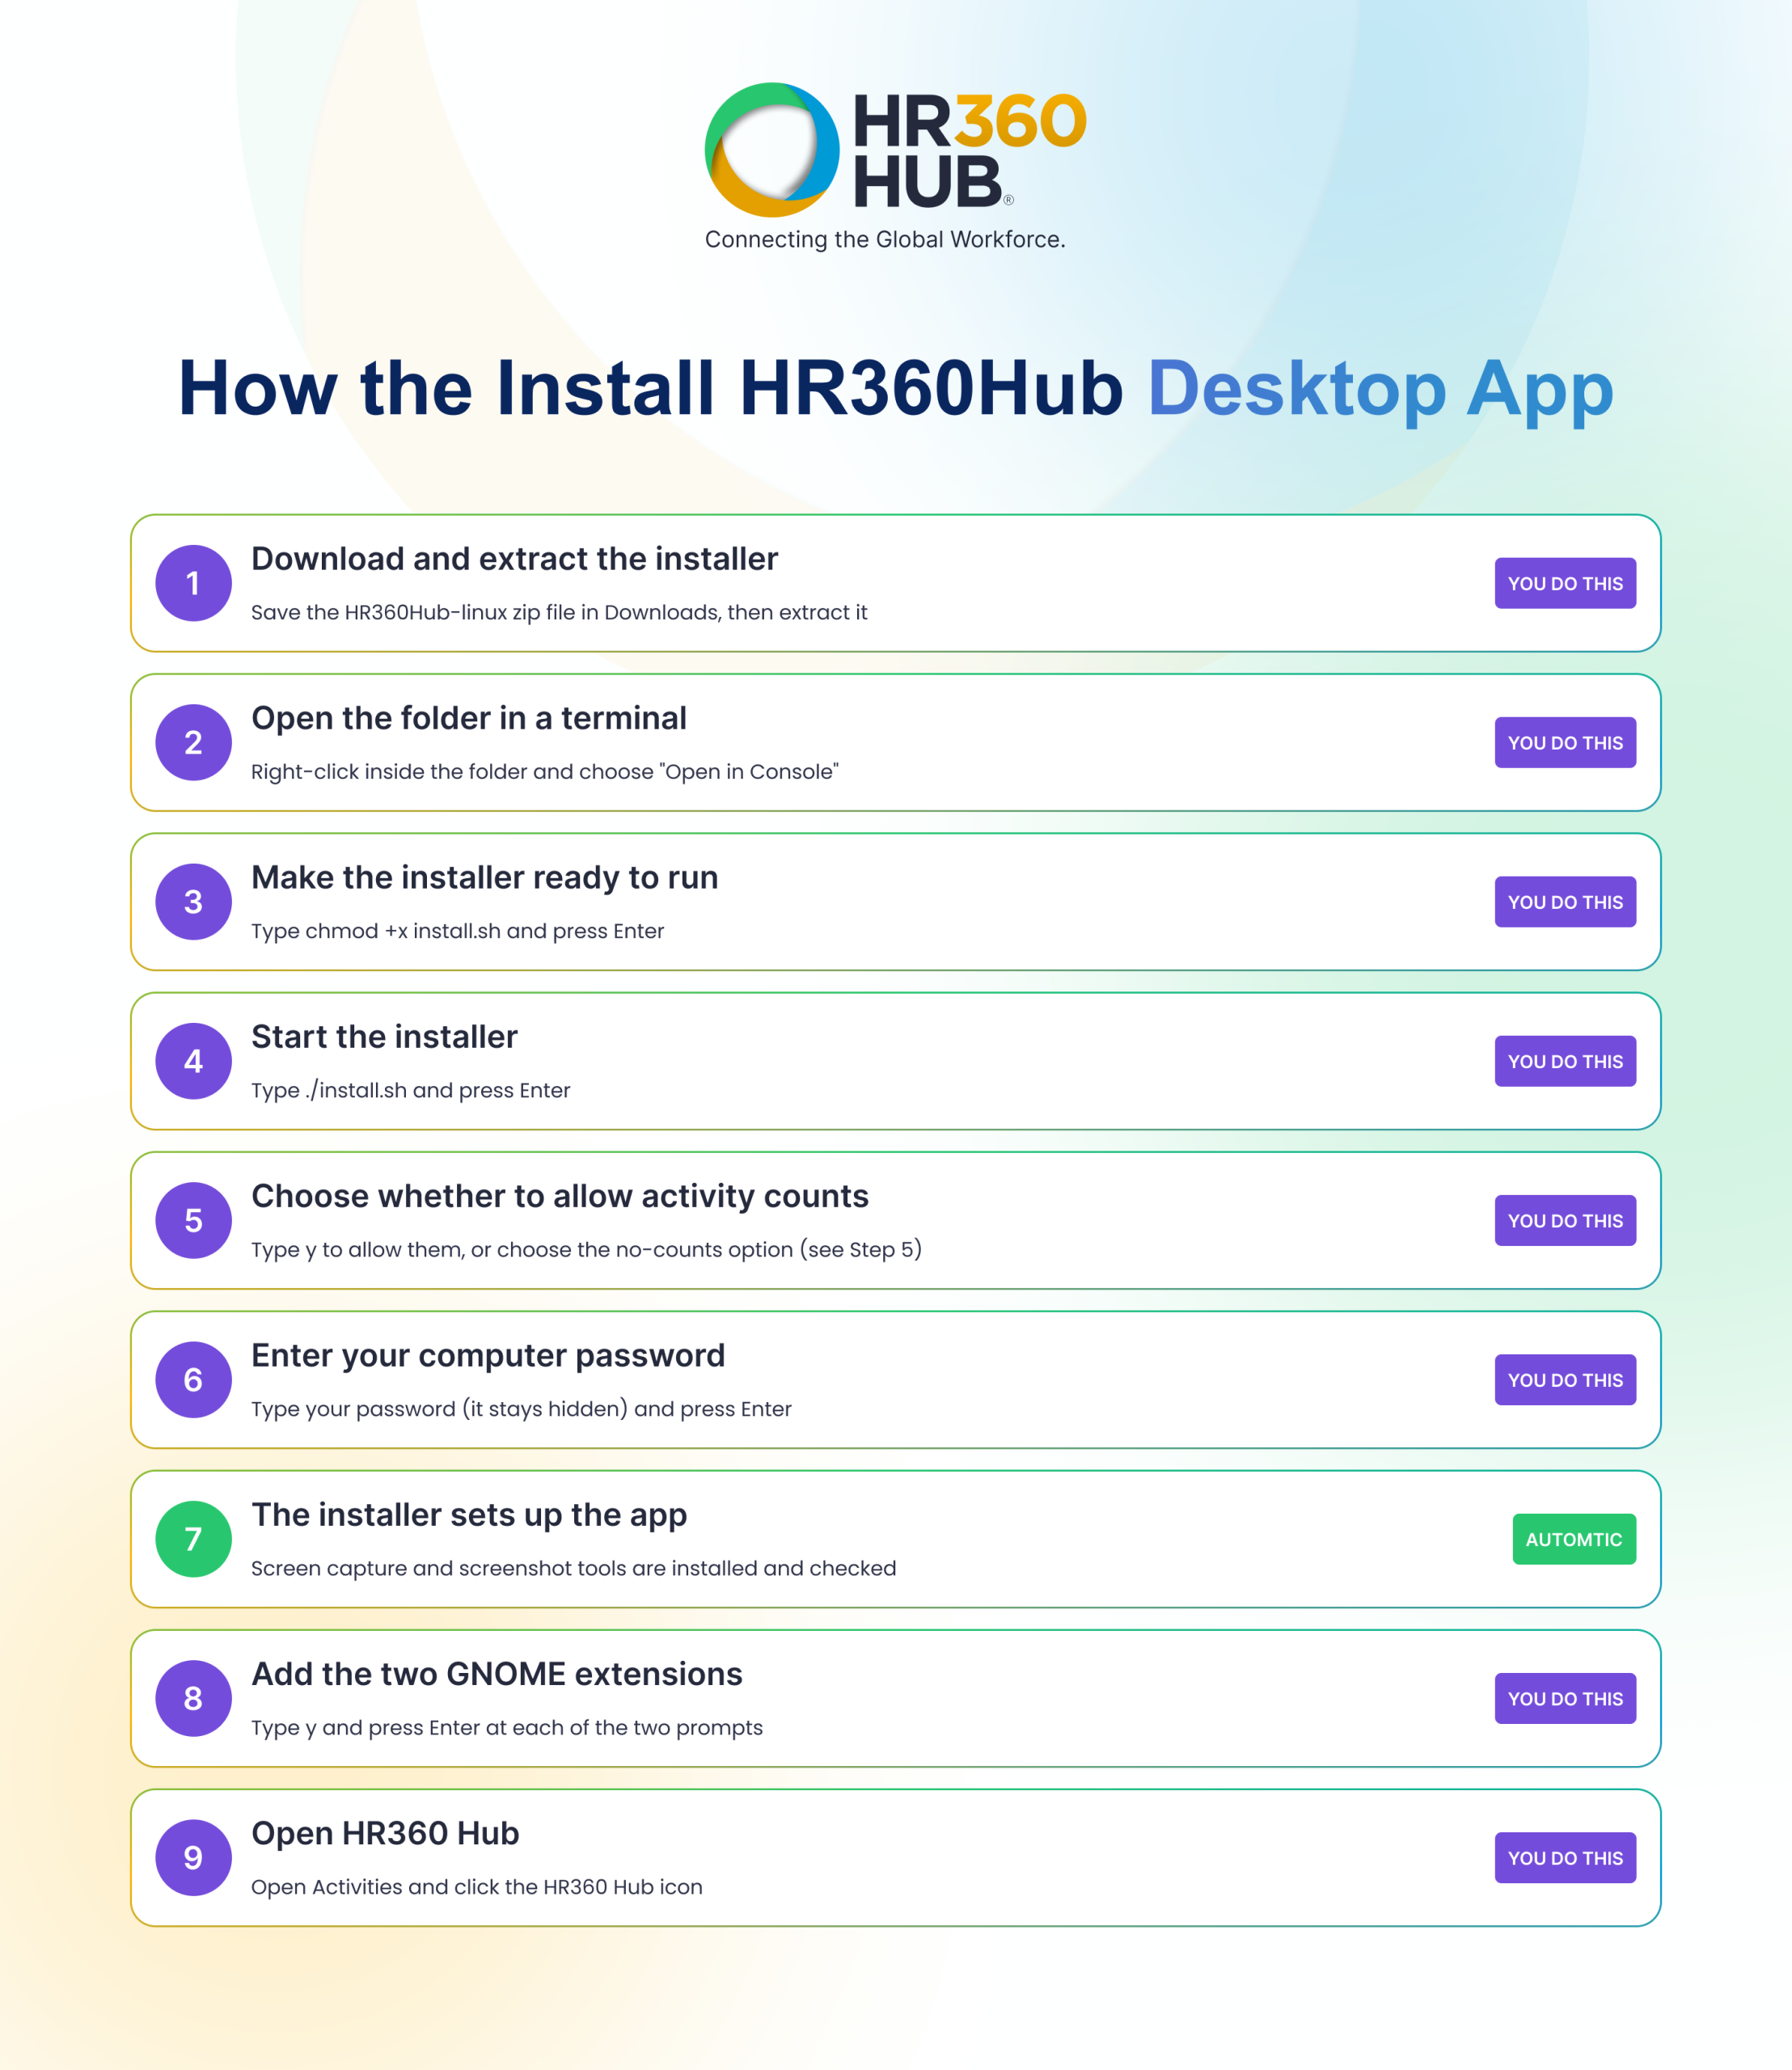
Step | What You Do | What You Will See |
1 | Extract the downloaded zip file. | A folder named HR360Hub-linux. |
2 | Right-click inside the folder and choose Open in Console. | A terminal window opens in that folder. |
3 | Type the chmod command and press Enter. | No message. This is normal. |
4 | Type ./install.sh and press Enter. | A message about keyboard and mouse activity counts. |
5 | Choose whether to allow activity counts: type y to allow them, or use the no-activity-counts option described in Step 5. | With y, a request for your password. |
6 | Type your password and press Enter. | Messages as the installer sets up the app. |
7 | Wait. No action is needed. | Screen capture and screenshot tools are checked. |
8 | Type y and press Enter at each extension prompt. | The installer finishes and the terminal prompt returns. |
9 | Open Activities and click the HR360 Hub icon. | The HR360 Hub app opens. |
💡 Tip: Keep the terminal window open until the installer finishes. It may stop and wait for you at the prompts in Steps 5, 6 and 8.
Section 2: Installing the Desktop App
2.1. Step 1: Download and Extract the Installer
- Download the HR360Hub-linux zip file to the computer. The file is named like HR360Hub-linux.
- Open the Files app and go to the Downloads folder (or the folder where the zip file was saved).
- Extract the zip file, for example by right-clicking it and choosing the extract option. A folder named HR360Hub-linux is created.
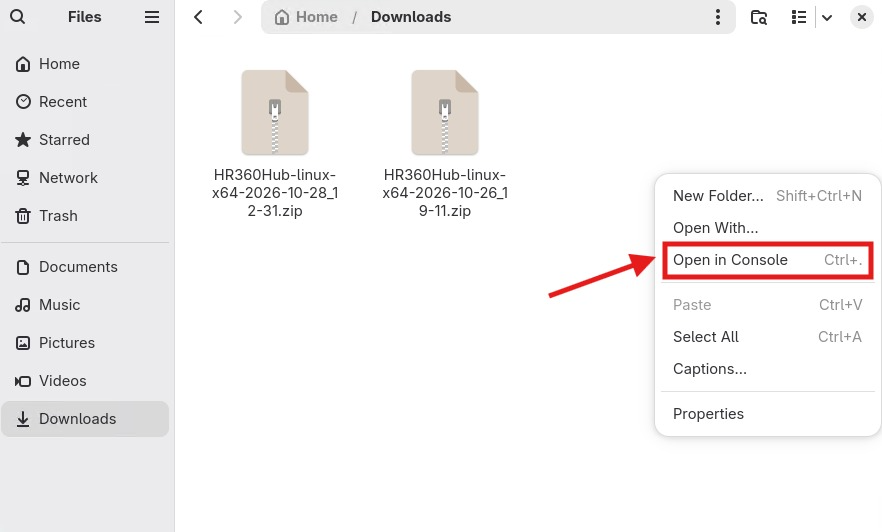
📜 Note: If more than one HR360Hub-linux zip file is present, as in Figure 2, use the one with the most recent date and time, as this is the latest build.
2.2. Step 2: Open the Folder in a Terminal
- In the Files app, open the extracted HR360Hub-linux folder.
- Right-click on an empty area inside the folder.
- Choose Openin Console from the menu (shortcut: Ctrl + .).
A terminal window opens, already pointing at the folder.The prompt in the terminal ends with the folder name, for example ~/Downloads/HR360Hub-linux, which confirms that you are in the right place.
2.3. Step 3: Make the Installer Ready to Run
In the terminal, type the following command exactly as shown, including the spaces, and press Enter. This allows the install.sh script to run. No message is shown when it succeeds.
Command | Purpose |
chmod +x install.sh | Marks the installer script as executable so that it can be run. |
📜 Note: Type the command exactly as shown in the table above: chmod +x install.sh, with a plus sign before the x and a space before install.sh.
2.4. Step 4: Start the Installer
Type ./install.sh and press Enter. The installer starts and, on a Wayland session, immediately asks the question described in Step 5.
Command | Purpose |
./install.sh | Runs the installer from the current folder and installs HR360 Hub for the current user. |
📜 Note: The app is installed in the current user’s home directory, so a separate installation is required for each user account that needs the app.
2.5. Step 5: Choose Whether to Allow Keyboard and Mouse Activity Counts
On a Wayland session, the installer explains that keyboard and mouse activity counts need read access to /dev/input, which is granted by adding your user account to the input group. It then asks:
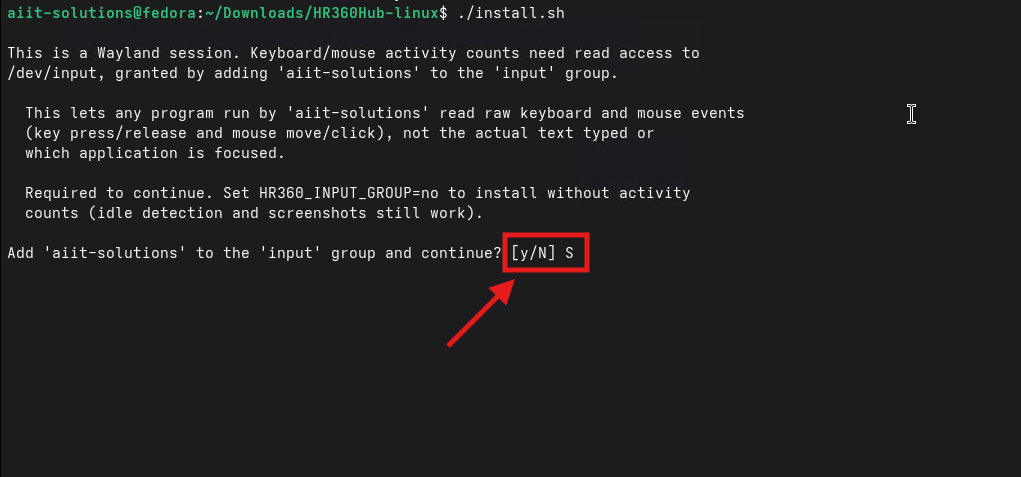
The installer states that it only reads raw keyboard and mouse events (key presses and releases, and mouse movement and clicks). It does not read the actual text typed or which application is in focus.
The installer allows you to continue in one of two ways. Choose the option that suits your organization, or check with your administrator if you are unsure.
Option | What You Do | Result |
Option A: Allow activity counts | Type y at the [y/N] prompt and press Enter. | Your user is added to the input group. Keyboard and mouse activity counts are recorded, along with idle detection and screenshots. |
Option B: Install without activity counts | Run the installer with HR360_INPUT_GROUP=no in front of the command. | Your user is not added to the input group. Idle detection and screenshots still work, but activity counts are not recorded. |
Option A: Allow activity counts
- Type y at the [y/N] prompt.
- Press Enter, and continue with Step 6.
Option B: Install without activity counts
- If the installer is already running, stop it by pressing Ctrl + C.
- Enter HR360_INPUT_GROUP=no ./install.sh and press Enter.
- Continue with the remaining steps. The installer may still ask for your password in Step 6 to install system packages.
⚠️ Important: The capital N in [y/N] means the default answer is No. Pressing Enter without typing y declines the request, and the installer states that this step is required to continue. To install without activity counts, use Option B instead of answering n.
2.6. Step 6: Enter the sudo Password
The installer then asks for your account password so that it can make system changes and install packages. A short message beginning We trust you have received the usual lecture... may appear first. This is a standard Linux reminder and needs no action.
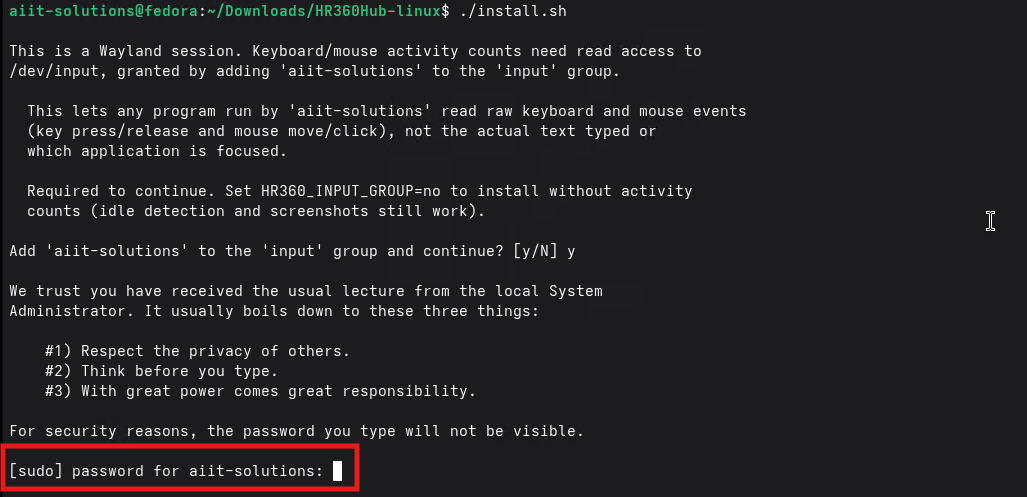
- At the [sudo] password prompt, type the password for your account.
- Press Enter. For security, nothing appears on screen while you type, which is normal.
2.7. Step 7: Wait for the Screen Capture Setup and Checks
The installer now installs and checks each screen capture component one by one. Wait for it to finish; no action is needed.
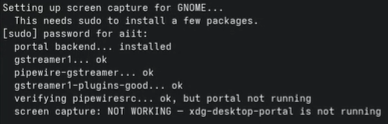
Component | What It Is For |
portal backend | Lets GNOME share screen content with applications. |
gstreamer1 | Multimedia framework used to process screen capture. |
pipewire-gstreamer | Connects screen capture to the PipeWire system. |
gstreamer1-plugins-good | Additional plug-ins needed for capture. |
verifying pipewiresrc | Confirms the capture source is available. |
⚠️ Important: If the last line shows screen capture: NOT WORKING — xdg-desktop-portal is not running, the app is installed but screen capture will not work yet. Continue with the installation, then follow Section 4 to resolve this.
The installer then tests the screenshot tools on the computer. Each tool is given up to 10 seconds, so the installer may pause briefly.

A result such as gnome-screenshot... installed but not capturing means the tool is present but did not take a test screenshot. The installation continues regardless.
2.8. Step 8: Install the GNOME Shell Extensions
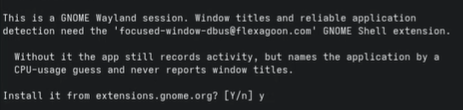
The installer then asks whether to install two GNOME Shell extensions from extensions.gnome.org. Type y and press Enter at each prompt.
The first prompt, shown on a Wayland session, is for the [email protected] extension. It allows the app to report window titles and detect applications reliably.
The second prompt is for the [email protected] extension. It adds the system tray icon used to reopen the app after its window is closed.

Extension | Recommended Answer | If You Answer n |
y | The app still records activity, but names applications by a CPU-usage guess and never reports window titles. | |
y | Closing the window keeps the app running in the background, but there is no tray icon to reopen it from. |
💡 Tip: Answer y to both prompts so that applications are identified reliably and the app can be reopened from the system tray.
2.9. Step 9: Open the HR360 Hub App
When the installer has finished and the terminal prompt returns, HR360 Hub is ready to use.
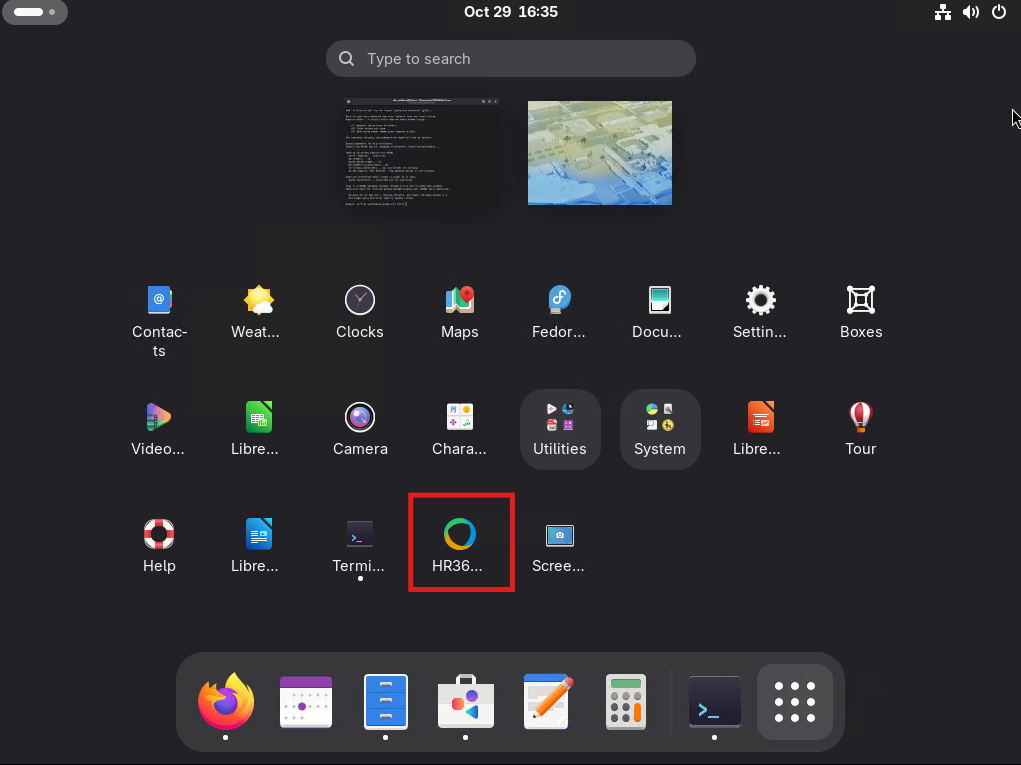
- Open the Activities overview (press the Super key, or click Activities at the top left of the screen) and show all applications.
- Find the HR360Hub icon. The name may be shortened, for example HR36…, in the application grid.
- Click the icon to open the app.
Section 3: After Installation
Once the app is installed, complete the following checks.
- Review the installer output and note any line that shows NOT WORKING or not capturing. These are explained in Section 4.
- If the extensions were installed and do not seem to be active, log out of the computer and log back in. GNOME on Wayland normally needs a new login before newly installed extensions become active.
- Open HR360 Hub from the Activities overview, as shown in Step 9.
- Sign in with your HR360 Hub account details when prompted.
📜 Note: Employee activity data appears in the HRMS Portal only after the employee has checked in through the desktop app.
Section 4: Troubleshooting
The following table lists the messages most likely to appear during installation and what to do about each.
Message / Issue | What It Means | What to Do |
Permission denied | The installer script has not been made executable. | Enter chmod +x install.sh, then run ./install.sh again. |
No such file or directory | The terminal is not in the HR360Hub-linux folder, or the zip file has not been extracted. | Extract the zip file, open the HR360Hub-linux folder in a terminal (Step 2), and run the command again. |
The installer stops after the input group question | The answer was n, or Enter was pressed without typing y. The installer states this step is required to continue. | Run ./install.sh again and type y (Option A), or install without activity counts using HR360_INPUT_GROUP=no ./install.sh (Option B). |
Sudo password is not accepted | The password was typed incorrectly, or the account does not have sudo rights. | Retype the password carefully. If it still fails, ask your administrator for sudo access. |
screen capture: NOT WORKING — xdg-desktop-portal is not running | The desktop portal service that GNOME uses for screen capture was not running when the installer checked. | Log out and log back in (or restart the computer), then run ./install.sh again and check the screen capture line. If it still shows NOT WORKING, contact your administrator or support desk. |
gnome-screenshot... installed but not capturing | The tool is installed but did not take a test screenshot. | Continue the installation. If screenshots are not captured by the app later, contact your support desk. |
No tray icon after installation | The system tray extension was skipped, or it is not active yet. | Log out and back in. If the icon is still missing, run ./install.sh again and answer y to the system tray prompt. |
Window titles are not reported | The focused window extension was skipped, or it is not active yet. | Log out and back in. If titles are still missing, run ./install.sh again and answer y to the focused window prompt. |
HR360 Hub icon is not in Activities | The installation did not finish, or the application list has not refreshed. | Check that the installer completed without stopping, then log out and back in and search for HR360 Hub in Activities. |
📜 Note: Running ./install.sh again is safe if a step needs to be repeated. Run it from the same HR360Hub-linux folder.
Summary
The following table provides a complete step-by-step summary of the Linux desktop app installation workflow:
# | Action / Step | Result |
1 | Download and extract the installer: Save the HR360Hub-linux zip file → extract it. | A folder named HR360Hub-linux is created. |
2 | Open the folder in a terminal: Right-click inside the folder → Open in Console. | A terminal opens in the HR360Hub-linux folder. |
3 | Make the installer executable: Enter chmod +x install.sh. | The installer script is allowed to run. |
4 | Start the installer: Enter ./install.sh. | The installer asks about adding the user to the input group. |
5 | Choose activity counts: Enter y at the [y/N] prompt → press Enter (or run HR360_INPUT_GROUP=no ./install.sh to skip activity counts). | With y, the user is added to the input group and a password prompt appears. With the skip option, activity counts are not recorded. |
6 | Enter the sudo password: Type the account password → press Enter. | The installer continues with system package setup. |
7 | Wait for the checks: Allow the screen capture and screenshot tools checks to complete. | The status of each component is displayed. |
8 | Install the GNOME extensions: Enter y at each of the two prompts → press Enter. | Window titles, application detection and the system tray icon are enabled. |
9 | Open the app: Open Activities → click the HR360 Hub icon. | The app opens and is ready for sign-in. |
10 | Resolve any warnings: Check for NOT WORKING or not capturing messages → follow Section 4. | Screen capture and screenshot tools work as expected. |