

Overview
The Portal Settings module in HR360 Hub provides organization-level configuration options that control how other modules behave across the platform. It gives administrators a single place to manage subscription details, organization-wide preferences, and the configurable options used by other modules, such as attendance break types, license types, and recruitment defaults.
The Portal Settings module contains the following areas:
- My Subscription: Used to view and manage the organization's active subscription plan.
- Organization Setting: Used to configure organization-wide preferences.
- Attendance: Used to configure Break Types available to employees when logging attendance breaks in the Attendance module.
- License Type: Used to manage the license types available across the organization.
- Recruitment: Used to configure default settings for the Recruitment module.
This guide currently covers:
- How to access the Portal Settings module from the left sidebar.
- How to configure Attendance Break Types, including viewing the Break Types listing and adding a new break type, editing or deleting a break type.
Prerequisites
Before working with the Portal Settings module, ensure the following are in place:
- The user must be logged in with a role that has access to the Portal Settings module.
- Administrative permissions are typically required to view or modify Portal Settings, since changes here affect other modules across the organization.
Section 1: Accessing Portal Settings
After logging in to HR360 Hub, follow the steps below to access the Portal Settings module.
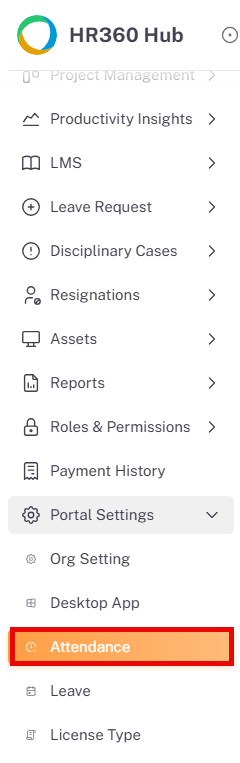
- From the left sidebar, click on Portal Settings to expand the sub-menu.
- The sub-menu displays My Subscription, Org Setting, Attendance, License Type, and Recruitment.
- Click on Attendance to open the Attendance Settings page.
Section 2: Attendance Settings
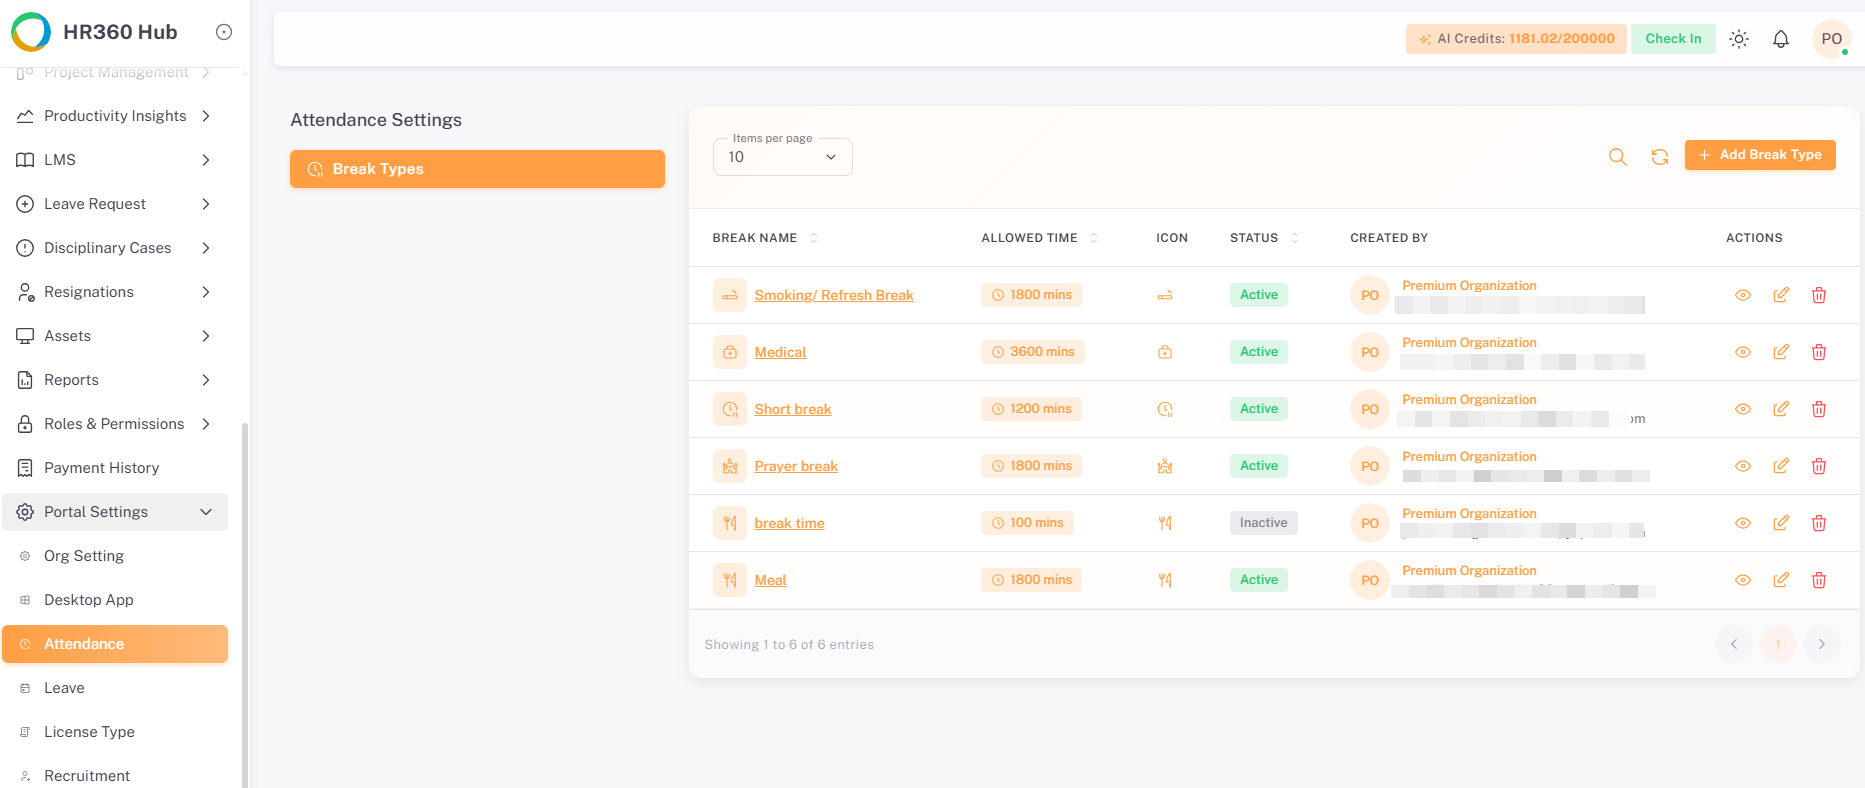
The Attendance Settings page under Portal Settings is used to configure the Break Types that employees can select from when logging a break in the Attendance module. Each break type defines a name, an allowed duration, an icon, and a status.
2.1. Break Types Listing
The Break Types listing table displays every break type configured for the organization.
Column | Description |
Break Name | The name of the break type, shown alongside its selected icon, e.g. Meal Break. |
Allowed Time | The maximum duration permitted for the break, shown in minutes. |
Icon | The icon associated with the break type, also shown on the Add/Edit Break Type form. |
Status | Whether the break type is Active or Inactive. |
Created By | The organization or user who created the break type. |
Actions | Eye icon: view the break type. Pencil icon: edit the break type. Trash icon: delete the break type. |
Page Controls
- Items per page selector: Controls the number of records displayed per page (default: 10).
- Search icon: Filter break types by name or other fields.
- Refresh icon: Reload the listing to reflect the latest changes.
- + Add Break Type button: Opens the Add Break Type dialog to create a new break type.
- Pagination controls: Navigate through pages using the numbered page buttons at the bottom of the listing.
2.2. Adding a Break Type
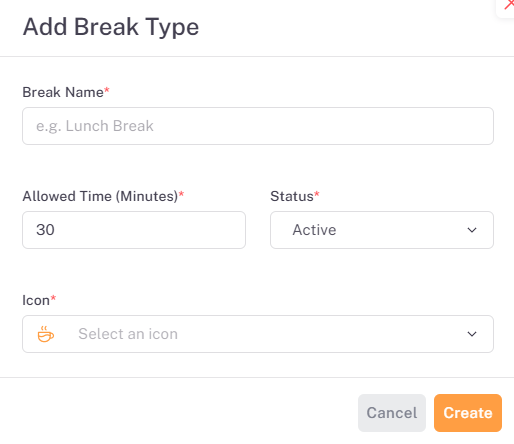
To create a new break type, click the + Add Break Type button on the Break Types listing page. The Add Break Type dialog opens.
Field | Required | Description |
Break Name | Yes | Enter a name for the break type, e.g. Lunch Break. |
Allowed Time (Minutes) | Yes | Enter the maximum duration allowed for this break, in minutes. |
Status | Yes | Select whether the break type is Active or Inactive. |
Icon | Yes | Select an icon to represent the break type from the icon picker. |
⚠️Important: All fields on the Add Break Type dialog "Break Name, Allowed Time, Status, and Icon" are required. The break type cannot be created until every field is completed.
Click Create to save the new break type and add it to the Break Types listing.
Click Cancel to close the dialog without creating a break type.
2.3. Viewing a Break Type
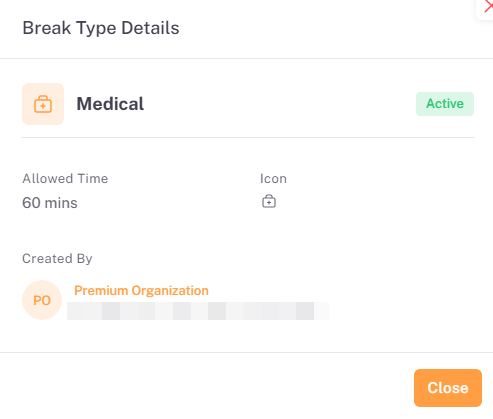
To view an existing break type, click the view button in Actions Column for any of the Break Type . The Break Type details dialog opens.
Field | Description |
Break Type Name | The name of the break type whose details are being viewed |
Break Type Status | Status of the break, whether the break type is active or inactive |
Allowed Time | Maximum duration allowed for this break, in minutes. |
Icon | Icon selected from icon picker to represent the break type |
Created By | The user or organization who created the break type |
Click Close to dismiss the dialog.
2.3. Editing a Break Type
Click the pencil icon (✏️) on any break type row to open the Edit Break Type form.
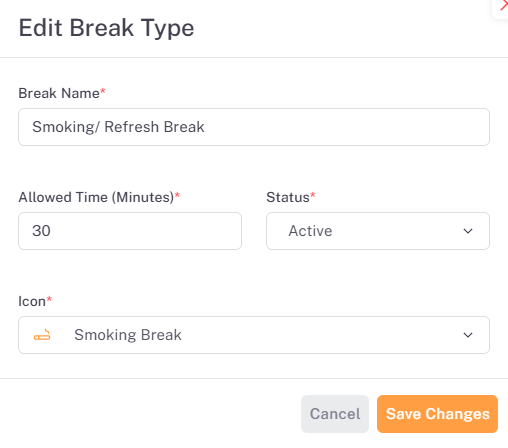
The Edit Break Type form is identical in structure to the Add Break Type form, with all fields pre-populated from the current configuration.
Update the required fields and click Save Changes to apply the changes, or Cancel to discard.
Summary
Section | Details |
Attendance Settings Purpose | Configure Break Types employees can select when logging breaks. Each break type includes name, allowed duration, icon, and status. |
Break Types Listing | Columns: Break Name, Allowed Time, Icon, Status, Created By, Actions (View, Edit, Delete).Page controls: Items per page, Search, Refresh, Add Break Type, Pagination. |
Adding Break Type | Required fields: Break Name, Allowed Time (minutes), Status, Icon. Actions: Create (save) or Cancel. |
Viewing Break Type | Displays details: Name, Status, Allowed Time, Icon, Created By. Close button to dismiss. |
Editing Break Type | Pencil icon opens Edit form (same as Add form, pre‑populated).Actions: Save Changes or Cancel. |
Deleting Break Type | Trash icon in Actions column removes the selected break type. Used to permanently delete a break type from the listing. |