

1.What Are Email Templates?
HR360Hub can automatically send emails to employees, managers, and administrators when specific actions happen in the portal — such as a password reset, a new asset being created, or a disciplinary case being opened.
Instead of sending a plain, generic email every time, the Email Templates module lets you design and customize exactly what those emails will look like — including the subject line, the message body, and which employees receive them.
📜 Note: Think of Email Templates as pre-written letters. You write them once, and the system sends them automatically whenever they are needed with the employee's name and other details filled in automatically.
1.1. Where to Find Email Templates
Email Templates are located inside Portal Settings in the left-side navigation menu.
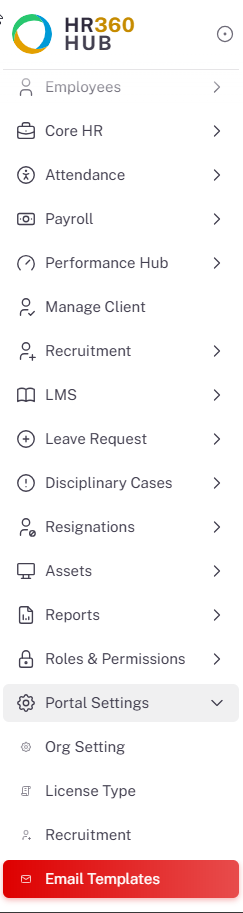
Step | Where to Click | What Happens |
1 | Left Menu → Portal Settings | The Portal Settings section expands to show sub-items. |
2 | Click Email Templates | The Email Templates list page opens. |
2.The Email Templates List
When you open Email Templates, you will see a list of all email templates currently set up in the system. The portal currently has 33 email templates spread across 4 pages .
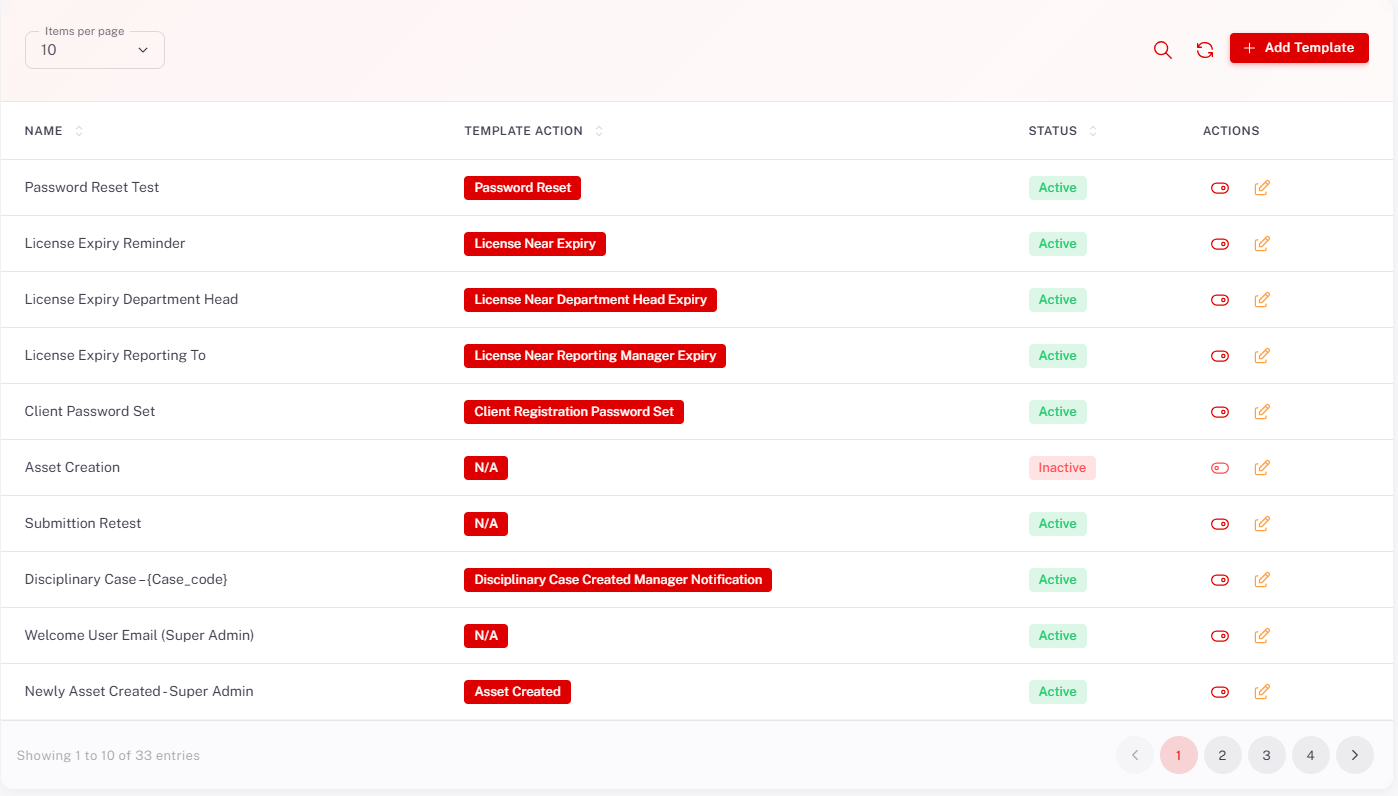
2.1. Understanding Each Column
Column | What It Means |
Name | The title you give to this email template. Example: 'Password Reset Test' or 'License Expiry Reminder'. |
Template Action | The event in the portal that triggers this email to be sent automatically. Shown as a red label. If no action is linked, it shows as 'N/A'. |
Status | Shows whether this template is Active (currently being used) or Inactive (switched off and not being sent). |
Actions | Two icons: the eye icon (👁) to preview the email, and the pencil icon (✏️) to edit the template. |
💡 Tip: Use the Items per page dropdown (top-left) to show more templates on one page. You can also use the Search icon (🔍) to quickly find a specific template by name.
2.2. Template Action Labels
Each template is linked to a specific action (event) in the portal. Here are the template actions you will see:
Template Action Label | When This Email Is Sent |
Password Reset | When an employee or admin requests a password reset. |
License Near Expiry | When an employee's license is about to expire. |
License Near Department Head Expiry | When a license is expiring for someone under a department head. |
License Near Reporting Manager Expiry | When a license is expiring for someone under a reporting manager. |
Client Registration Password Set | When a new client account is created and their password is set. |
Asset Created | When a new asset is added to the system. |
Disciplinary Case Created Manager Notification | When a disciplinary case is opened — the manager is notified. |
N/A | This template is not yet linked to an automatic trigger. It would be added in sub template configuration when the email has to be sent to a specific user. |
3. How to Add a New Email Template
To create a new email template, click the + Add Template button (top-right of the list page). The Add Email Template page will open with two main panels: Template Details on the left and Email Content on the right.
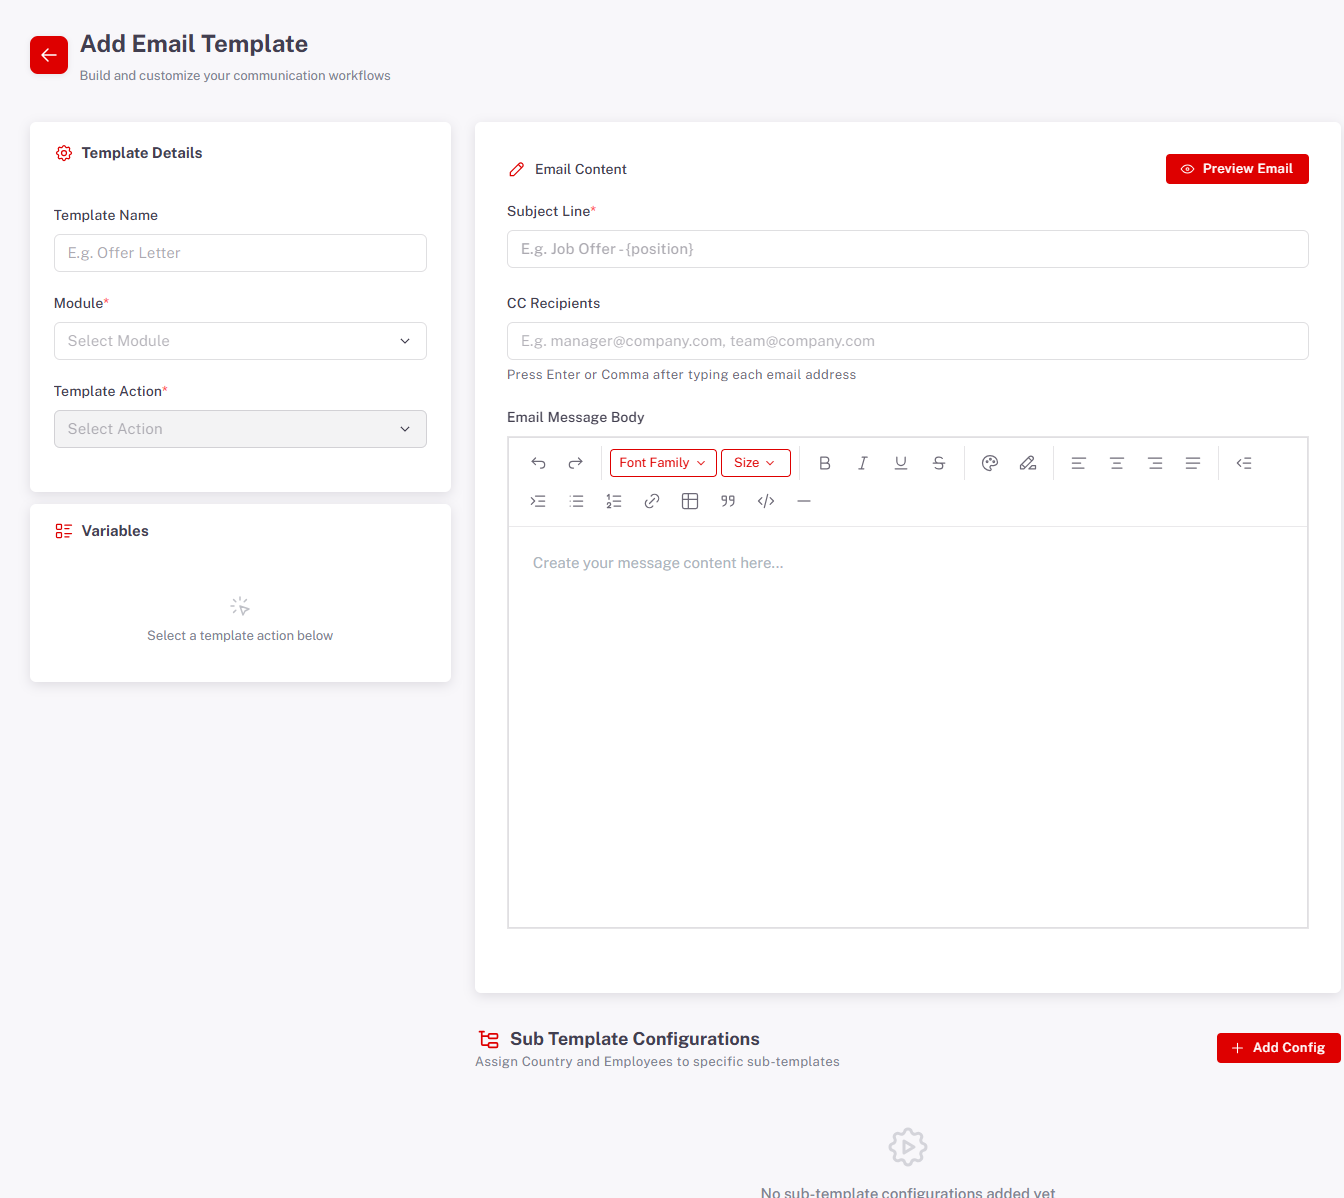
3.1. Step-by-Step Flow — Creating a Template
Follow these steps in order to successfully create and save an email template:
STEP 1—Click '+ Add Template' button (top-right of the list) |
↓
STEP 2—Fill in Template Details(left panel) |
↓
a. Template Name | → | b.Select Module | c. Select Action |
↓
STEP 3—Check the Variables panel(auto-appears after selecting action) |
↓
STEP 4—Fill in Email Content(right panel) |
↓
a. Subject Line | → | b. CC Recipients | c. Message Body |
↓
STEP 5—(Optional)Add Sub Template Configurations |
↓
STEP 6—Click 'Save Changes'✓ Template is now active! |
4. Template Details Panel (Left Side)
The Template Details panel is on the left side of the Add Email Template page. It has three fields that must be filled before writing the email content.
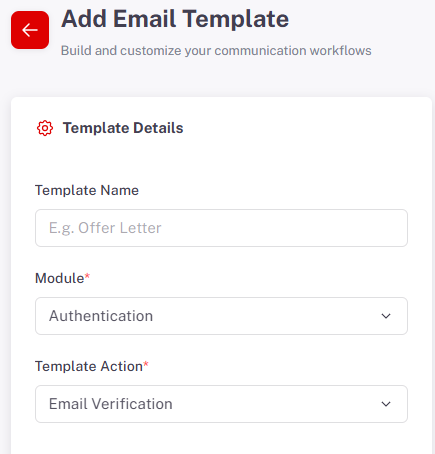
4.1. Field Descriptions
Field | Required? | Description |
Template Name | Optional | A short, clear title for this template. Example: 'Password Reset – Global Knowledge University'. This name appears in the templates list only — employees do not see it. |
Module | Optional | Select which part of the portal this template belongs to. Example: Authentication, Payroll, Leave Request. This filters the available Template Actions. |
Template Action | Required when Module is selected | Select the specific event that will trigger this email. Example: 'Email Verification', 'Password Reset'. The Variables panel will update automatically based on your selection. |
4.2. Variables Panel
After you select a Template Action, a Variables section automatically appears below the Template Details panel. This shows you the dynamic fields (called variables) that you can insert into your email.
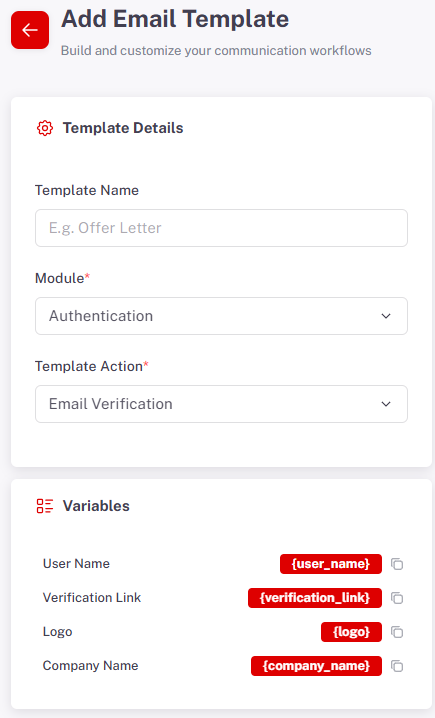
📜 Note: Variables are placeholders written inside curly brackets { }. When the email is sent, the system automatically replaces them with the actual value. For example, {user_name} becomes 'Ahmed Khan'.
Common Variables and What They Insert
Variable Code | What It Inserts Into the Email |
{user_name} | The full name of the employee receiving the email. |
{company_name} | The name of the organization (e.g., Global Knowledge University). |
{verification_link} | A clickable link the employee uses to verify their email address. |
{reset_link} | A clickable link the employee uses to reset their password. |
{logo} | The company logo image displayed in the email. |
💡 Tip: To insert a variable into your email body, simply copy the code (e.g., {user_name}) from the Variables panel by clicking the copy icon next to it, then paste it into the message body where you want it to appear.
5. Email Content Panel (Right Side)
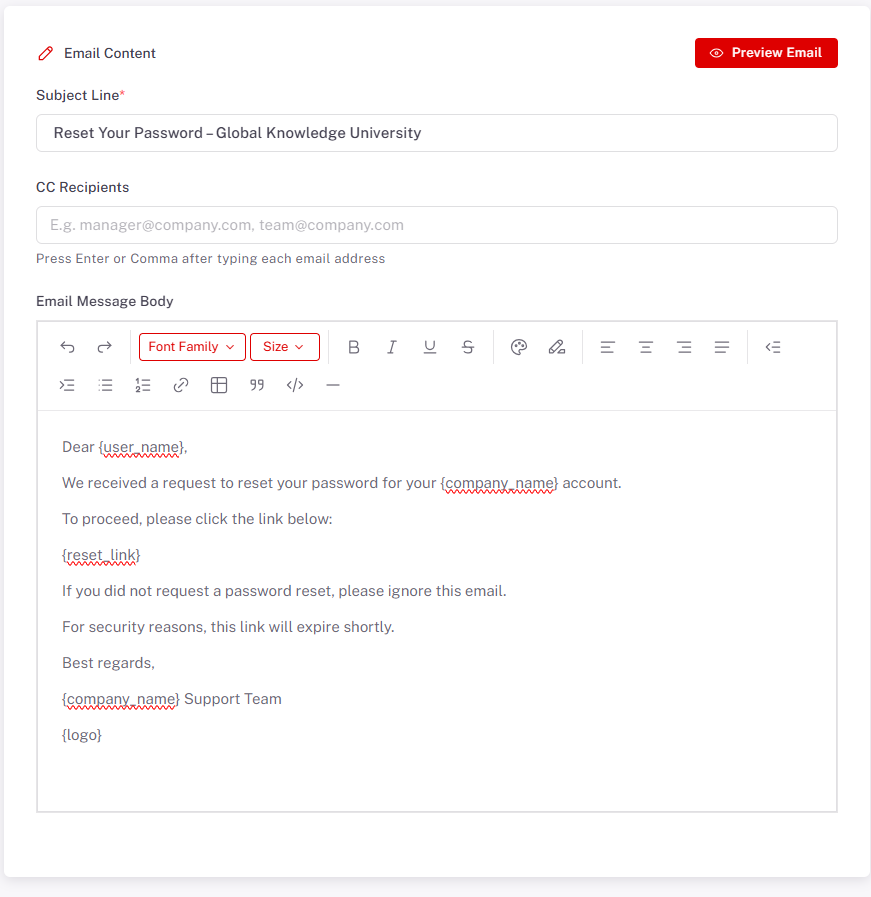
The Email Content panel is where you write the actual email that will be sent to employees. It has three main areas: Subject Line, CC Recipients, and Email Message Body.
5.1. Subject Line
This is the subject of the email — the first thing the recipient sees in their inbox. Keep it clear and specific.
Example: Reset Your Password –Agency VA
💡 Tip: You can use variables in the Subject Line too. For example: 'Your License Expires Soon – {company_name}' will automatically fill in the company name.
5.2. CC Recipients
If you want additional people to receive a copy of this email (other than the main recipient), enter their email addresses here. Press Enter, space or type a comma between each email address.
📜 Note: CC Recipients are optional. Leave this field empty if only the main recipient should receive the email.
5.3. Email Message Body
This is where you write the full email message. A formatting toolbar is available with the following tools:
Toolbar Option | What It Does |
Font Family | Change the text font style. |
Size | Change the text size. |
B (Bold) | Make selected text bold. |
I (Italic) | Make selected text italic. |
U (Underline) | Underline selected text. |
S (Strikethrough) | Put a line through selected text. |
Alignment icons | Align text to the left, center, right, or justify. |
List icons | Create a bulleted list or numbered list. |
Link icon (🔗) | Insert a clickable hyperlink. |
Table icon | Insert a table into the email body. |
Quote icon | Format text as a block quotation. |
Code icon (</>) | Format text as code (for technical content). |
Undo / Redo (↩ ↪) | Undo or redo your last change. |
5.4. Example: Password Reset Email Body
Here is an example of a complete email message body, as seen in the portal:
Dear {user_name}, We received a request to reset your password for your {company_name} account. To proceed, please click the link below: {reset_link} If you did not request a password reset, please ignore this email. For security reasons, this link will expire shortly. Best regards, {company_name} Support Team {logo} |
⚠️ Important: Do not delete the curly brackets { } when using variables. Writing {user_name} correctly will be replaced with the employee's name. Writing user_name without brackets will be sent as plain text.
5.5. Previewing Your Email
Before saving, always click the Preview Email button (top-right of the Email Content panel) to see exactly how the email will look to the recipient.
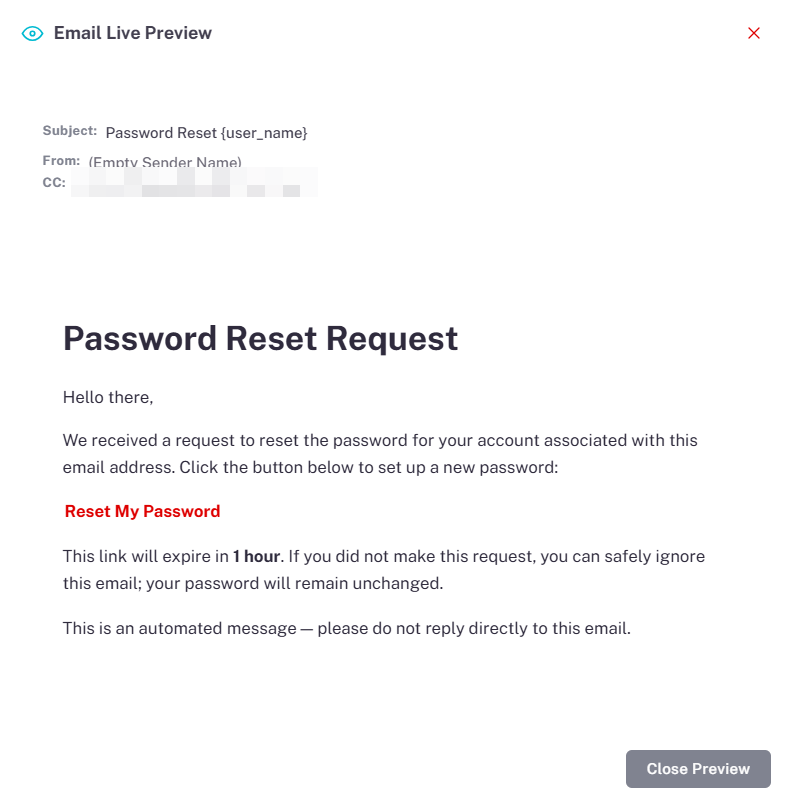
📜 Note: The preview shows the email as it will appear in an inbox — with formatting, colours, and layout applied. Variables like {user_name} will still show as placeholders in the preview unless real data is loaded.
6. Sub Template Configurations
The Sub Template Configurations section appears at the bottom of the Add Email Template page. This feature allows you to send a second, separate version of the same email to a different recipient — such as a reporting manager, HR Director, or any other relevant person — whenever the same event is triggered for an employee.
The key distinction is:
- The main template is the email sent to the employee involved in the event.
- The sub template is a different version of the email sent to another person — typically the employee's manager or an HR stakeholder — notifying them of the same event from their perspective.
Example 1 — Leave Application: When an employee submits a leave request, the main template sends a leave confirmation email to the employee. At the same time, the sub template sends a separate notification to the employee's reporting manager, informing them that a leave request has been submitted and prompting them to take further action such as approval or rejection.
Example 2 — License Expiry: When an employee's professional licence is about to expire, the main template sends an email to the employee stating: "Your licence is expiring in X days." The sub template simultaneously sends a notification to the HR Director or reporting manager stating: "This employee's licence is expiring in X days" — so the relevant authority is also kept informed and can act accordingly.
This ensures that both the employee and the responsible stakeholder receive timely, contextually appropriate communication from the same email event — without needing to set up two separate email templates.
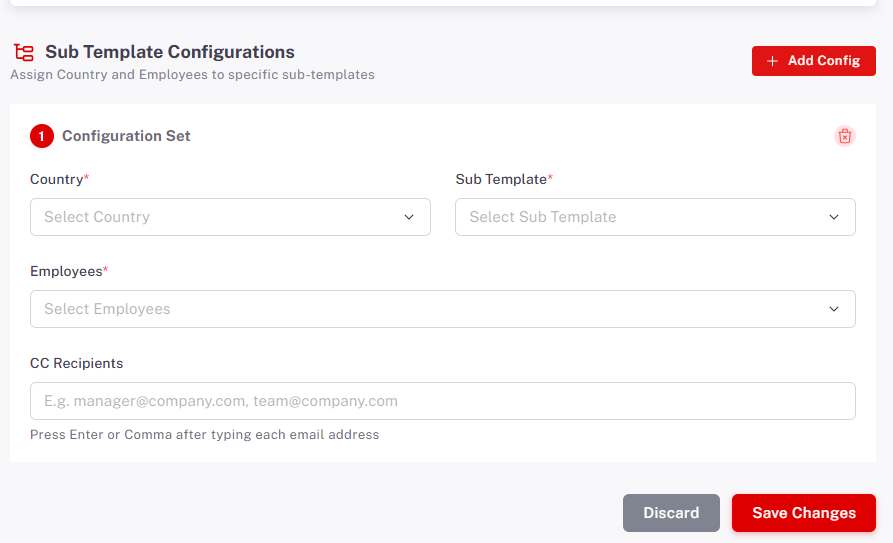
6.1. How to Add a Sub Template Configuration
Step | Action | Details |
1 | Click '+ Add Config' | A new Configuration Set panel (numbered 1, 2, 3…) appears below the main email content. |
2 | Select Country | Choose the country this sub-template applies to. Example: Pakistan. |
3 | Select Sub Template | Choose which alternate template should be sent to employees in that country. |
4 | Select Employees | Choose which specific employees this configuration applies to. At least one employee must be selected. |
5 | CC Recipients (optional) | Add any CC email addresses for this sub-template specifically. |
6 | Click 'Save Changes' | The configuration is saved. You can add multiple configuration sets by clicking '+ Add Config' again. |
7 | Delete a config | Click the red trash icon (🗑) on the top-right of any Configuration Set to remove it. |
⚠️ Important: The 'Employees' field inside a Sub Template Configuration is required — you will see the error 'At least one employee must be selected' if you try to save without choosing an employee.
📜 Note: Sub Template Configurations are optional. If you do not need country-specific or employee-specific variations, you can leave this section empty and just save the main template.
📜 Note: Sub Templates must be created in advance before they can be selected here. Ensure that the secondary recipient's version of the email (e.g., the manager notification template) has already been configured as a separate template in the system before setting up the Sub Template Configuration
7. Managing Existing Templates
7.1. How to Edit a Template
From the Email Templates list, click the pencil icon (✏️) in the Actions column of the template you want to edit. The template will open in the same Add/Edit page with all existing values pre-filled. Make your changes and click Save Changes.
7.2. How to Preview a Template
Click the eye icon (👁) in the Actions column to open the Email Live Preview for any existing template. This shows you the current email layout without opening the full edit page.
7.3. Active vs. Inactive Status
Status | Meaning |
Active | The template is live and will be sent automatically when its trigger event happens. |
Inactive | The template is switched off. The system will not send this email even when the trigger event happens. |
💡 Tip: If you want to temporarily stop sending a particular email (for example, during a holiday period), you can set its status to Inactive instead of deleting the template.
7.4. Searching and Filtering the List
Use these tools at the top of the Email Templates list to find templates faster:
Tool | How to Use |
🔍Search icon | Click the search icon (top-right) and type a template name to filter the list instantly. |
🔄Refresh icon | Click the refresh icon to reload the list and see the latest changes. |
Items per page | Change from 10 to a higher number (e.g., 25 or 50) to see more templates at once. |
Page numbers (1, 2, 3, 4) | Click page numbers at the bottom-right to move between pages. |
8. Complete Process Flow Diagram
The diagram below shows the complete lifecycle of an Email Template — from creating it in the portal to the employee receiving the email in their inbox.
ADMINISTRATOR opens HR360Hub Portal |
↓
Goes to:Portal Settings→Email Templates |
↓
➕Create NEW template | OR | ✏️Edit EXISTING template |
↓
Fill Template Details:Name|Module|Template Action |
↓
Variables panel appears automatically→Copy variables for use in email body |
↓
Write Email Content:Subject Line|CC Recipients|Message Body |
↓
(Optional)Add Sub Template Configurations | 👁Click Preview Email to check |
↓
Click'Save Changes'→Template is saved and set to ACTIVE |
↓
SYSTEM (Automatic) When the linked Template Action event occurs in the portal (e.g., password reset is requested), the system automatically sends the email to the correct employee with all variables replaced with real data. |
↓
✅Employee receives the email in their inbox |
9. Quick Reference Summary
Use this page as a quick reference card when working with Email Templates.
9.1. Things to Remember
Rule / Reminder | |
✅ | Always select a Module before selecting a Template Action — the action list depends on the module. |
✅ | After selecting a Template Action, check the Variables panel to see which variables are available. |
✅ | Always use variables with their exact curly-bracket format: {variable_name}. Do not add spaces inside. |
✅ | Use the Preview Email button before saving to catch any mistakes in formatting or variables. |
✅ | If a template should not be sent right now, set it to Inactive rather than deleting it. |
✅ | The Employees field inside Sub Template Configurations is required — at least one must be selected. |
9.2. Status at a Glance
Status | Email Is Sent? | When to Use |
✅ Active | Yes — automatically sent when triggered | When the template is ready and should go live |
⛔ Inactive | No — email will NOT be sent | When temporarily pausing a template |
9.3. Glossary of Terms
Term | Simple Definition |
Email Template | A pre-written email stored in the portal, ready to be sent automatically. |
Template Action | The event (e.g., password reset, asset creation) that triggers the email to be sent. |
Variable | A placeholder like {user_name} that the system replaces with real data when sending. |
Module | A section of the HR portal (e.g., Authentication, Payroll, Leave Request). |
Sub Template | An alternate version of an email for specific countries or employees. |
CC Recipients | Additional email addresses that receive a copy of the sent email. |
Active | The template is switched ON and will be sent automatically. |
Inactive | The template is switched OFF — no emails are sent. |
Preview Email | A button that shows you how the email will look before you save it. |
Configuration Set | One sub-template rule applied to a specific country and employee group. |