

Overview
The Evaluation Cycle settings in the HRMS Portal let administrators define the evaluation cycles used by the organization. Each cycle has a frequency, the countries it applies to, and a start and end date. Cycles can be created, reviewed, edited, and deleted from a single listing page in Portal Settings.
The Evaluation Cycle area contains the following:
Evaluation Cycle Listing: Used to view every evaluation cycle with its frequency, countries, and dates, and to search, refresh, and page through the records.
Add Evaluation Cycle: Used to create a new cycle by choosing a frequency, naming the cycle, selecting its countries, and setting a start date.
View, Edit, and Delete: Row actions used to review a cycle’s details, change its settings, or remove it.
Assigning Cycles to Employees: Evaluation cycles can be assigned to employees when the employee is created, or later by editing the employee’s profile.
Appraisals: Evaluation cycles are further used in the Appraisals module, where employee increments are processed with reference to these cycles.
This guide covers:
- How to access Evaluation Cycle from the Portal Settings menu in the left sidebar.
- Understanding the Evaluation Cycle listing page and its columns.
- How to create a new evaluation cycle, including how the end date is calculated.
- How to view the details of an evaluation cycle.
- How to edit an existing evaluation cycle.
- How to delete an evaluation cycle.
- How to assign an evaluation cycle to an employee when creating the employee or by editing the employee’s profile.
- How evaluation cycles are used in Appraisals.
📜 Note: Access to Portal Settings and its actions is controlled by role permissions. Users must have Portal Settings access to create, edit, or delete evaluation cycles.
Prerequisites
Before working with evaluation cycles, ensure the following are in place:
- The user must be logged in with a role that has access to the Appraisals module and permissions are granted for the Evaluation cycle.
- The countries the organization operates in should be available for selection, unless the cycle is organization-wide.
Section1: Accessing Evaluation Cycle
After logging in to the HRMS Portal, follow the steps below to access the Evaluation Cycle page.
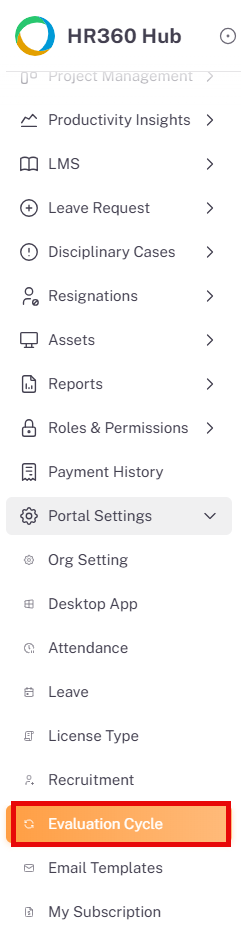
- From the left sidebar, click on Portal Settings to expand the sub-menu.
- The sub-menu displays Org Setting, Desktop App, Attendance, Leave, License Type, Recruitment, Evaluation Cycle, Email Templates, and My Subscription.
- Click on Evaluation Cycle to open the Evaluation Cycle listing page.
Section 2: Evaluation Cycle Listing Page
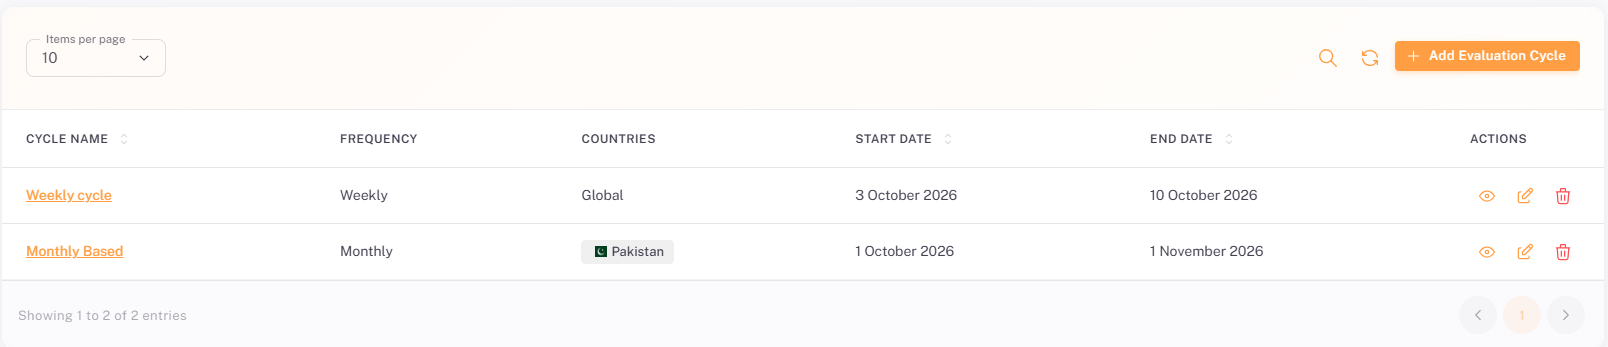
The Evaluation Cycle page lists every evaluation cycle created in the system.
2.1. Listing Table Columns
Column | Description | Sortable |
Cycle Name | The name of the evaluation cycle, displayed as a colored link. Clicking on it will open the Evaluation Cycle details | Yes |
Frequency | How often the cycle runs, e.g. Weekly, Bi-Weekly, Monthly, Quarterly, Semi-Annual, or Annual. | No |
Countries | The countries the cycle applies to, or Global for an organization-wide cycle. When a cycle covers several countries, the first is shown with a +N badge for the remainder, e.g. United States +4. | No |
Start Date | The date the evaluation cycle begins. | Yes |
End Date | The date the cycle ends, calculated from the start date and frequency. | Yes |
Actions | Eye icon: View the cycle’s details. Pencil icon: Edit the cycle. Bin icon: Delete the cycle. | No |
2.2. Page Controls
- Items per page selector: Controls the number of records displayed per page.
- Search icon: Filter evaluation cycles by name or other fields.
- Refresh icon: Reload the listing to reflect the latest changes.
- + Add Evaluation Cycle button: Opens the Create Evaluation Cycle dialog.
- Pagination controls: Navigate between pages. The footer shows the range of records displayed.
Section 3: Creating an Evaluation Cycle
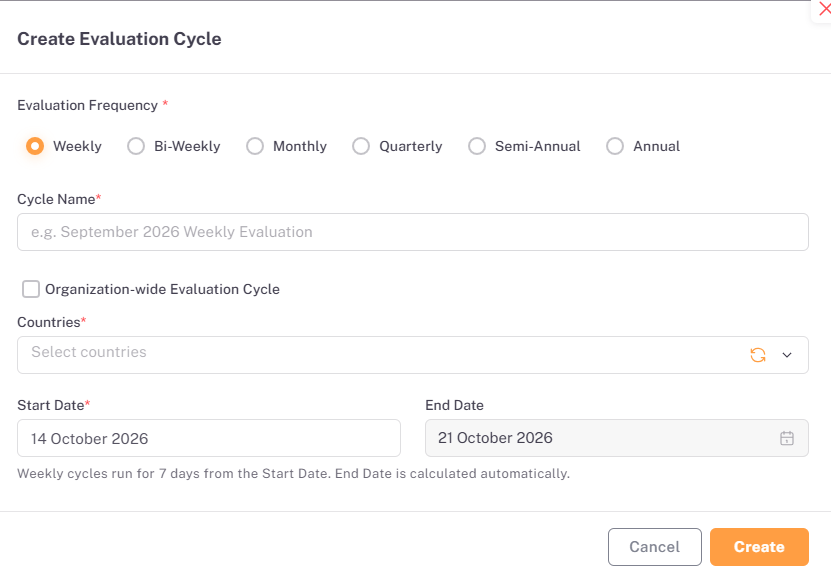
To create a new evaluation cycle, click the + Add Evaluation Cycle button on the listing page. The Create Evaluation Cycle dialog opens.
Field | Required | Description |
Evaluation Frequency | Yes | Select how often the cycle runs: Weekly, Bi-Weekly, Monthly, Quarterly, Semi-Annual, or Annual. Weekly is selected by default. |
Cycle Name | Yes | Enter a name for the cycle, e.g. “September 2026 Weekly Evaluation”. |
Organization-wide Evaluation Cycle | No | Tick this checkbox to apply the cycle to the whole organization instead of selected countries. The Countries field is then greyed out and the cycle appears as Global. |
Countries | Yes | Select one or more countries the cycle applies to. Not required when Organization-wide Evaluation Cycle is ticked. |
Start Date | Yes | Select the date the cycle begins. The field shows today’s date by default. |
End Date | Auto | Read-only. Calculated automatically from the Start Date and the selected frequency. |
📜 Note: The End Date cannot be selected or edited. A helper note beneath the dates explains the calculation for the chosen frequency — for example, “Weekly cycles run for 7 days from the Start Date. End Date is calculated automatically.”
To create the cycle:
- Select the Evaluation Frequency.
- Enter the Cycle Name.
- Tick Organization-wide Evaluation Cycle, or select one or more Countries.
- Select the Start Date and confirm the calculated End Date.
- Click Create to save the cycle, or Cancel to close the dialog without saving.
💡 Tip: Use a descriptive name that includes the period and frequency, such as “September 2026 Monthly Evaluation Cycle”, so cycles are easy to tell apart on the listing page.
Section 4: Viewing an Evaluation Cycle
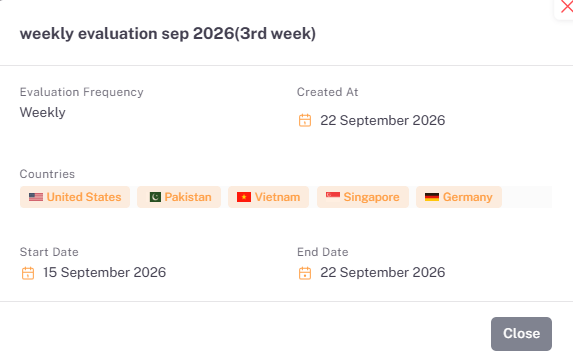
Click the Eye icon in the Actions column to open a read-only dialog showing the details of the evaluation cycle. Click Close to return to the listing.
Field | Description |
Evaluation Frequency | How often the cycle runs, e.g. Quarterly. |
Created At | The date the cycle was created. |
Countries | The countries the cycle applies to, or Global for an organization-wide cycle. |
Start Date | The date the cycle begins. |
End Date | The date the cycle ends. |
Section 5: Editing an Evaluation Cycle
Click the Pencil icon in the Actions column to open the Edit Evaluation Cycle dialog. It contains the same fields as the Create dialog, pre-filled with the cycle’s current values.
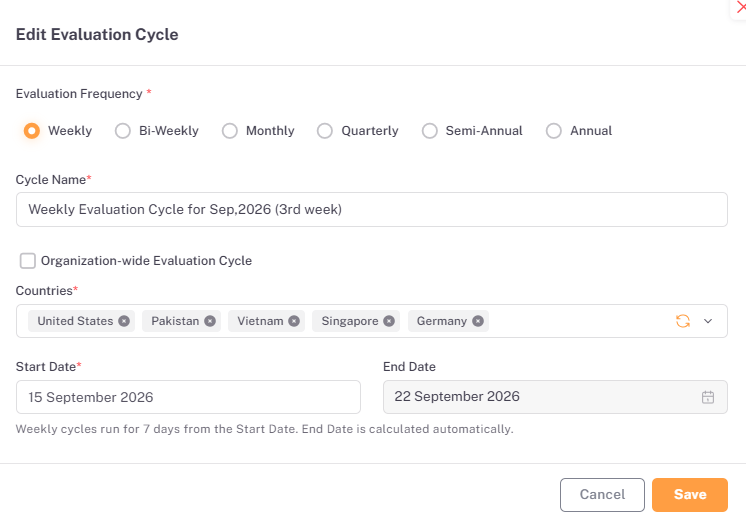
- Update the Evaluation Frequency, Cycle Name, countries, or Start Date as required.
- Check the End Date, which is recalculated automatically from the Start Date and frequency.
- Click Save to apply the changes, or Cancel to close the dialog without saving.
📜 Note: When Organization-wide Evaluation Cycle is ticked, the Countries field is greyed out and cannot be changed.
Section 6: Deleting an Evaluation Cycle
Click the Bin icon in the Actions column to delete an evaluation cycle. A confirmation dialog names the cycle and asks you to confirm before it is removed.
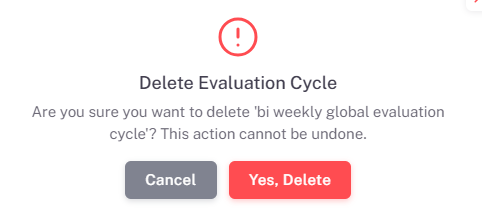
- Click the Bin icon next to the cycle you want to delete.
- Read the confirmation message to check the correct cycle is named.
- Click Yes, Delete to remove the cycle, or Cancel to keep it.
⚠️ Important: Deleting an evaluation cycle cannot be undone. Confirm the cycle name in the dialog before clicking Yes, Delete.
Section 7: Assigning Evaluation Cycles to Employees
Once an evaluation cycle has been created, it can be assigned to employees. An employee’s evaluation cycle can be set in either of two ways: when the employee is created, or later through the employee’s profile.
7.1. Assigning a Cycle When Creating an Employee
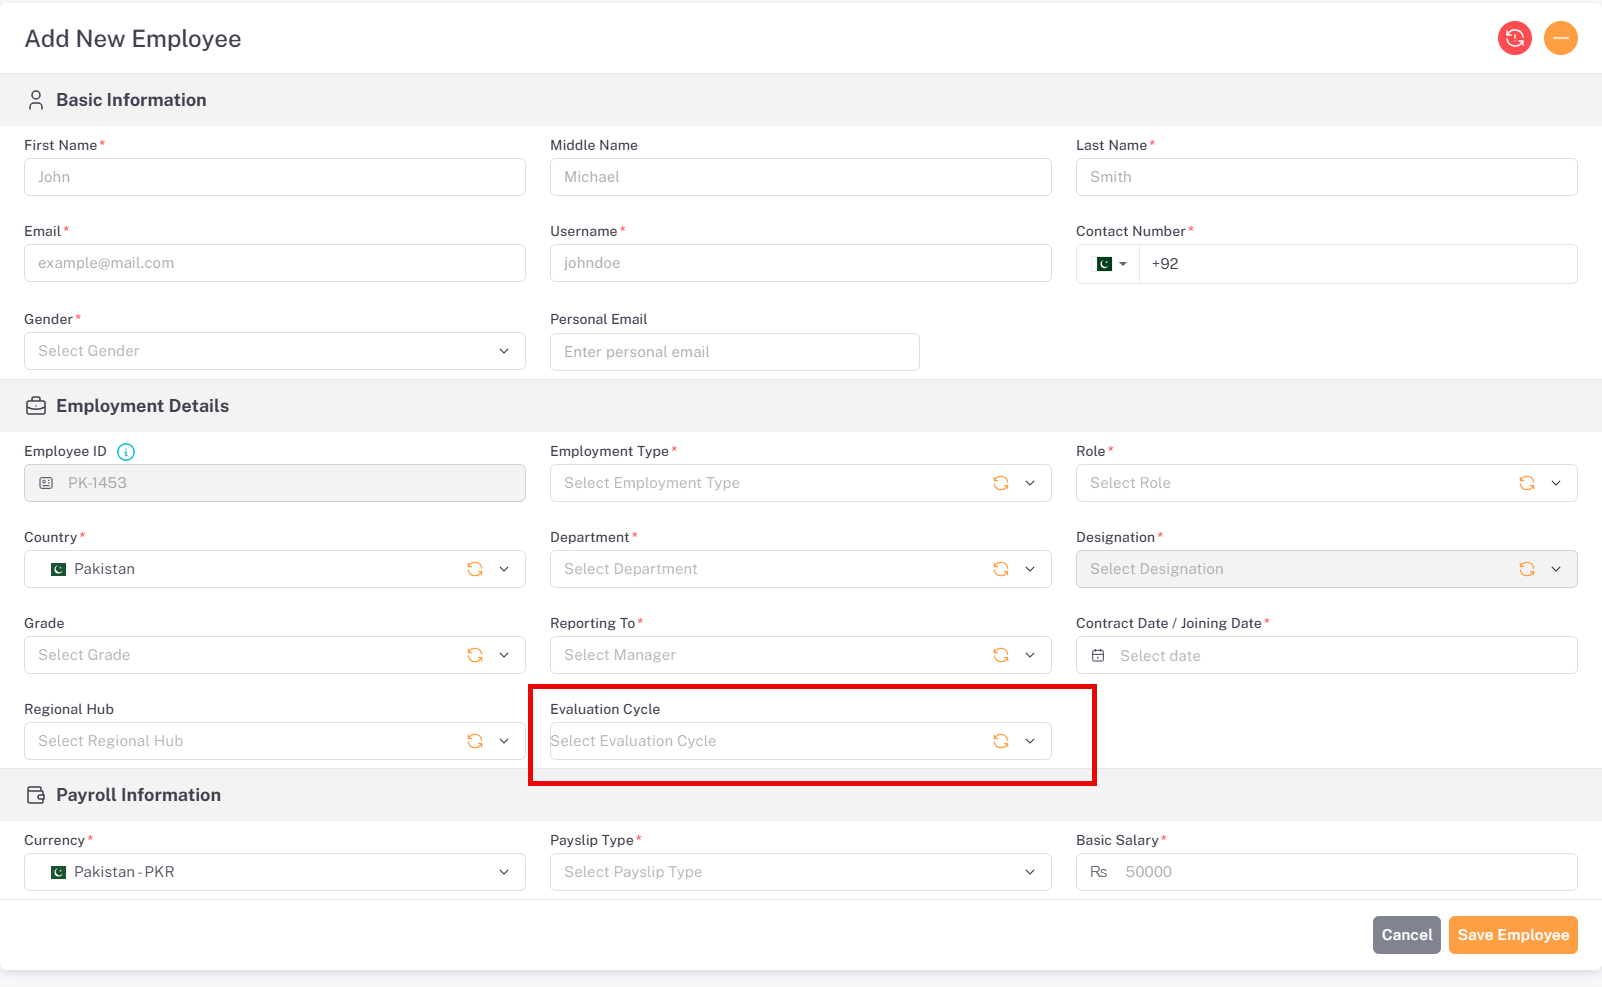
The Add New Employee form includes an Evaluation Cycle field in the Employment Details section. It is optional, so an employee can be saved without one.
- Open the Add New Employee form from the Employees module.
- In the Employment Details section, click the Evaluation Cycle dropdown.
- Select the evaluation cycle to assign to the employee.
- Complete the remaining required fields and click Save Employee.
7.2 Assigning or Changing a Cycle Through the Employee Profile
For an existing employee, the evaluation cycle is managed on the Contract tab of the employee’s profile. The Evaluation Cycle field shows the cycle currently assigned or empty field if no cycle is selected before.
- Open the employee’s profile from the Employees list.
- Click the Contract tab.
- In the Evaluation Cycle field, select the cycle to assign, or a different cycle to replace the current one.
- Save the changes to apply the new evaluation cycle.
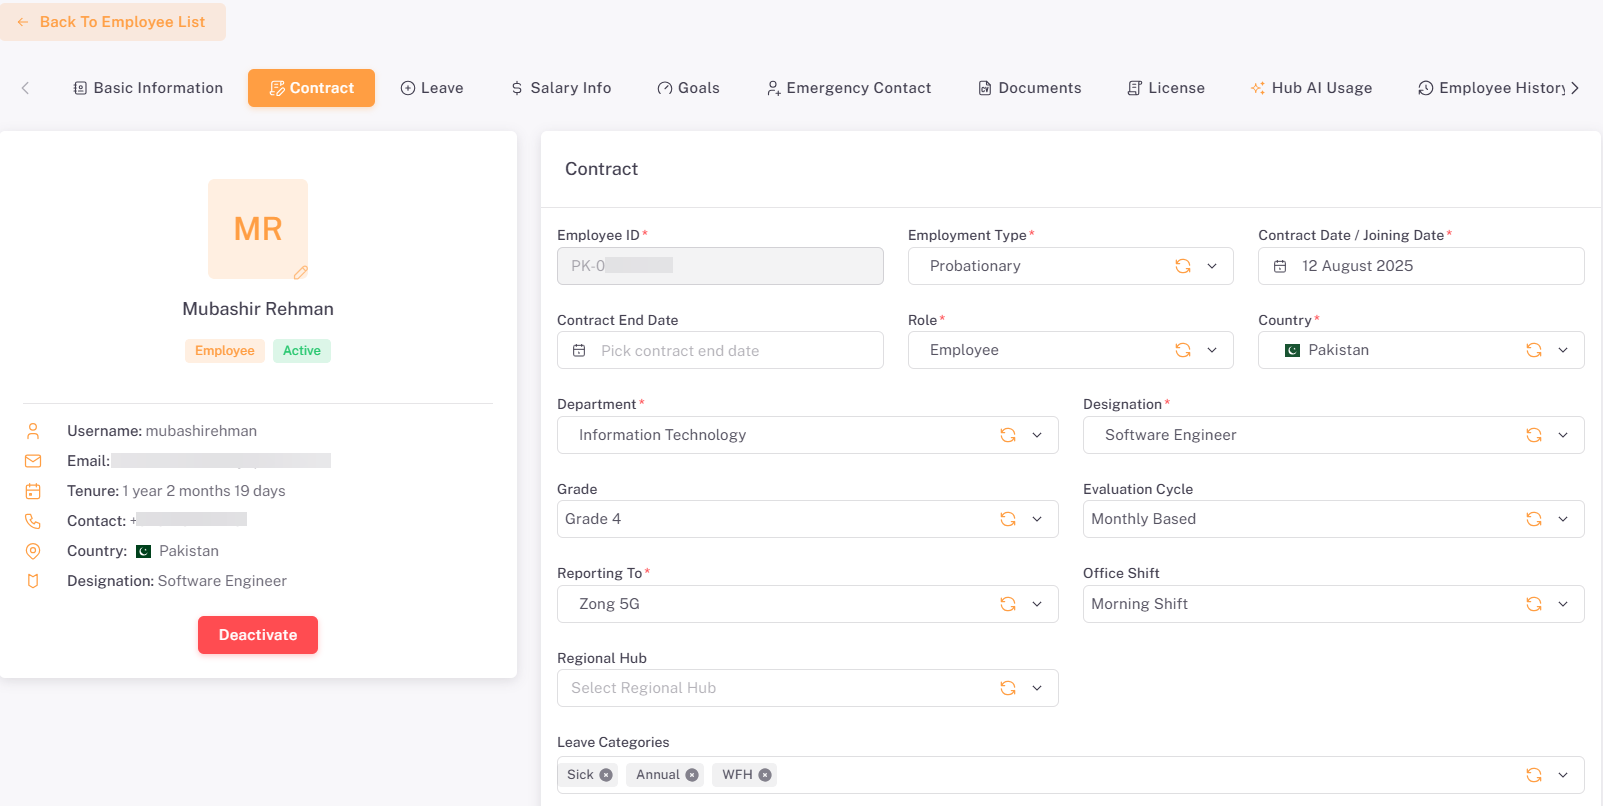
📜 Note: The Evaluation Cycle field is optional on both the Add New Employee form and the Contract tab. Evaluation cycles must already exist in Portal Settings > Evaluation Cycle before they can be assigned.
Section 8: Evaluation Cycles in Appraisals
Evaluation cycles are further used in the Appraisals module, where employee increments are processed with reference to these evaluation cycles. The Appraisals menu contains Appraisal Cycle, Team Approval, and Department Approval.
8.1. Accessing the Appraisal Cycle Page
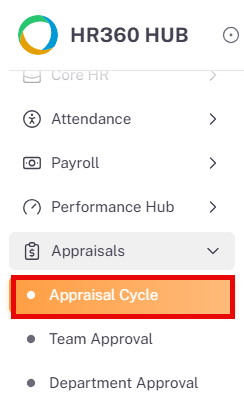
- From the left sidebar, click on Appraisals to expand the sub-menu.
- The sub-menu displays Appraisal Cycle, Team Approval, and Department Approval.
- Click on Appraisal Cycle to open the Appraisal Cycle listing page.
8.2. Appraisal Cycle Listing Page
The Appraisal Cycle page lists the evaluation cycles available for appraisals.
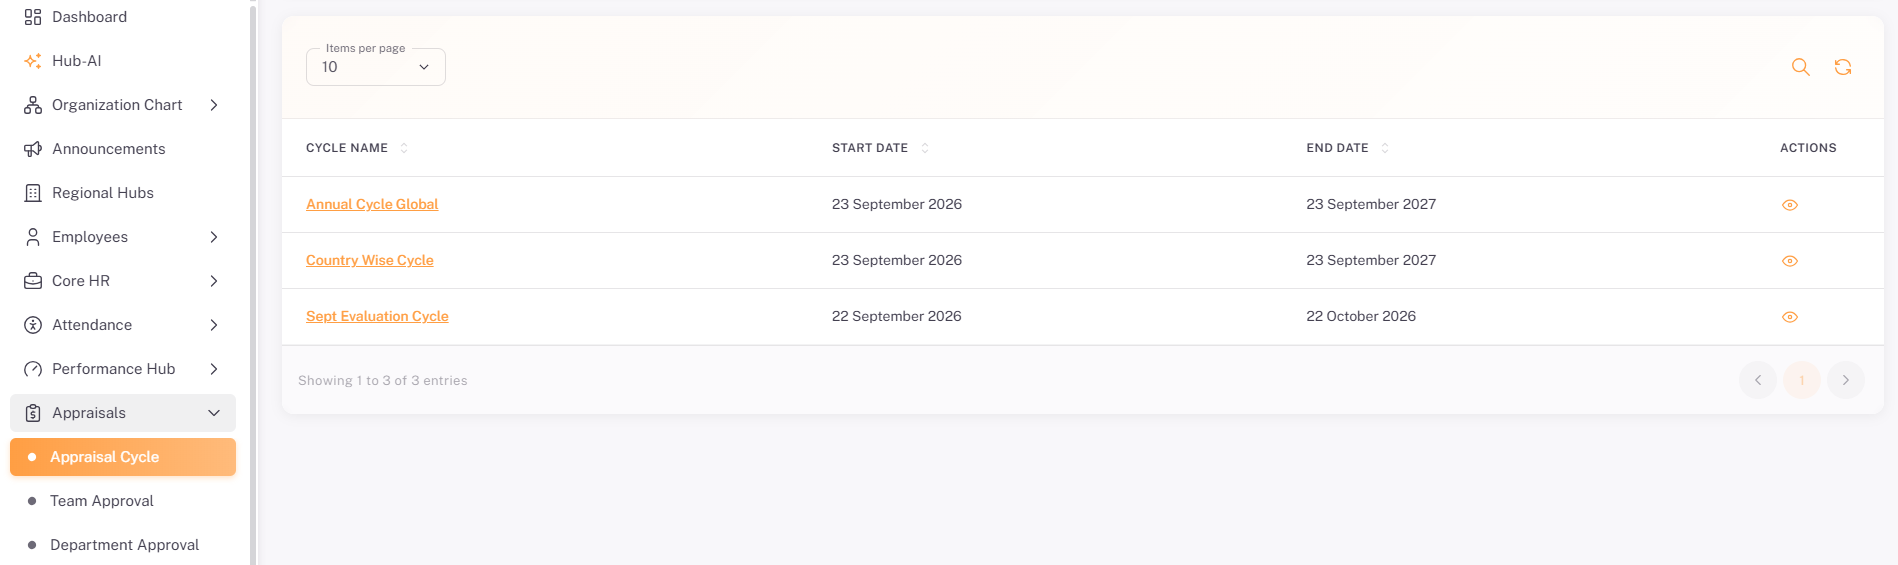
Column | Description | Sortable |
Cycle Name | The name of the evaluation cycle, displayed as an orange link. | Yes |
Start Date | The date the cycle begins. | Yes |
End Date | The date the cycle ends. | Yes |
Actions | Eye icon — view the cycle. | No |
- Items per page selector: Controls the number of records displayed per page.
- Search icon: Filter cycles by name or other fields.
- Refresh icon: Reload the listing to reflect the latest changes.
- Pagination controls: Navigate between pages. The footer shows the range of records displayed.
📜 Note: Appraisal cycles are not created on the Appraisal Cycle page, which has no Add button. They come from the evaluation cycles set up in Portal Settings > Evaluation Cycle.
Summary
The following table provides a complete step-by-step summary of all key workflows in the Evaluation Cycle module:
# | Action / Step | Result |
1 | Access Evaluation Cycle: Log in → Portal Settings in left sidebar → Evaluation Cycle. | The Evaluation Cycle listing page opens showing all cycles. |
2 | Review cycles: Use the search, refresh, items-per-page, and pagination controls. | Cycles are listed with name, frequency, countries, start date, and end date. |
3 | Create a cycle: Click + Add Evaluation Cycle → Select frequency → Enter cycle name → Tick Organization-wide or select countries → Select start date → Click Create. | The new cycle is created with the end date calculated automatically. |
4 | View a cycle: Click the Eye icon → Review details → Click Close. | The cycle’s frequency, created date, countries, start date, and end date are displayed. |
5 | Edit a cycle: Click the Pencil icon → Update the fields → Click Save. | The cycle is updated, and the end date is recalculated from the start date and frequency. |
6 | Delete a cycle: Click the Bin icon → Click Yes, Delete. | The cycle is removed. This action cannot be undone. |
7 | Assign a cycle when creating an employee: Add New Employee → Employment Details → Select Evaluation Cycle → Click Save Employee. | The employee is created with the selected evaluation cycle. |
8 | Assign or change a cycle for an existing employee: Open the employee’s profile → Contract tab → Select Evaluation Cycle → Save. | The employee’s evaluation cycle is updated. |
9 | Review cycles in Appraisals: Appraisals in left sidebar → Appraisal Cycle. | The Appraisal Cycle listing shows the cycles, with start and end dates, used when processing employee increments. |