

Overview
The Leave settings in the HRMS Portal let administrators define how the organization’s leave year is structured. The leave year decides when employee leave balances are issued, how accruals build up, when carry-forward is applied, and which period leave reports cover. Setting it correctly once, in Portal Settings, keeps every leave-related figure in the portal consistent.
Leave Settings currently contains the following area:
Leave Calendar: Used to set the month and day on which the organization’s leave year starts. The leave year end date, the current and next leave year, and the number of days remaining are all worked out automatically.
This guide covers:
- How to access Leave Settings from the Portal Settings menu in the left sidebar.
- Understanding the Leave Calendar page and its default configuration.
- How to choose a leave year using the Common leave years shortcuts or the start month and day fields.
- How the leave year end date, summary cards, and date checker are calculated.
- How to save or reset leave calendar changes.
📜 Note: Access to Portal Settings and its actions is controlled by role permissions. Users must have Portal Settings access to view or change the Leave Calendar.
Prerequisites
Before working with the Leave Calendar, ensure the following are in place:
- The user must be logged in with a role that has access to Portal Settings and leave management permissions should also be enabled.
- The organization’s leave year should be confirmed with HR or Finance before any change is saved.
Section 1: Accessing Leave Settings
After logging in to the HRMS Portal, follow the steps below to access the Leave Settings page.
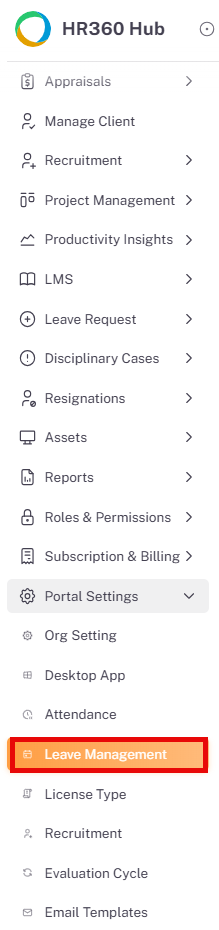
- From the left sidebar, click on Portal Settings to expand the sub-menu.
- The sub-menu displays Org Setting, Desktop App, Attendance, Leave, License Type, Recruitment, Evaluation Cycle, Email Templates, and My Subscription.
- Click on Leave Management to open the Leave Settings page.
Section 2: Leave Calendar
The Leave Settings page opens on the Leave Calendar selected by default. A Leave Settings panel on the left lists the available setting areas, with Leave Calendar highlighted as the active item. The main panel on the right is where the organization’s leave year is defined.
update the images, new filter added Apply these dates to:
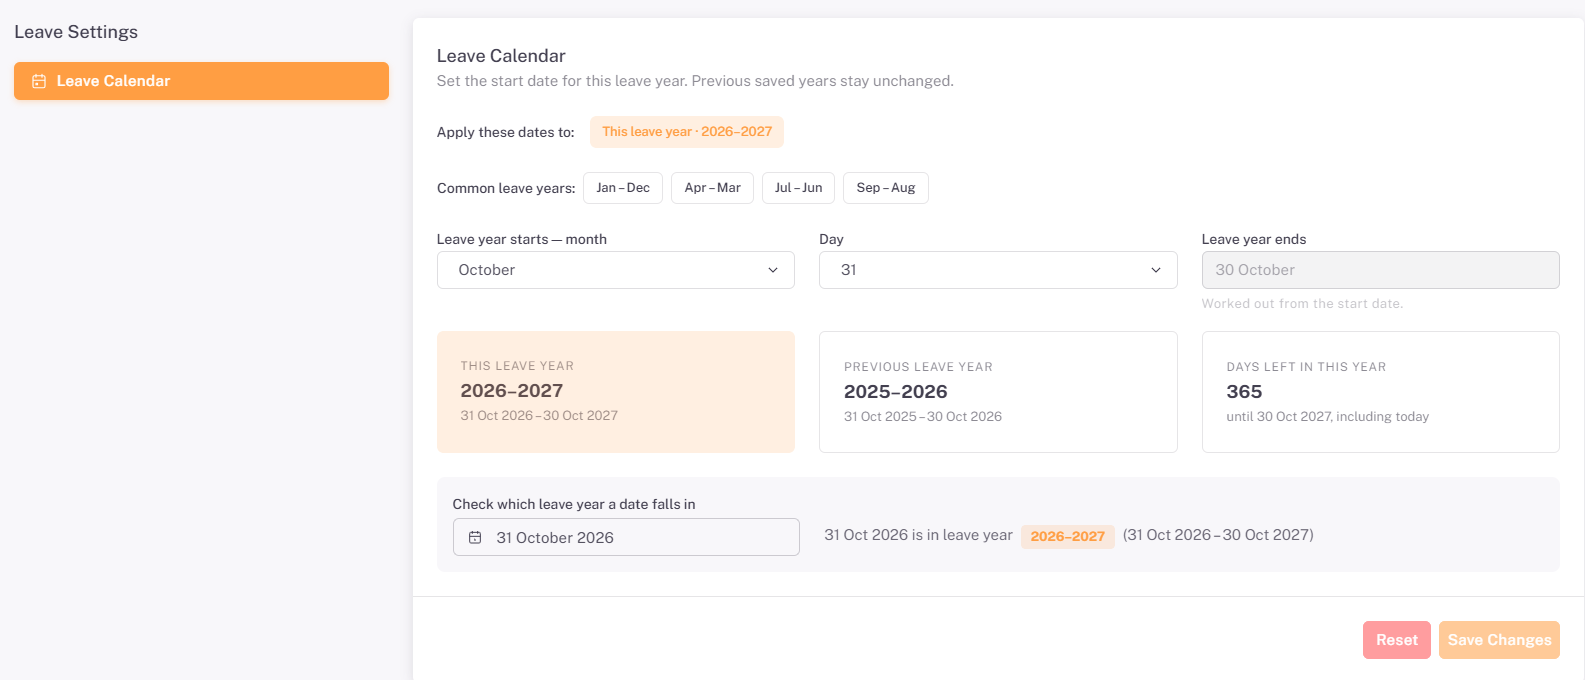
📜 Note: No Common leave years button is highlighted by default. The page opens showing the start month and day of the leave year currently configured, and the Reset and Save Changes buttons remain greyed out because no changes have been made.
2.1. Page Layout
The Leave Calendar page is made up of the following areas, from top to bottom:
Area | Description |
Apply these dates to | Shows the leave year the dates will be applied to, e.g. “This leave year · 2026–2027”. Previously saved leave years stay unchanged. |
Common leave years | A row of shortcut buttons — Jan–Dec, Apr–Mar, Jul–Jun, and Sep–Aug — for the most frequently used leave years. |
Leave year starts — month | Dropdown used to select the month in which the leave year begins. |
Day | Dropdown used to select the day of the month on which the leave year begins. |
Leave year ends | Read-only field that displays the leave year end date, worked out from the start date. |
Summary cards | Three cards showing This Leave Year, Previous Leave Year, and Days Left in This Year. |
Check which leave year a date falls in | A date checker used to confirm which leave year any chosen date belongs to. |
Reset / Save Changes | Buttons at the bottom of the page used to discard or apply changes. |
2.2. Common Leave Years
The Common leave years buttons provide a quick way to set the leave year without choosing the month and day manually. Click a button to apply that leave year. The selected button is highlighted, and the start month, day, end date, and summary cards update to match.
Option | Leave Year Starts | Leave Year Ends | Leave Year Label |
Jan–Dec | 1 January | 31 December | Single year, e.g. 2026 |
Apr–Mar | 1 April | 31 March | Two years, e.g. 2026–2027 |
Jul–Jun | 1 July | 30 June | Two years, e.g. 2026–2027 |
Sep–Aug | 1 September | 31 August | Two years, e.g. 2026–2027 |
2.3. Leave Year Start and End Dates
The start of the leave year is defined by two fields, and the end date is derived from them.
Field | Editable | Description |
Leave year starts — month | Yes | Select the month in which the leave year begins, e.g. January, April, July, or September. |
Day | Yes | Select the day of the month on which the leave year begins. The common leave years all start on day 1. |
Leave year ends | No | Displays the last day of the leave year, e.g. 31 December or 31 August. This field is greyed out and cannot be selected or edited. |
📜 Note: The Leave year ends field cannot be selected or changed directly. It is worked out from the start date. To change the end date, change the start month or day instead.
2.4. Leave Year Summary Cards
Three cards below the date fields summarize the leave year that results from the selected start date. The cards update as the start month and day are changed.
Card | Description |
Current Leave Year | The leave year that today’s date falls in, shown with its full date range, e.g. 1 Sep 2026 – 31 Aug 2027. This card is highlighted in orange. |
Days Left in This Year | The number of days remaining until the leave year ends, including today. |
Next Leave Year | The leave year that follows the current one, with a note that it starts automatically on the next start date, e.g. “starts automatically on 1 Sep 2027”. |
For a Jan–Dec leave year the cards show a single year(for example, 2026). For a leave year that runs across two calendar years, the cards show both years (for example, 2026–2027).
2.5. Checking Which Leave Year a Date Falls In
The Check which leave year a date falls in panel lets you confirm how any date maps to the configured leave year. It is useful when reviewing leave that is applied for near the start or end of a leave year.
- Click the date field in the Check which leave year a date falls in panel.
- Select a date from the calendar picker. The field shows the selected date, e.g. 16 October 2026.
- The result to the right of the field confirms the leave year the date belongs to, along with its full date range, e.g. “16 Oct 2026 is in leave year 2026–2027 (1 Sep 2026 – 31 Aug 2027)”.
💡 Tip: Use the date checker after changing the start month or day to verify that dates around the year boundary fall in the leave year you expect, before saving.
2.6. Saving or Resetting Changes
Two buttons at the bottom of the page control whether a change to the leave calendar is applied.
Button | Description |
Reset | Discards the changes made on the page. The button is greyed out until a change has been made. |
Save Changes | Applies the selected leave year. The button is greyed out until a change has been made. |
⚠️ Important: Balances, accruals, carry-forward, and leave reports all follow the leave year. Confirm the start month and day are correct before clicking Save Changes.
2.7. Example Leave Year Configurations
The following examples show how the Leave Calendar page appears when each of the other common leave years is selected. In each case the start month, day, end date, and summary cards update automatically, and the Reset and Save Changes buttons become active.
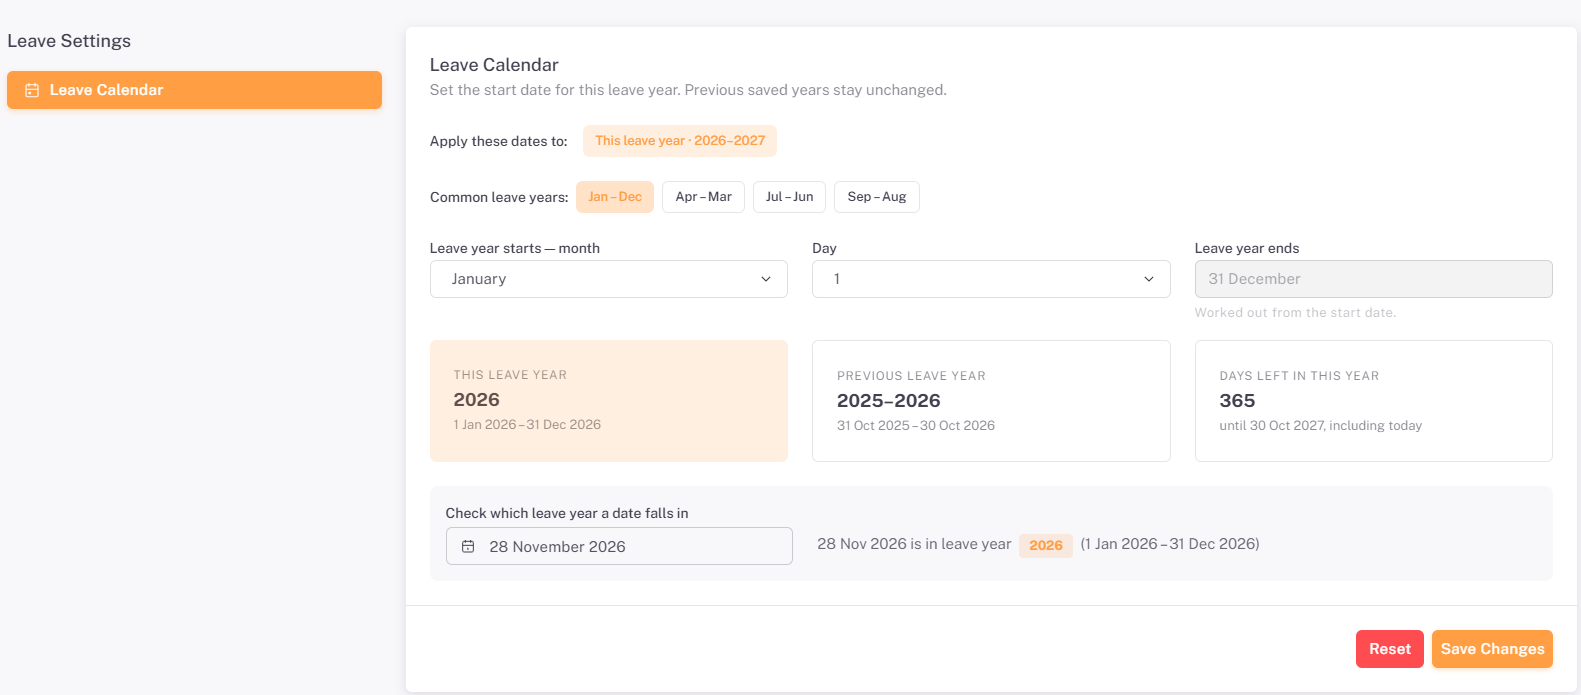
Jan–Dec: The leave year starts on 1 January and ends on 31 December.
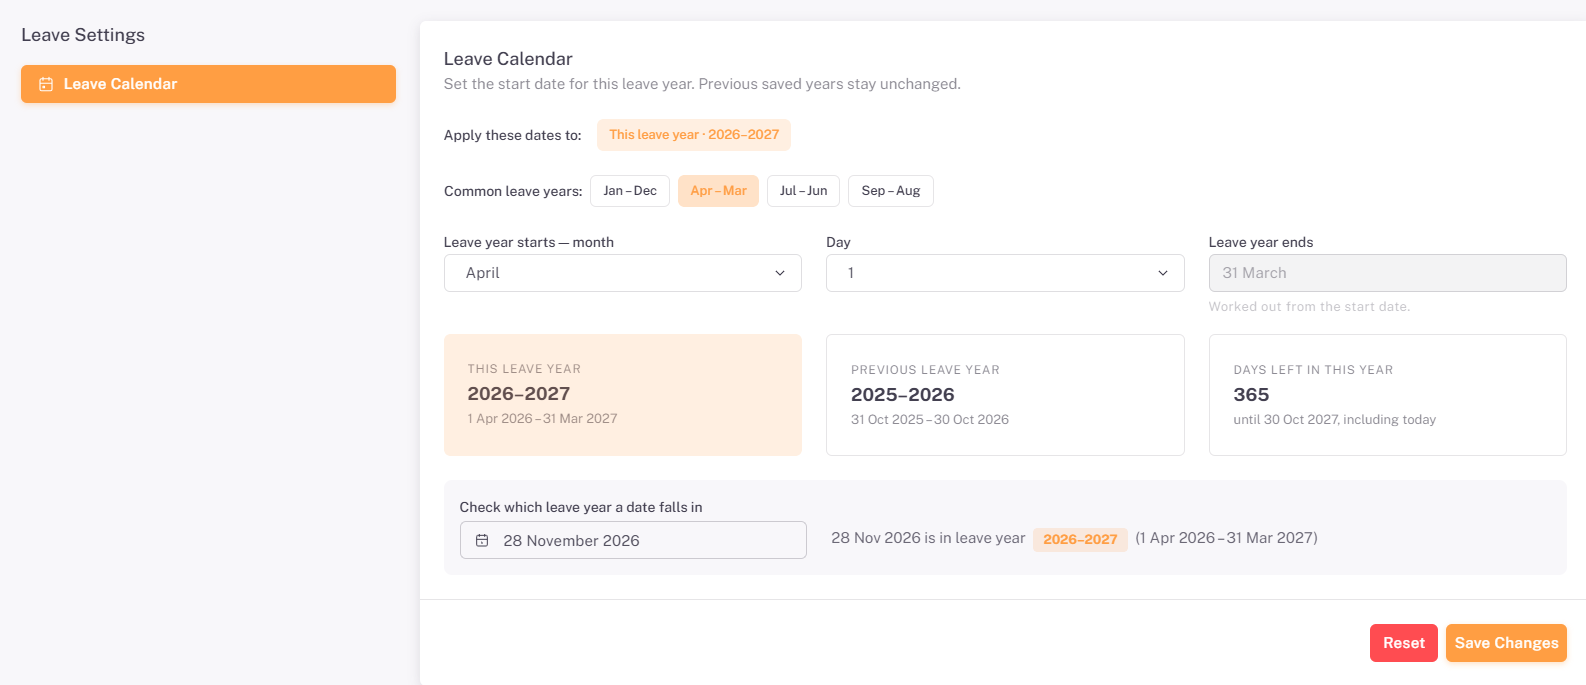
Apr–Mar: The leave year starts on 1 April and ends on 31 March.
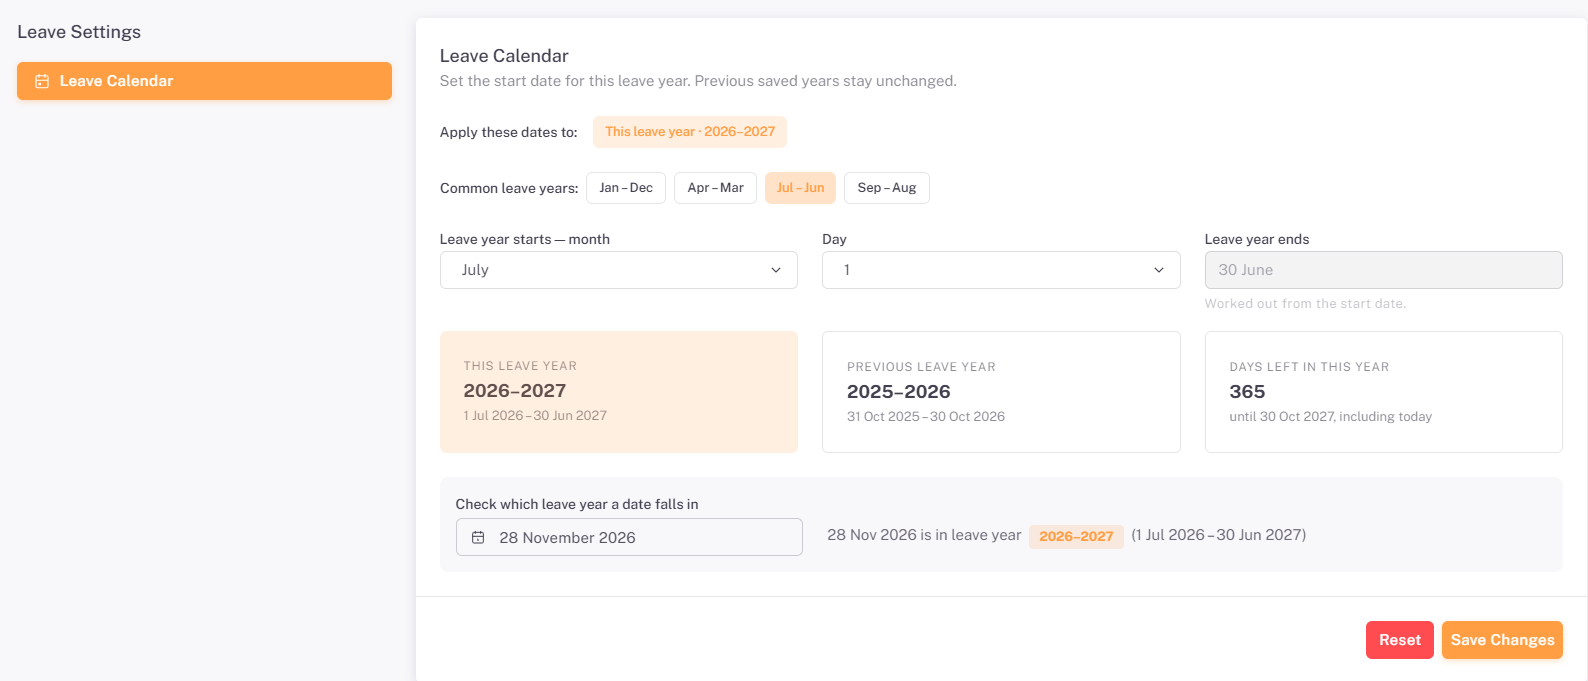
Jul–Jun: The leave year starts on 1 July and ends on 30 June.
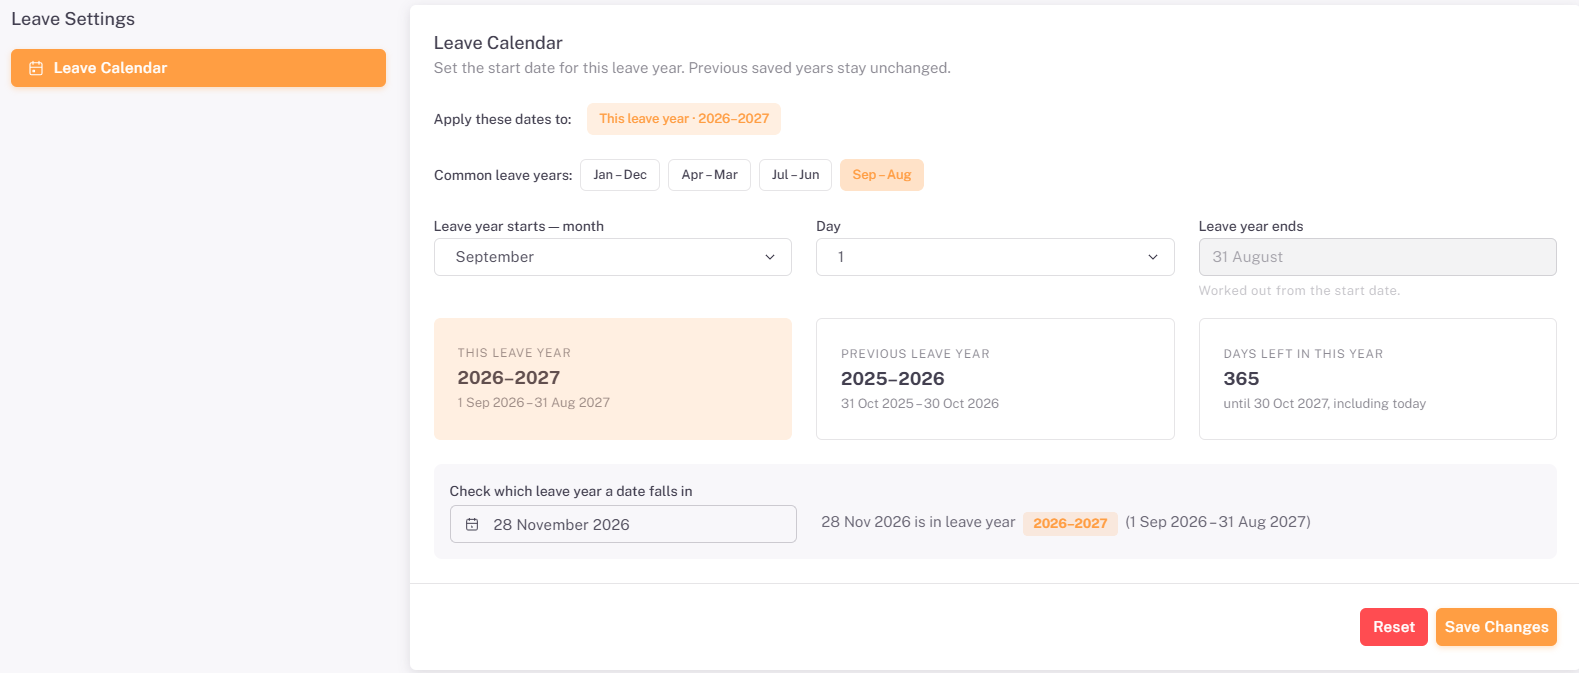
Sep–Aug: The leave year starts on 1 September and ends on 31 August.
Summary
The following table provides a complete step-by-step summary of all key workflows in the Leave Settings module:
# | Action / Step | Result |
1 | Access Leave Settings: Log in → Portal Settings in left sidebar → Leave. | Leave Settings page opens on the Leave Calendar. |
2 | Choose a common leave year: Click Jan–Dec, Apr–Mar, Jul–Jun, or Sep–Aug. | The selected button is highlighted in orange; the start month, day, end date, and summary cards update, and Reset and Save Changes become active. |
3 | Set a custom start date: Select the Leave year starts — month and the Day. | The Leave year ends field is worked out automatically from the start date, and the summary cards update. |
4 | Review the summary cards: Check This Leave Year, Previous Leave Year, and Days Left in This Year. | The resulting leave year, the one before it, and the days remaining are displayed. |
5 | Check a date: Click the date field in Check which leave year a date falls in → Select a date. | The result confirms which leave year the date belongs to, with its full date range. |
6 | Save the leave calendar: Click Save Changes. | The selected leave year is applied; previously saved leave years stay unchanged. |
7 | Discard changes: Click Reset. | Changes made on the page are discarded. |