

Overview
Email Templates, found under Portal Settings, is where Super Admins configure the automated email notifications sent out as recruitment events happen — for example, notifying a Reporting Manager when a new job requisition is created, or notifying a Recruiter when a candidate applies.
Email Templates is a shared area covering every module in the portal, not just Recruitment. This guide focuses specifically on setting up templates for the Recruitment module's Template Actions.
This guide covers:
- How to access Email Templates from the left sidebar.
- Understanding the Email Templates listing page.
- How to add a new Recruitment email template, from Template Details through to saving.
- How to preview an email template before it goes live.
- How to activate, deactivate, or edit an existing template.
- A full reference of every Recruitment Template Action available.
📜 Note: Only Super Admins, or users with Email Templates module access, can view or edit email templates. A template only sends automatically once its Status is set to Active.
Prerequisites
Before setting up a Recruitment email template, ensure the following are in place:
- The user must be logged in as a Super Admin or have Email Templates module access.
- Decide which recruitment event and recipient the template is for before starting — this determines which Template Action to select.
Section 1: Accessing Email Templates
After logging in to the HRMS Portal as a Super Admin, follow the steps below to access Email Templates.
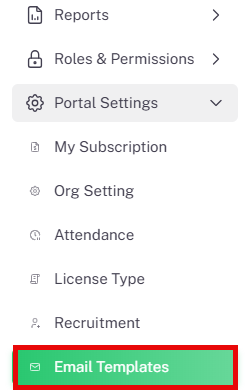
- From the left sidebar, scroll down and click on Portal Settings to expand its sub-menu.
- Click on Email Templates under Portal Settings.
- The Email Templates listing page opens.
Section 2: Email Templates Listing Page
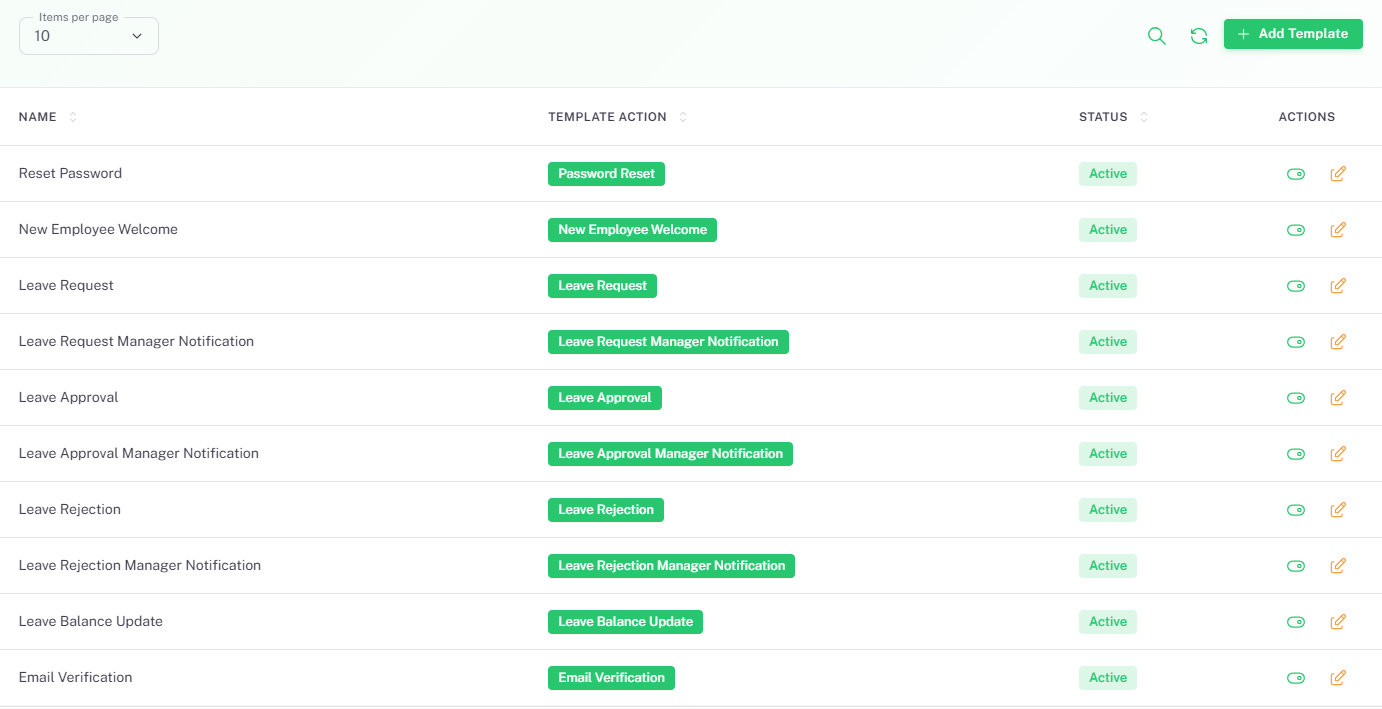
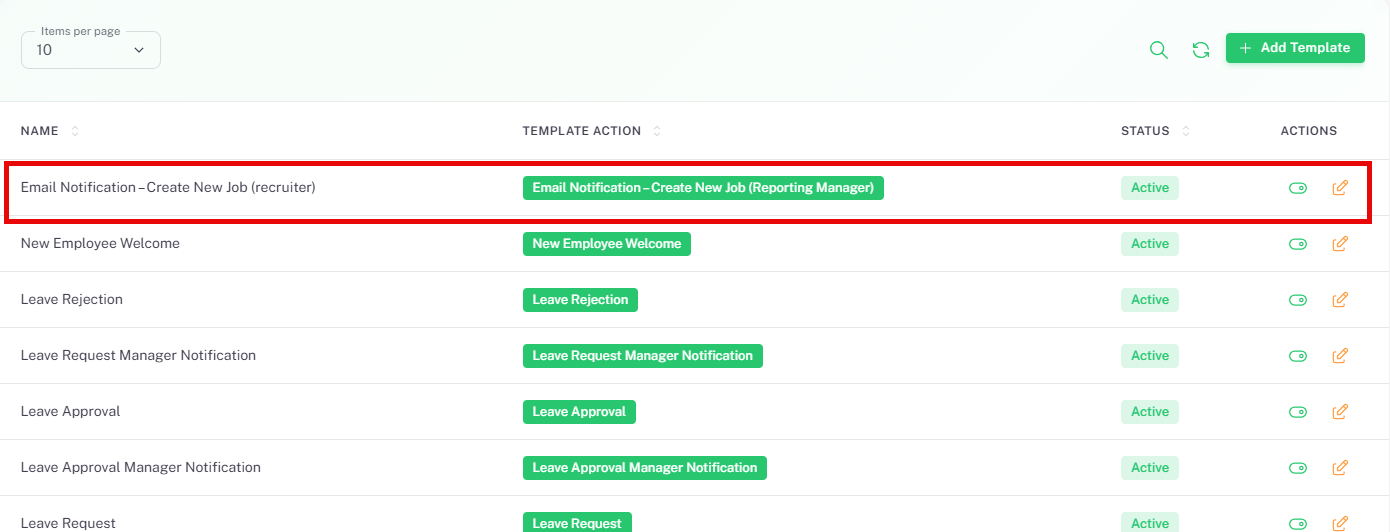
The Email Templates listing page displays every email template configured across the portal, covering all modules including Recruitment.
2.1. Listing Table Columns
Column | Description | Sortable |
Name | The display name given to the template when it was created. | Yes |
Template Action | The specific system event the template is linked to, shown as a badge, e.g. Leave Approval, Password Reset. | Yes |
Status | Whether the template is Active and will be sent automatically when its Template Action occurs. | Yes |
Actions | Toggle switch — turns the template on or off without deleting it. Pencil icon — opens the template for editing. | No |
2.2. Page Controls
- Search icon — Filter templates by name.
- Refresh icon — Reload the listing to reflect the latest changes.
- + Add Template button — Opens the Add Email Template form to create a new template.
Section 3: Adding a Recruitment Email Template
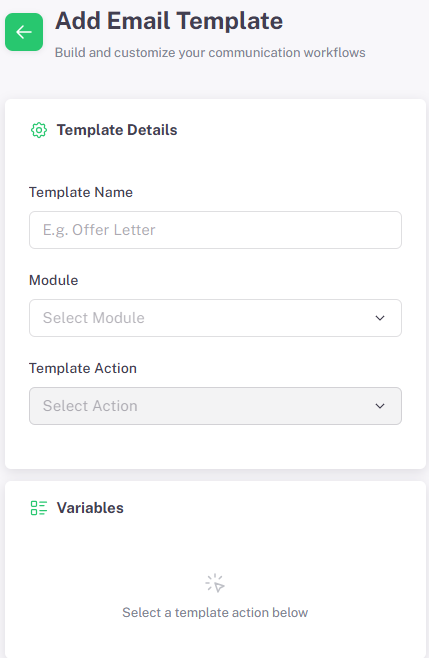
To create a new Recruitment notification, click + Add Template on the Email Templates listing page. The Add Email Template form opens.
3.1. Template Details
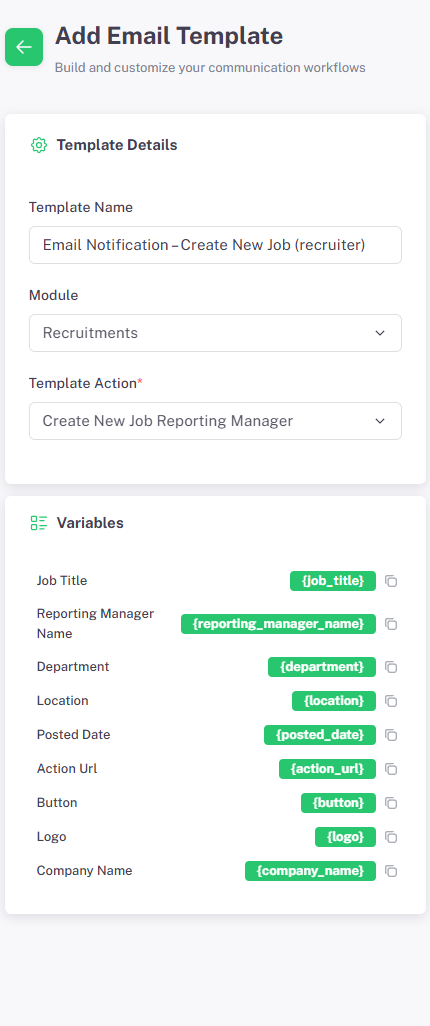
Fill in the Template Details panel first. Selecting Recruitments as the Module, then a Template Action, determines which merge-field variables are available for this template.
Field | Required | Description |
Template Name | Yes | Enter a descriptive name for the template, e.g. "Email Notification – Create New Job (recruiter)". This name is for internal reference only and is not shown to email recipients. |
Module | Yes | Select Recruitments to scope the Template Action list to Recruitment events. |
Template Action | Yes | Select the specific recruitment event that should trigger this email, e.g. Create New Job Reporting Manager. See Section 5 for the full list of available actions. |
⚠️ Warning: Template Name and Subject Line (see Section 3.3) are both required. Attempting to save without them highlights the fields in red with a "Name is required" / "Subject is required" message.
3.2. Variables
Once a Template Action is selected, the Variables panel populates with the merge-fields available for that specific event. Each variable can be copied and pasted into the Subject Line or Email Message Body, and is automatically replaced with the real value when the email is sent.
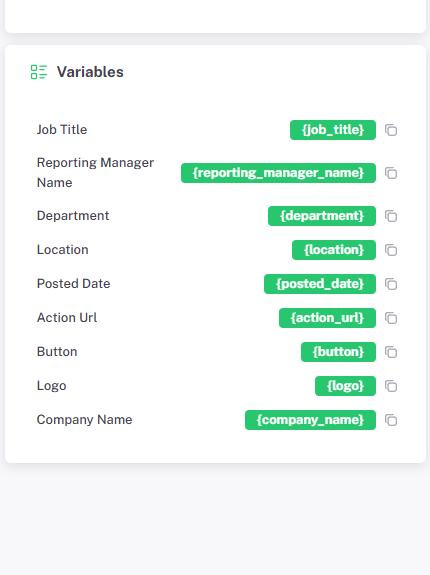
📜 Note: The variables offered depend entirely on the selected Template Action. The Create New Job Reporting Manager action shown above offers Job Title, Reporting Manager Name, Department, Location, Posted Date, Action URL, Button, Logo, and Company Name — a different action, such as Applicant Status Update Applicant, will offer a different set relevant to that event.
3.3. Email Content
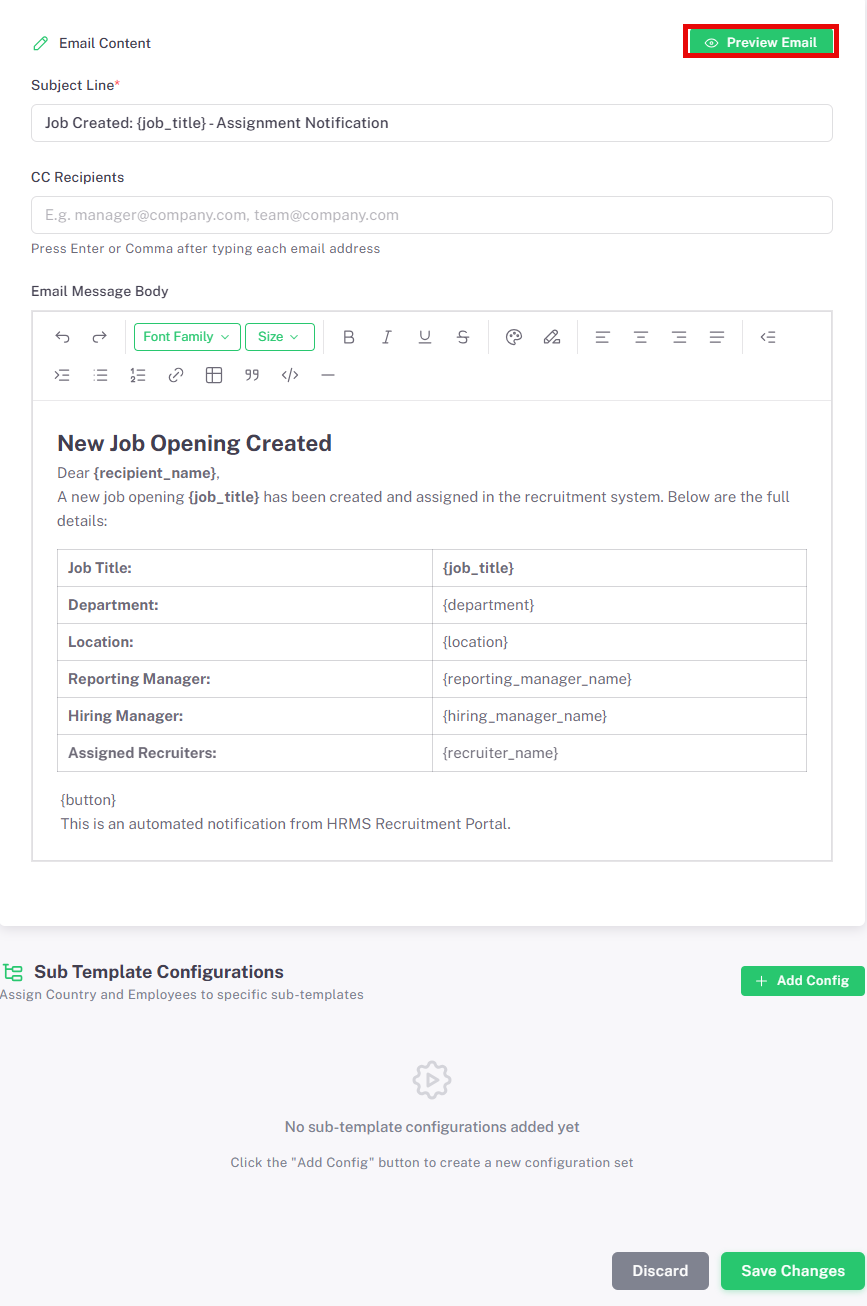
The Email Content panel is where the actual email is written, using the variables from Section 3.2 to personalize it.
Field | Required | Description |
Subject Line | Yes | Enter the email subject. Variables can be used here, e.g. "Job Created: {job_title} - Assignment Notification". |
CC Recipients | No | Enter one or more email addresses to CC on every email this template sends. Press Enter or Comma after each address to add it. |
Email Message Body | Yes | Compose the email content using the rich-text editor. Insert variables where the corresponding value should appear, e.g. a details table using {job_title}, {department}, {location}, and {reporting_manager_name}. Formatting options include Bold, Italic, Underline, Strikethrough, headings, lists, links, and tables. |
3.4. Previewing the Email
Click Preview Email, at the top right of the Email Content panel, to see how the email will look when a recipient receives it.
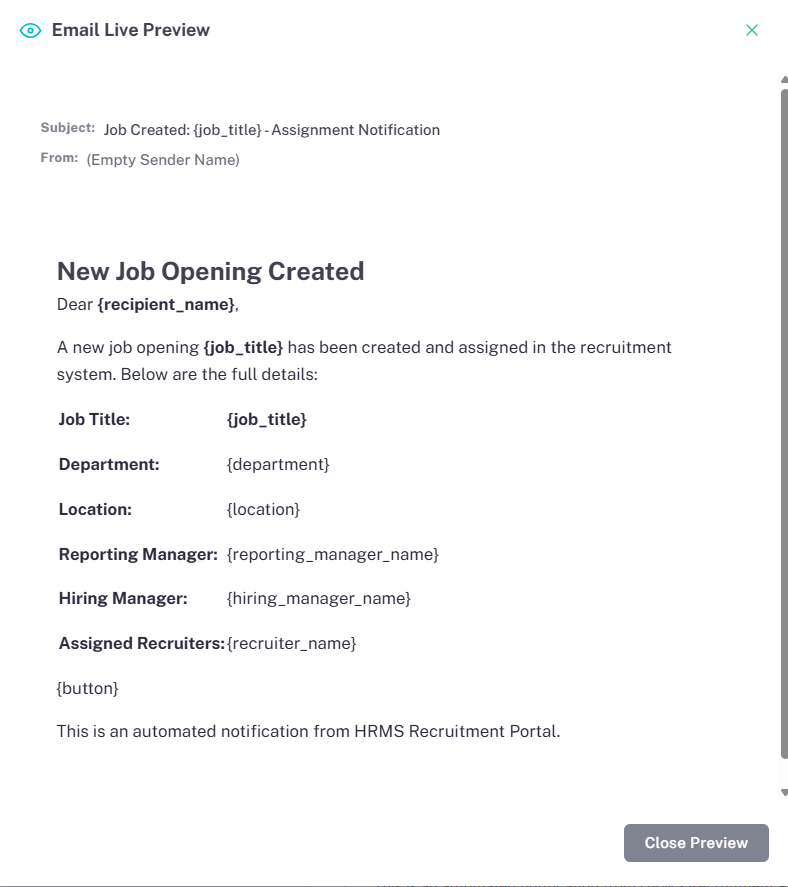
- Review the Subject, From, and rendered Email Message Body.
- Click Close Preview to return to the Add Email Template form and continue editing.
📜 Note: In Preview, variables display as their placeholder text, e.g. {job_title}, rather than a real value, since no specific job or recipient is being previewed. Real values are substituted only when the template actually sends.
3.5. Sub Template Configurations
Sub Template Configurations, shown below the Email Content panel, let a single Template Action send additional parallel notification variants — for example, a differently worded version of the same notification routed to a specific stakeholder group such as HR — on top of the base template. Click + Add Config to create a configuration set.
📜 Note: This section is labelled "Assign Country and Employees to specific sub-templates" in the interface, but it is not used for country-based language variations. It is used to configure additional, parallel notifications to specific employees or stakeholder groups, such as HR, alongside the base template's recipients.
Leave this section empty if the base template's Template Action and variables are all that is needed. Sub Template Configurations are optional and templates will not require them to be saved.
3.6. Save Changes
Once Template Details, Variables usage, and Email Content are complete, click Save Changes at the bottom right of the form.
- Click Save Changes to create the template. It immediately appears in the Email Templates listing.
- Click Discard to close the form and return to the listing without saving.
Section 4: Managing Existing Templates
Once a Recruitment email template exists, it can be turned on or off, or edited, directly from the Email Templates listing page.
- Toggle switch — Switch a template between Active and Inactive without deleting it.
- Pencil (Edit) icon — Reopens the template in the same Add/Edit Email Template form used to create it, with all fields pre-populated.
⚠️ Important: A template only sends automatically while its Status is Active. Setting a template to Inactive stops it from sending for its Template Action, without losing the configured content — useful for temporarily pausing a notification without recreating it later.
Section 5: Available Recruitment Template Actions
The following Template Actions are available when Module is set to Recruitments, grouped by the recruitment event that triggers them and the recipient each one notifies. Any of these can be configured as a template, as needed by the organisation — not every action needs a template.
Event | Template Action | Notifies |
Job Created | Create New Job Reporting Manager | Reporting Manager |
Job Created | Create New Job Recruiter | Recruiter |
Job Created | Create New Job Department Head | Department Head |
New Applicant | New Applicant Apply Reporting Manager | Reporting Manager |
New Applicant | New Applicant Apply Recruiter | Recruiter |
New Applicant | New Applicant Apply Department Head | Department Head |
Activity Logged | New Activity Reporting Manager | Reporting Manager |
Activity Logged | New Activity Recruiter | Recruiter |
Activity Logged | New Activity Department Head | Department Head |
Job Details Updated | Update Job Details Reporting Manager | Reporting Manager |
Job Details Updated | Update Job Details Recruiter | Recruiter |
Job Details Updated | Update Job Details Department Head | Department Head |
Job Status Updated | Update Job Status Reporting Manager | Reporting Manager |
Job Status Updated | Update Job Status Recruiter | Recruiter |
Job Status Updated | Update Job Status Department Head | Department Head |
Applicant Status Updated | Applicant Status Update Reporting Manager | Reporting Manager |
Applicant Status Updated | Applicant Status Update Recruiter | Recruiter |
Applicant Status Updated | Applicant Status Update Department Head | Department Head |
Applicant Status Updated | Applicant Status Update Applicant | Applicant |
Activity Updated | Update Activity Reporting Manager | Reporting Manager |
Activity Updated | Update Activity Recruiter | Recruiter |
Activity Updated | Update Activity Department Head | Department Head |
💡 Tip: Applicant Status Update Applicant is the only action in this list that notifies the candidate directly rather than internal staff — useful for keeping applicants informed as they move through the hiring pipeline, e.g. when they are moved to Interview or Offered.
Summary
The following table provides a complete step-by-step summary of setting up a Recruitment email notification:
# | Action / Step | Result |
1 | Access Email Templates: Log in as Super Admin → Portal Settings in left sidebar → Email Templates. | Email Templates listing page opens showing templates across all modules. |
2 | Click + Add Template. | Add Email Template form opens with Template Details and Variables panels. |
3 | In Template Details, enter Template Name, select Module = Recruitments, and select the required Template Action. | Variables panel populates with the merge-fields available for that action. |
4 | In Email Content, enter Subject Line, optional CC Recipients, and compose Email Message Body using the relevant variables. | Email content is drafted, ready for review. |
5 | Click Preview Email. | Email Live Preview opens showing how the email will look, with variables shown as placeholders. |
6 | Optional: Click + Add Config under Sub Template Configurations to add parallel notification variants. | Additional configuration set(s) added for specific employees or stakeholder groups. |
7 | Click Save Changes. | Template is created and appears in the Email Templates listing. |
8 | Confirm the template Status is Active, or toggle it on if needed. | Template will now send automatically whenever its Template Action occurs. |