

Overview
The Organization Settings area of the HR360Hub portal lets administrators configure how the portal is set up and branded for their organization. It is reached from Portal Settings in the left sidebar and groups related configuration pages into a single menu: General Settings, Organization Chart, Branding, Theme Customizer, SMTP Setting, AI Settings, and SSO Login Settings.
This guide covers SSO Login Settings. Single Sign-On (SSO) allows users to sign into HR360 Hub with an account from their organization’s identity provider, instead of entering a separate email and password. The portal supports two providers:
- Google Workspace: Users sign in with their Google account.
- Microsoft 365 / Azure AD: Users sign in with their Microsoft account.
📜 Note: Only one SSO configuration can be enabled at a time. Enabling one provider automatically disables the other.
This guide covers:
- How to access SSO Login Settings from the left sidebar.
- Understanding the SSO Login Settings listing page and its columns.
- How to add an SSO configuration for Google Workspace, Microsoft 365 / Azure AD.
- How to set up a Microsoft Entra organization and find the Tenant ID, with a step-by-step workflow.
- How to edit an existing SSO configuration and enable or disable it.
- How users sign in to the portal with an enabled SSO provider.
Prerequisites
Before configuring SSO, ensure the following are in place:
- The user must be logged in with a role that has permission to update Portal Settings in the Portal Settings module of Roles & Permissions.
- The organization’s email domain (for example, company.com) must be known, as it is entered as the Authorized Domain.
- For Microsoft 365 / Azure AD, an organization must exist in Microsoft Entra with the domain verified, and the Tenant ID must be available. See Section 3.3.
- Every user who will sign in with SSO must have an account in HR360 Hub that matches their account in the SSO provider. See Section 3.
Section 1: Accessing SSO Login Settings
After logging in to HR360 Hub, follow the steps below to open SSO Login Settings.
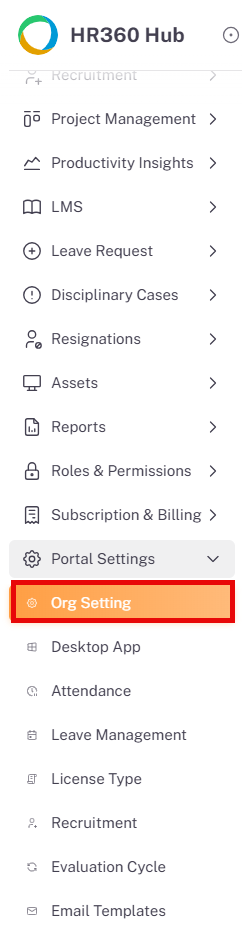
- From the left sidebar, click on Portal Settings to expand the sub-menu.
- The sub-menu displays Org Setting, Desktop App, Attendance, Leave Management, License Type, Recruitment, Evaluation Cycle, and Email Templates.
- Click on Org Setting to open Organization Settings.
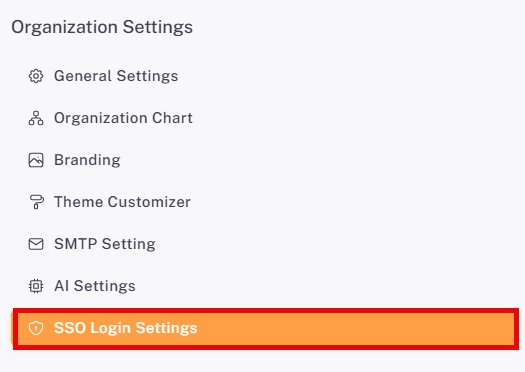
The Organization Settings page displays a menu on the left with the following options: General Settings, Organization Chart, Branding, Theme Customizer, SMTP Setting, AI Settings, and SSO Login Settings. Click on SSO Login Settings to open the SSO listing page.
Section 2: SSO Login Settings Listing Page
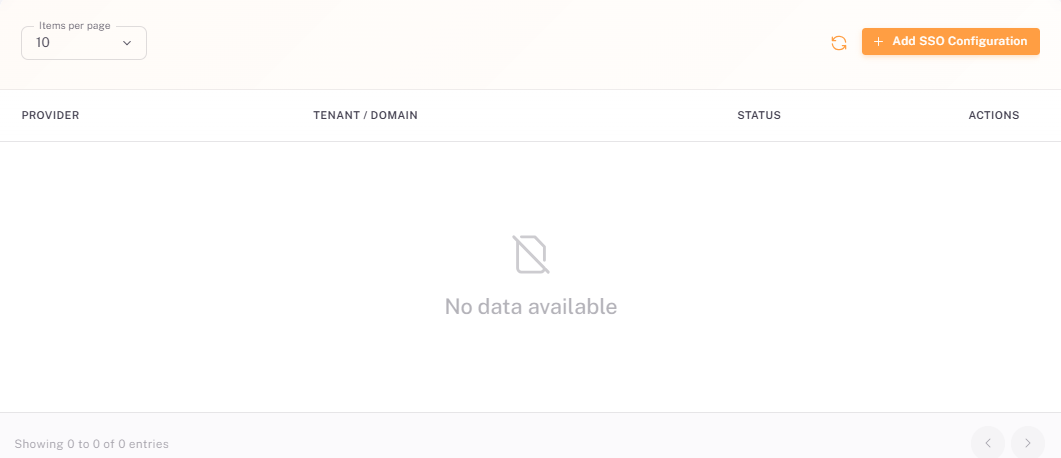
The SSO Login Settings page lists every SSO configuration created for the organization, along with its SSO status (Enabled or Disabled). When no provider has been configured yet, the listing displays a No data available message.
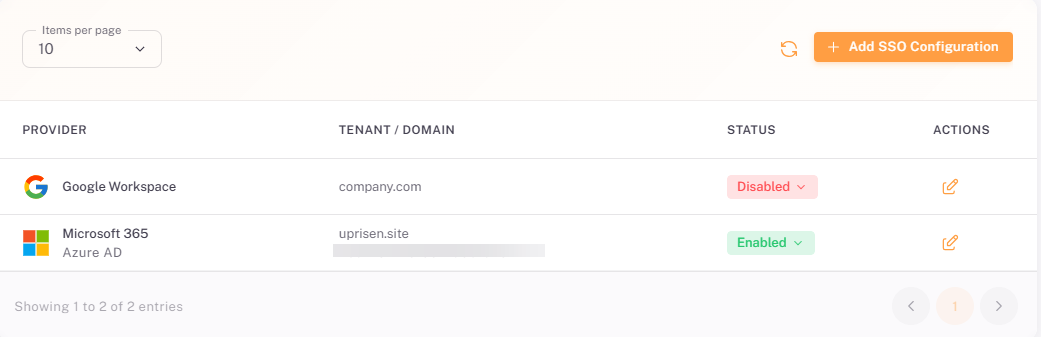
Once a provider is configured, it appears as a row in the listing. The example below shows Google Workspace (Disabled) and Microsoft 365 / Azure AD (Enabled) configured for the same domain.
2.1. Listing Table Columns
Column | Description |
Provider | The SSO provider, shown with its logo: Google Workspace, or Microsoft 365 with the Azure AD sub-label. |
Tenant / Domain | The Authorized Domain configured for the provider. For Google Workspace, only the domain is displayed. For Microsoft 365 / Azure AD, the Tenant ID is also displayed below the domain. |
Status | The SSO status of the configuration, shown as a badge: Enabled (green) or Disabled (red). Only one configuration can be enabled at a time. |
Actions | Edit (pencil) icon — opens the Edit SSO Configuration dialog. A configuration cannot be deleted; it can only be edited, enabled, or disabled. |
2.2. Page Controls
- Items per page selector: Controls the number of records displayed per page.
- Refresh icon: Reload the listing to reflect the latest changes.
- + Add SSO Configuration button: Opens the Add SSO Configuration dialog to set up a new provider.
- Pagination controls: Navigate between pages using the arrows at the bottom of the listing. The footer shows the range of entries displayed.
💡 Tip: Use the Status badge on the listing to quickly confirm which provider is currently enabled for sign-in.
Section 3: Adding an SSO Configuration
To set up a new provider, click the + Add SSO Configuration button on the listing page. The Add SSO Configuration dialog opens, where you select a provider and enter its details.
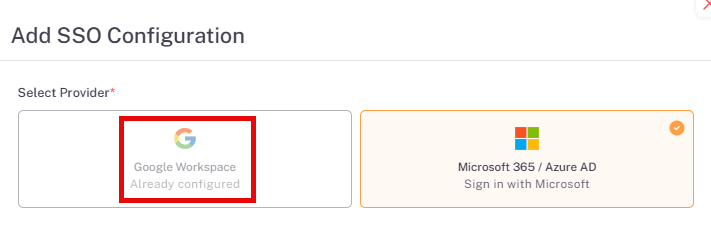
📜 Note: If a provider is already configured, its option is greyed out in the Add SSO Configuration dialog and shows “Already configured”. For example, if Google Workspace is already configured, the Google Workspace option cannot be selected when you click + Add SSO Configuration.
3.1. Common Elements
The following elements appear in the Add SSO Configuration dialog. Fields that are specific to a provider are described in Sections 3.2 and 3.3.
Field | Required | Description |
Select Provider | Yes | Select Google Workspace or Microsoft 365 / Azure AD. The selected provider is marked with an orange tick, and the rest of the form updates to match it. A provider that is already configured is greyed out. |
How to set up for Microsoft | Info | A collapsible panel shown when Microsoft 365 / Azure AD is selected. It lists the steps to find the Tenant ID. |
Authorized Domain | Yes | Enter the organization’s email domain, e.g. company.com. Users with an email address on this domain will be sent to your SSO provider. Login with multiple domains is not allowed; only one domain can be entered. |
Enable SSO | No | A toggle that is off by default. Turn it on to allow users to sign in with the selected provider as soon as the configuration is saved. Only one configuration can be enabled at a time. |
3.2. Google Workspace
Select Google Workspace (Sign in with Google).
Enter the Authorized Domain, then choose whether to enable SSO.
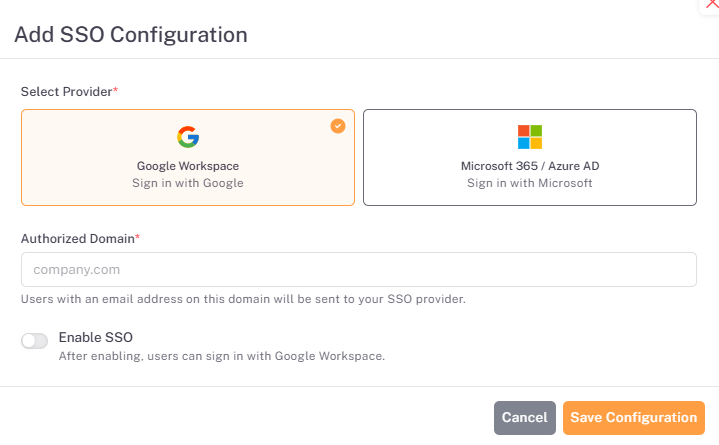
⚠️ Warning: The user account in the configured Google Workspace and the user account in HR360 Hub must be the same for SSO login to succeed. If the user’s account is disabled, does not exist, or belongs to a different domain, the user will not be able to log in.
3.3. Microsoft 365 / Azure AD
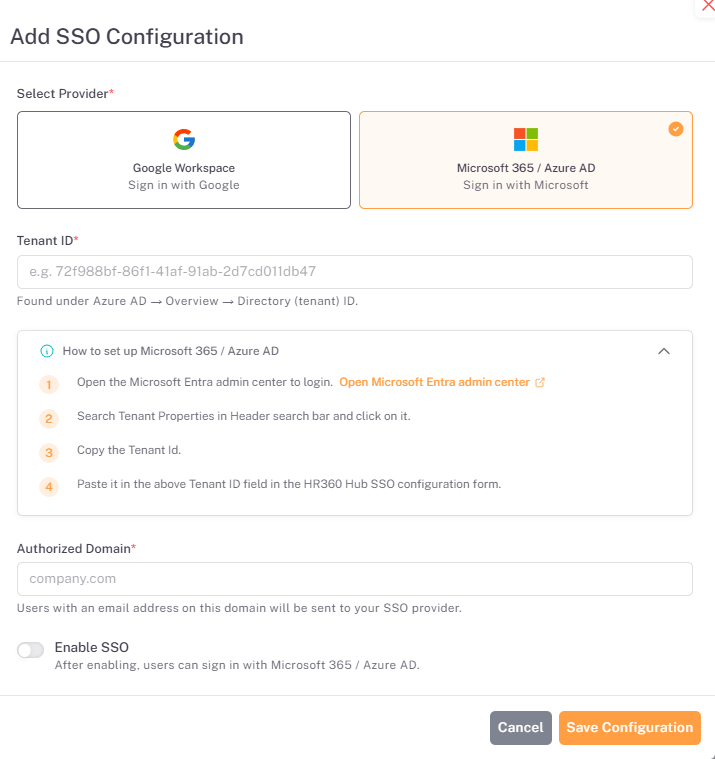
Select Microsoft365 / Azure AD (Sign in with Microsoft). This provider requires a Tenant ID and an Authorized Domain to set up the SSO configuration.
Field | Required | Description |
Tenant ID | Yes | Enter the Directory (tenant) ID of your Microsoft Entra organization. It is found on the Tenant Properties page as described in Section 3.3.1. |
Authorized Domain | Yes | Enter the verified domain of your Microsoft organization. It must be the same domain used for the HR360 Hub user accounts. |
The How to set up Microsoft 365 / Azure AD panel lists the steps to find the Tenant ID:
- Open the Microsoft Entra admin center to log in. [Open Microsoft Entra admin center]
- Search Tenant Properties in the header search bar and click on it.
- Copy the Tenant ID.
- Paste it in the Tenant ID field in the HR360 Hub SSO configuration form.
3.3.1. Setting Up the Organization and Domain
Before copying the Tenant ID, the organization and its domain must be ready in Microsoft Entra. Complete these steps first, as they are done outside HR360 Hub:
- Create the organization (tenant) in Microsoft Entra, if your company does not already have one.
- Add your company domain. In the Microsoft Entra admin center, go to Entra ID → Domain names → Add custom domain, enter the domain (for example, company.com), and click Add domain.
- Verify the domain. Microsoft shows a DNS record (TXT or MX) for the domain. Add this record at your domain registrar or DNS provider, then return to Microsoft Entra and click Verify.
- Add users with the same domain as the HR360 Hub domain, so that each user’s Microsoft account matches their HR360 Hub account.
📜 Note: DNS changes can take an hour or more to take effect, so verification may not succeed immediately. A domain that is already verified in another Microsoft directory cannot be verified again until it is removed from that directory. If the domain is already verified on Microsoft, then step 2 and 3 are not needed.
⚠️ Important: The user account in Microsoft Entra and the user account in HR360 Hub must use the same domain for SSO login to succeed. If the user’s account does not exist or the domain is different, the user will not be able to log in.
3.3.2. Getting the Tenant ID
Once the organization and domain are set up, copy the Tenant ID:
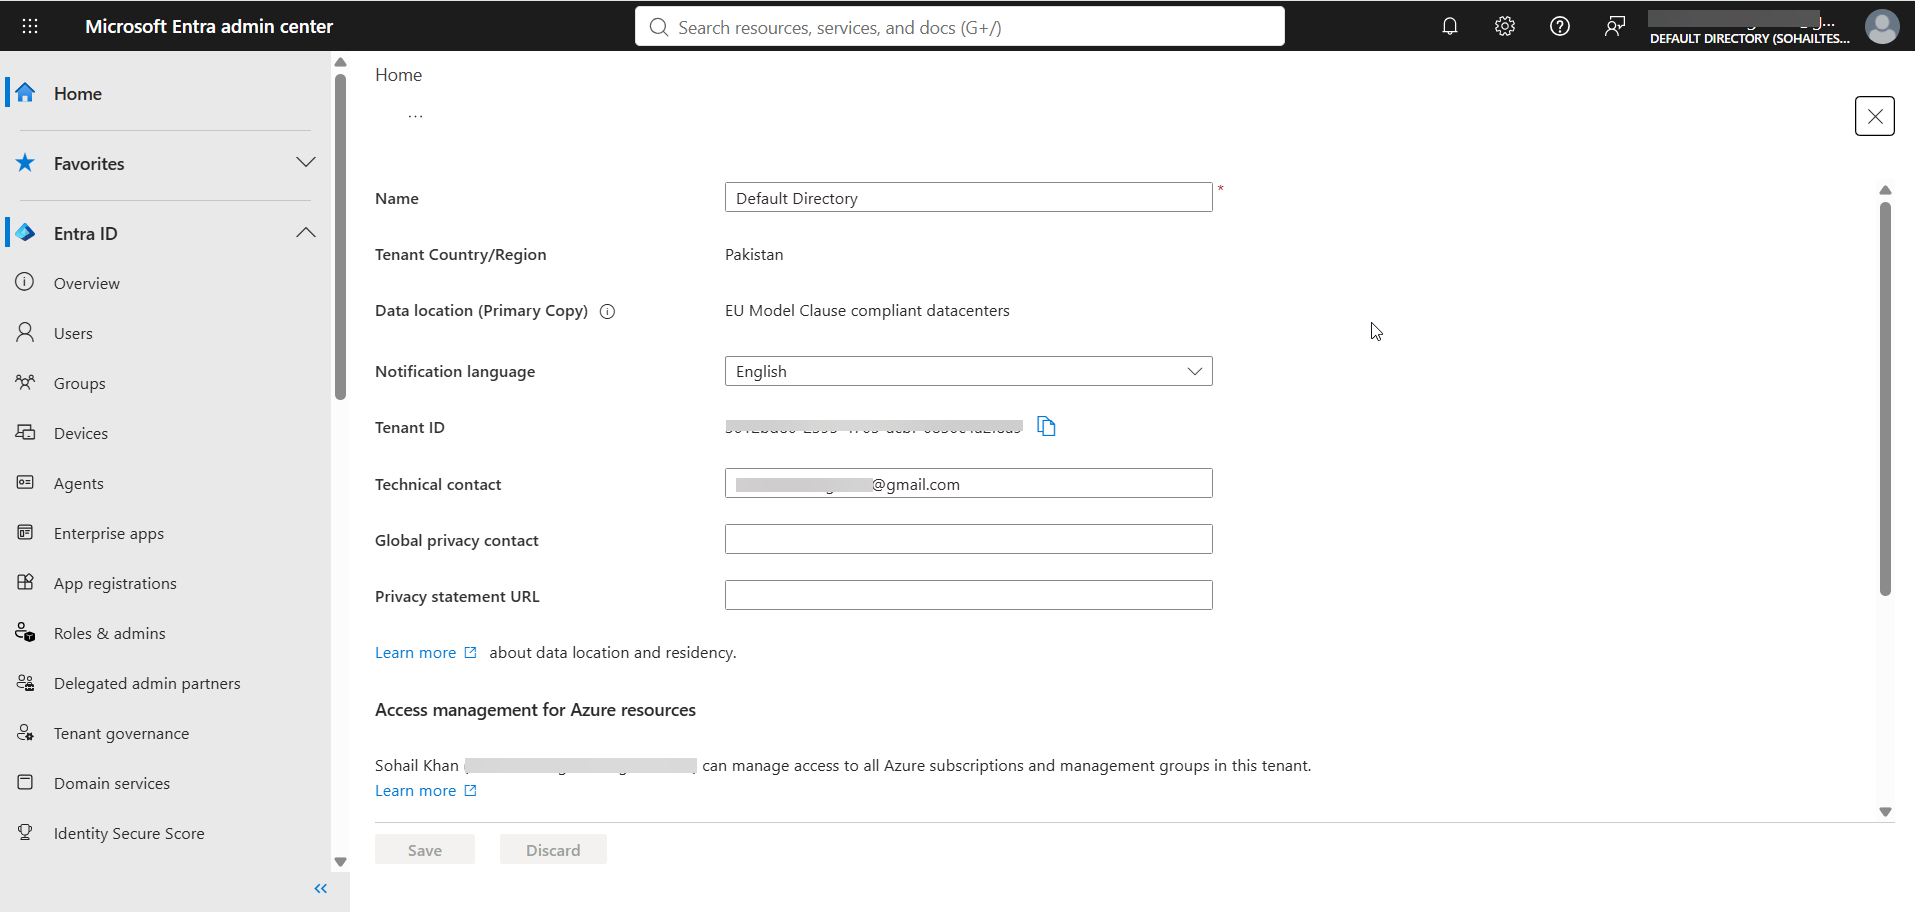
- In your browser, go to Microsoft Entra admin center and sign in to the Microsoft Entra admin center.
- In the header search bar, search for Tenant Properties and click on it. The Properties page opens.
- Locate the Tenant ID field and click the copy icon next to it to copy the Tenant ID.
3.3.3. Microsoft SSO Workflow
The diagram below summarizes the complete process, from creating the organization in Microsoft Entra to a user signing in to HR360 Hub.
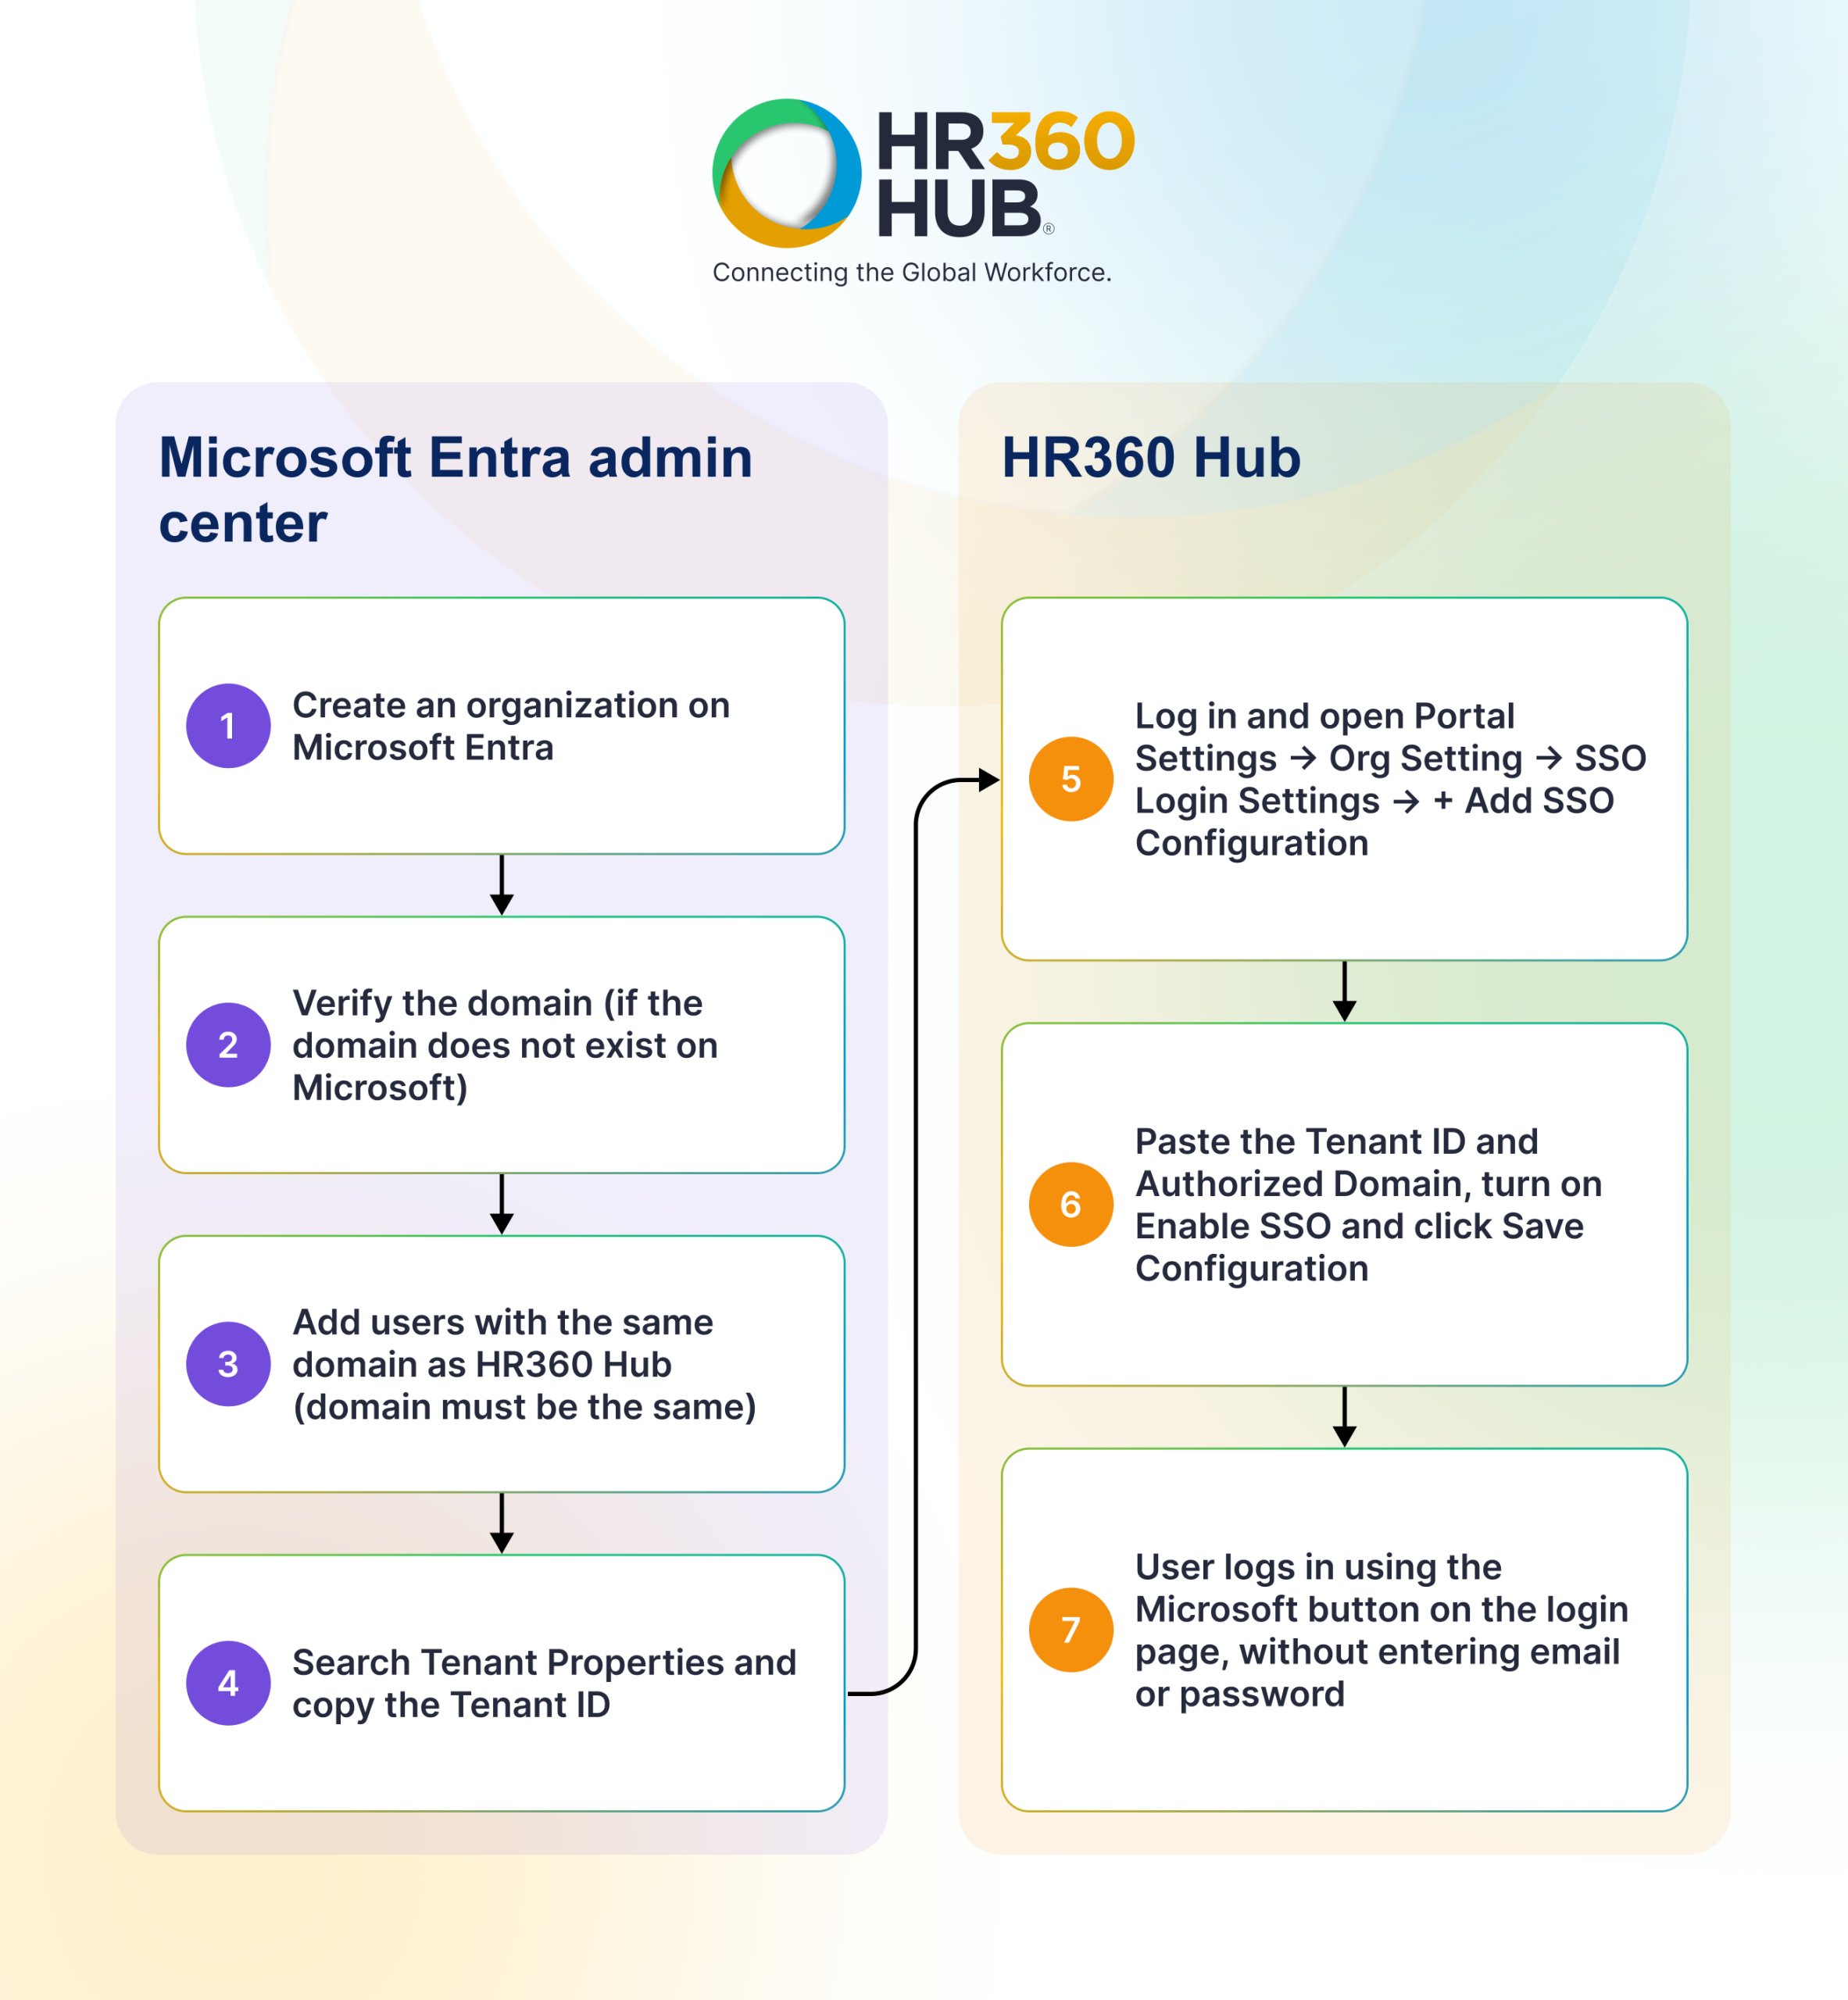
- Create an organization on Microsoft Entra.
- Verify the domain.
- Add users with the same domain as HR360 Hub. The domain must be the same.
- After setting up the organization, search Tenant Properties and copy the Tenant ID.
- In HR360 Hub, log in and navigate to the SSO settings using the path Dashboard → Portal Settings → Org Setting → SSO Login Settings → + Add SSO Configuration
- Paste the copied Tenant ID and the Authorized Domain in the Add SSO Configuration dialog, turn on the Enable SSO toggle, and click Save Configuration.
- The user logs in to HR360 Hub using the Microsoft button on the login page, without entering an email address or password.
3.4. Saving the Configuration
- Complete all required fields (marked with a red asterisk) for the selected provider.
- Turn on the Enable SSO toggle if users should be able to sign in with this provider immediately. Leave it off to save the configuration without enabling it.
- Click Save Configuration to create the SSO configuration. It appears in the listing.
Click Cancel to close the dialog without saving.
⚠️ Warning: Only one SSO configuration can be enabled at a time. Enabling a new configuration disables the one that is currently enabled. See Section 4.4 for details.
Section 4: Editing an SSO Configuration
To update an existing configuration, click the Edit (pencil) icon in the Actions column of the listing. The Edit SSO Configuration dialog opens with the saved values filled in. A configuration cannot be deleted; use this dialog to edit its details or to enable or disable it.
4.1. What Can Be Changed
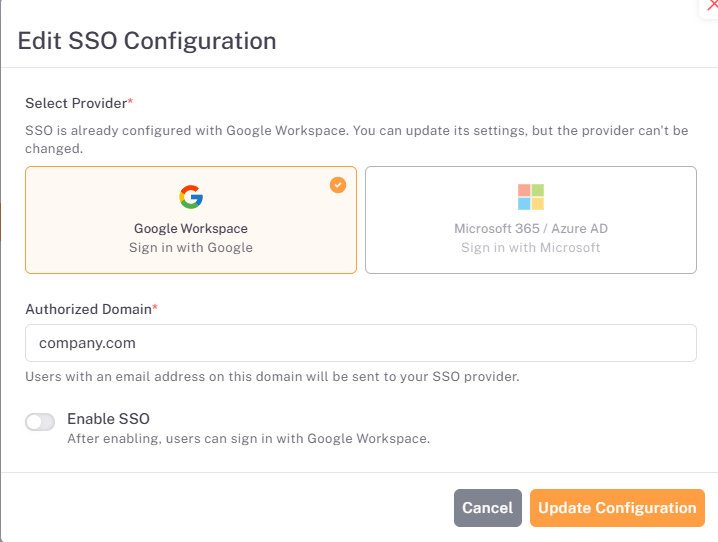
The Edit dialog displays a message confirming which provider the configuration uses, for example “SSO is already configured with Google Workspace. You can update its settings, but the provider can’t be changed.” The other provider cards are greyed out and cannot be selected.
Field | Required | Description |
Select Provider | — | Locked. The provider cannot be changed once the configuration is created. |
Tenant ID | Yes | Shown for Microsoft 365 / Azure AD only. Update it if the Tenant ID changes. |
How to set up | Info | Shown for Microsoft 365 / Azure AD only. Click to expand the steps to find the Tenant ID. |
Authorized Domain | Yes | The saved email domain. Update it if the organization’s domain changes. Only one domain is allowed. |
Enable SSO | No | Turn the toggle on to enable the provider or off to disable it. |
4.2. Editing Google Workspace
4.3. Editing Microsoft 365 /Azure AD
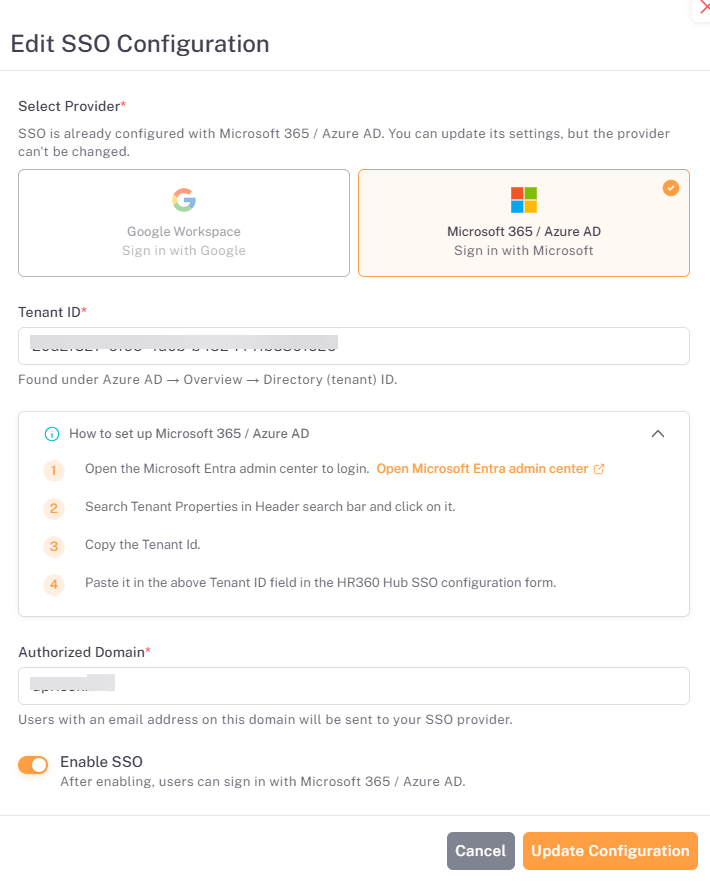
Click Update Configuration to save your changes, or Cancel to close the dialog without saving.
4.4. Enabling or Disabling a Configuration
Only one SSO configuration can be enabled at a time. When you turn on the Enable SSO toggle for a provider while the other provider is already enabled, a warning appears below the toggle. It names the provider that will be disabled when you save, for example “Only one SSO configuration can be enabled at a time. Saving will disable the currently enabled Microsoft 365 / Azure AD configuration.”

- Click the Edit (pencil) icon for the provider you want to enable or disable.
- Turn the Enable SSO toggle on to enable the provider, or off to disable it. When enabling, review the warning to confirm which provider will be disabled.
- Click Update Configuration. The Status badge in the listing updates to Enabled or Disabled.
⚠️ Important: Saving an enabled configuration automatically disables the provider that was previously enabled. Make sure users are informed before switching providers, as they will sign in with the newly enabled provider.
Section 5: Signing In with SSO
Once an SSO configuration is enabled, users can sign in from the HR360 Hub login page. Users do not need to enter an email address and password. They can log in using the continue with buttons for the SSO configuration that is enabled for the organization and then selecting their user account.
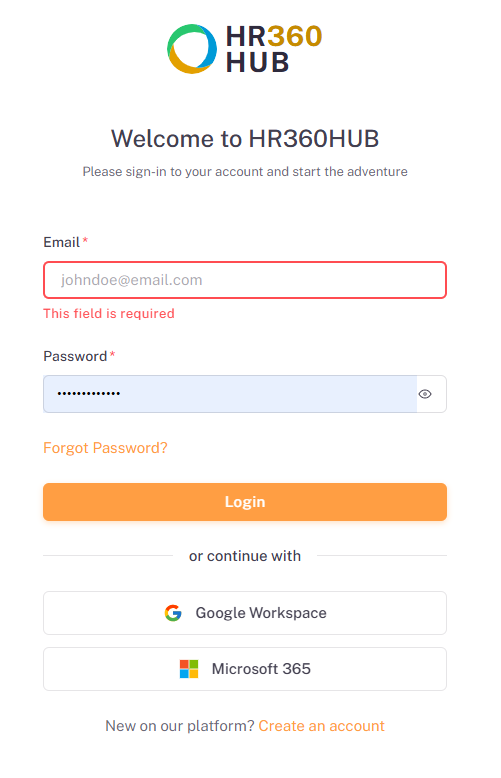
Element | Description |
Used for standard login. Not required when signing in with SSO. | |
Password | Used for standard login. Not required when signing in with SSO. |
Forgot Password? | Link used to reset a forgotten password. |
Login | Signs the user in with the entered email and password. |
Google Workspace / Microsoft 365 | Sign-in buttons under “or continue with”. Click the button for the enabled SSO provider to sign in without entering an email address or password. |
Create an account | Link for new users, shown under “New on our platform?”. |
To sign in with SSO:
- Open the HR360 Hub login page.
- Under or continue with, click the button for the SSO provider enabled for your organization: Google Workspace or Microsoft 365.
- An account selection screen appears. Select the account you want to sign in with.
- After you select the account, you are signed in to HR360 Hub.
5.1. Selecting a Google Account
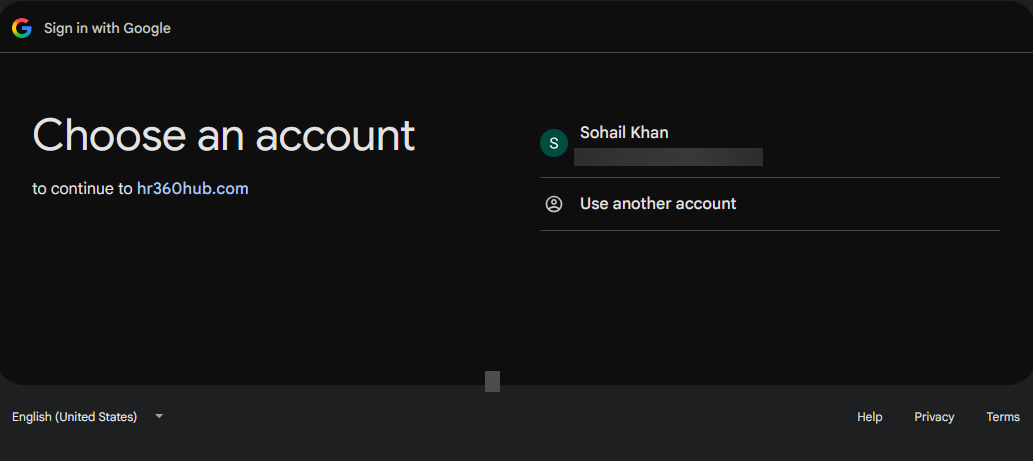
When you click Google Workspace, Google displays the Choose an account screen, with the message "to continue to" followed by the HR360 Hub address. Select the account you want to sign in with, and you are logged in. If the account you need is not listed, click Use another account.
5.2. Selecting a Microsoft Account
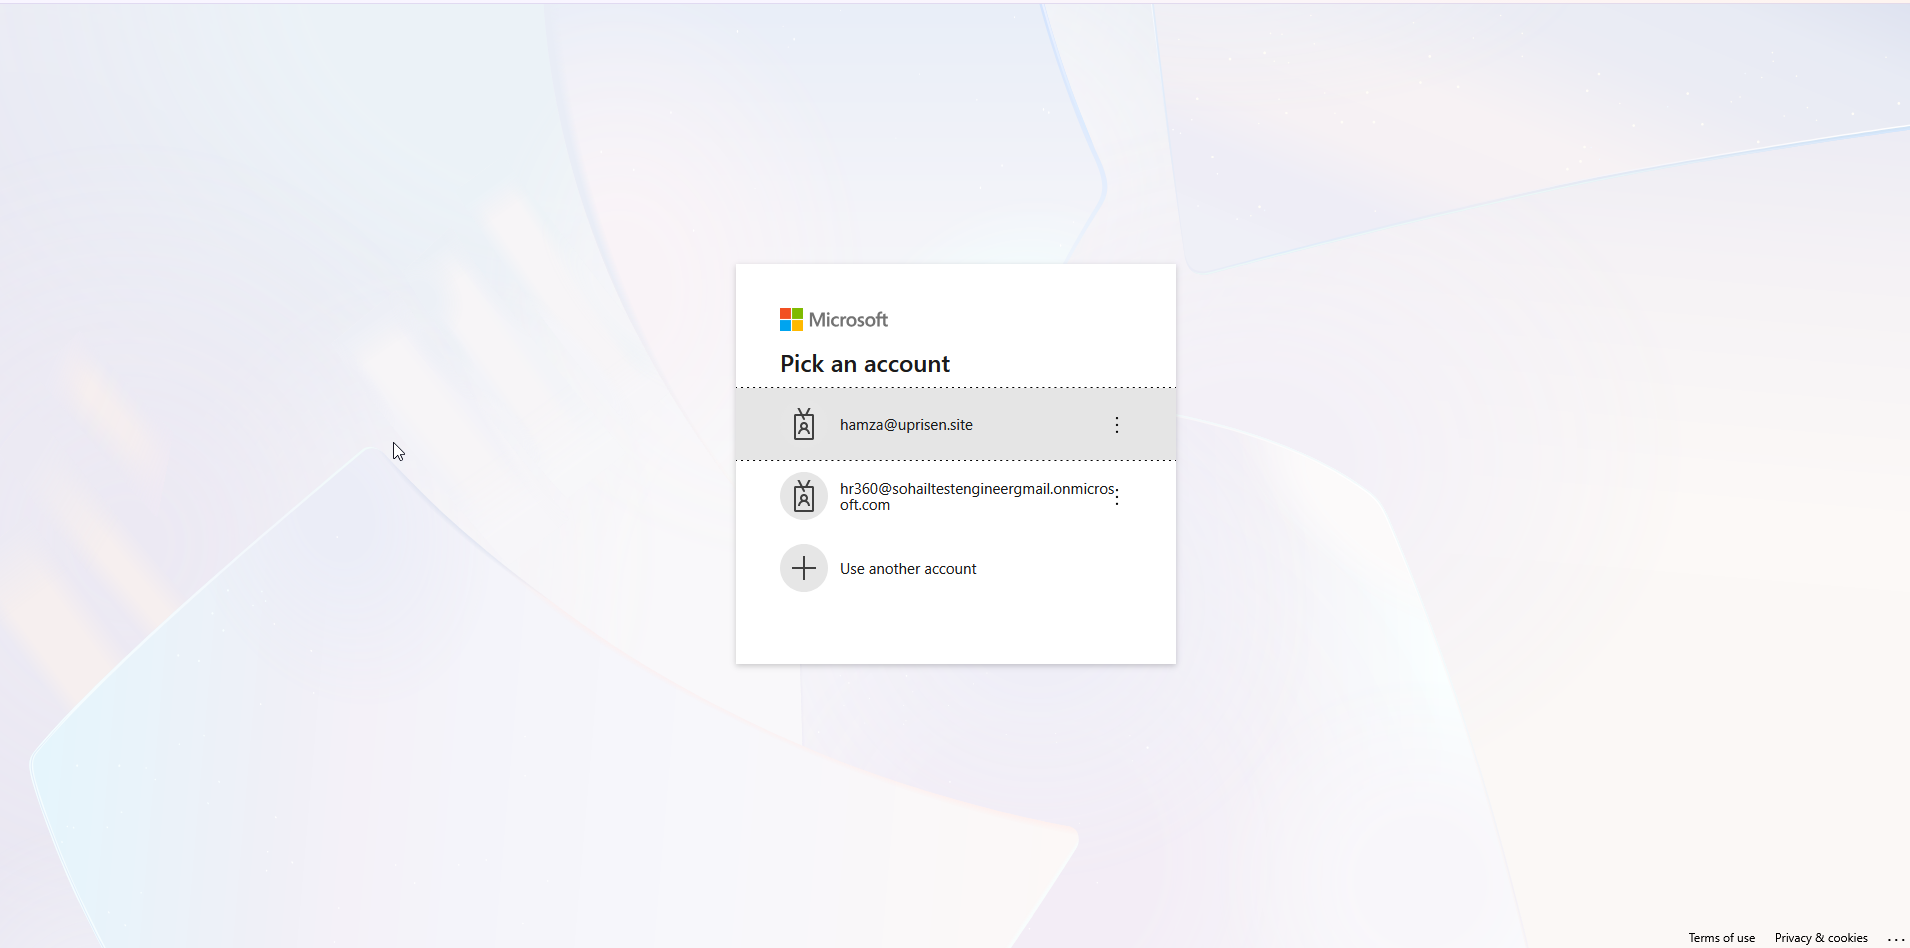
When you click on Microsoft 365, Microsoft displays the Pick an Account screen. It lists the Microsoft accounts available on your device. Select the account you want to sign in with, and you are logged in. If the account you need is not listed, click Use Another Account
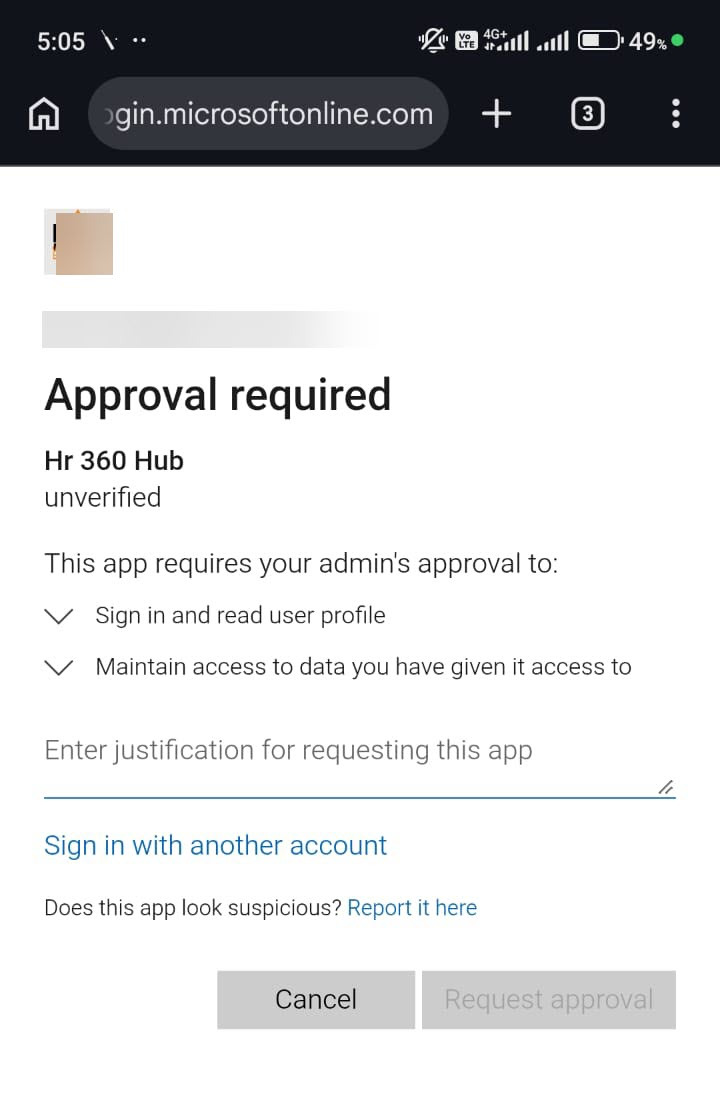
💡 Tip: In some cases, if your organization has not allowed the app or requires approval for it, users will see the Approval required screen. Contact your administrator to approve the app. The users can then try signing in again.
📜 Note: Users whose email address belongs to the Authorized Domain configured for the enabled provider are sent to that provider to sign in. The user’s account must exist in HR360 Hub, be active, and use the same domain; otherwise the user cannot log in.
Summary
The following table provides a complete step-by-step summary of all key workflows in SSO Login Settings:
# | Action / Step | Result |
1 | Access SSO Login Settings: Log in → Portal Settings in left sidebar → Org Setting → SSO Login Settings. | The SSO Login Settings listing page opens. |
2 | Review the listing: Check the Provider, Tenant / Domain, Status, and Actions columns. | All configured providers are displayed with their domain (and Tenant ID for Microsoft) and Enabled or Disabled status. |
3 | Add Google Workspace: Click + Add SSO Configuration → Select Google Workspace → Enter the Authorized Domain → Turn on Enable SSO if required → Click Save Configuration. | The Google Workspace configuration is created and added to the listing. Its option is greyed out in later Add dialogs. |
4 | Add Microsoft 365 / Azure AD: Create and verify the organization in Microsoft Entra → Copy the Tenant ID from Tenant Properties → Click + Add SSO Configuration in HR360 Hub → Select Microsoft 365 / Azure AD → Paste the Tenant ID and enter the Authorized Domain → Click Save Configuration. | The Microsoft 365 / Azure AD configuration is created and added to the listing. |
5 | Edit a configuration: Click the Edit icon in the Actions column → Update the Tenant ID (Microsoft only) or Authorized Domain → Click Update Configuration. | The configuration is updated. The provider itself cannot be changed, and configurations cannot be deleted. |
6 | Enable or disable a provider: Click the Edit icon → Turn Enable SSO on or off → Review the warning, if shown → Click Update Configuration. | The Status updates. Only one provider can be enabled at a time, so enabling one automatically disables the other. |
7 | Sign in with SSO: Open the login page → Click the provider button under “or continue with”→ On the Microsoft "Pick an account" or Google "Choose an account" screen, select the account. | The user is signed in to HR360 Hub without entering an email address or password, provided their account exists with the same domain. |